Power of Garlic in Honey

Power of Garlic in Honey

Power of Garlic in Honey

One remedy that is particularly effective and tasty in the world of home cures is fermented garlic in honey. This age-old recipe creates a genuinely unique treatment by fusing the immune-stimulating effects of garlic with the antibacterial qualities of honey. What’s the best thing, then? It also has a great flavour! For older folks looking for natural ways to improve their well-being, this article is ideal. Let’s explore the realm of fermented garlic in honey and discover the proper preparation methods while maintaining safety.


The Components That Increase Energy

There are simply two basic ingredients needed to make this amazing elixir:

  • whole garlic cloves: These tiny marvels function as a natural antibacterial and are renowned for strengthening the immune system.
  • Raw, organic honey: Honey enhances the flavour of the garlic and acts as a preservative and antimicrobial, making the mixture more appetising.


How to Make Your Own Honey- Fermented Garlic

It’s not as hard as you may imagine to make this wonderful elixir. Simply adhere to these steps:

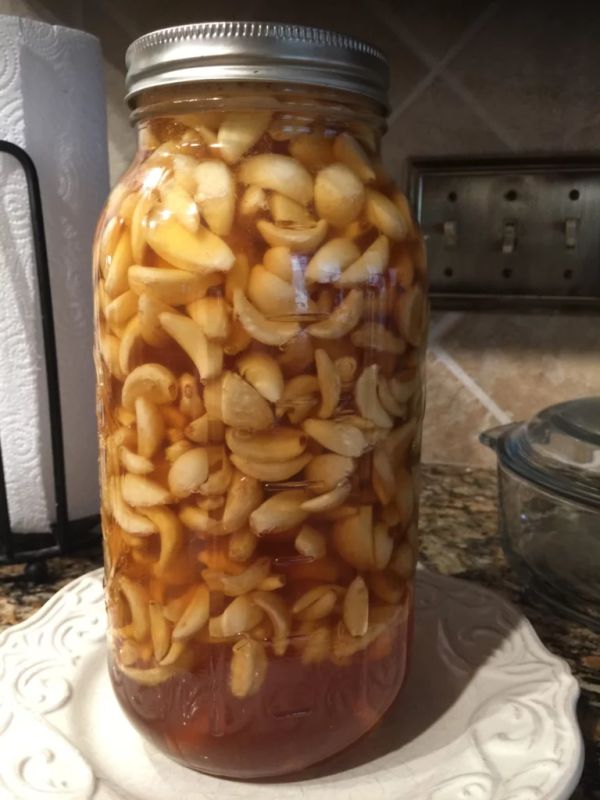
  1. To prepare the garlic, peel enough cloves to cover approximately three-quarters of a small jar. Recall that the more recent the garlic, the more powerful its health advantages.
  2. Soak in Honey: Drench the garlic cloves in raw, organic honey, making sure to cover them thoroughly. Make sure there’s enough honey to allow the cloves to expand slightly during fermentation.
  3. Seal and Store: Place a tight-fitting lid on the jar and keep it somewhere cool and dark, such as a pantry shelf or cupboard. Allow the fermentation process to happen on its own.
  4. The Key Is Patience: Give the mixture of garlic and honey a minimum of one month to ferment. You can start using the elixir once the garlic cloves have softened and the honey has thinned out.

Crucial Safety Advice

Although it’s normally safe to ferment garlic in honey, you should be mindful of the possibility of botulism, which can happen in an oxygen-free environment. Utilise these safety precautions to reduce this risk:

  • Always make use of premium, fresh ingredients.
  • Make sure the garlic cloves are completely immersed in the honey.
  • To stop harmful bacteria from growing, store the combination in a cold, dark place.
  • You can enjoy the great advantages of fermented garlic in honey worry-free by adhering to these safety precautions.


Accepting the Mysterious Elixir

This treatment of fermented garlic in honey not only improves your health but also adds flavour to your food. It can be added to marinades and dressings or you can just take a teaspoon as a regular vitamin. It’s the epitome of how enjoying natural flavours and conventional wisdom can be combined to create a joyful experience for preserving health.


Recall that the secret to enjoying the advantages of this age-old remedy is to prepare it safely. Raise a glass to your health, enhanced by the delightful strength of honey-fermented garlic!

Air-fryer cheeseburger nachos recipe

Air-fryer cheeseburger nachos recipe

Air-fryer cheeseburger nachos recipe These loaded nachos are a fantastic snack to have with friends on match days. They’re definitely moreish when topped with crispy mince, lots of cheese, and a homemade burger sauce! If you don’t own an air fryer, check out our suggestion below for baking them in your oven instead.

580 calories per serving,

10 minutes to prepare, and 15 minutes to cook

Recipe By: Realfood


Ingredients For Air-fryer cheeseburger nachos recipe:

  1. One teaspoon of vegetable oil
  2. One finely sliced onion
  3. 300g of minced 5% fat steak
  4. 1/4 teaspoon smoked paprika
  5. 1 teaspoon powdered chilli (optional)
  6. One tablespoon of tomato purée
  7. 75g of shredded Red Leicester cheese
  8. 75g of mozzarella, grated
  9. 200g bag of tortilla chips with light salt
  10. Three tablespoons of mayonnaise
  11. 1 teaspoon dijon mustard
  12. 1 tablespoon of Worcestershire sauce-flavored ketchup
  13. 50g chopped sliced gherkins plus 1 tablespoon jar
  14. liquid 1 chopped salad tomato


Instructions For Air-fryer cheeseburger nachos recipe:

  • Turn the air fryer on to 200°C. Spread a piece of foil inside the air fryer, then add the onion and mince, breaking it up with a wooden spoon. Cook, stirring once, for 5 minutes, or until the mince is nicely browned.
  • Add the tomato purée, smoked paprika, and chilli powder (if using), and season with salt and black pepper to taste. Cook for two more minutes. After transferring the mince mixture to a platter, set it aside.
  • Gently stir in the grated cheeses.
  • Place half of the tortilla chips and half of the cheese in the bottom of the air fryer. Place a portion of the mince in the centre and top with the remaining tortilla chips. Depending on how crunchy you like your nachos, add the remaining mince and cheese and cook for three to five minutes.
  • Mix the ketchup, mustard, and mayo in a small bowl while the nachos are cooking. Stir in 1 tablespoon pickle juice and season with a pinch of Worcestershire sauce and black pepper.
  • After the nachos are heated, top with the remaining chopped onion, gherkins, and tomato. Before serving, sprinkle the sauce over with a tiny spoon.


Advice: If you don’t have an air fryer, cook the mince and onion until they are crispy in a skillet. Then, assemble your nachos on a baking tray and warm up the grill to melt the cheese.


Air fryer parmesan and herb bubble bread

Air fryer parmesan and herb bubble bread

Air fryer parmesan and herb bubble bread As you are aware if you have been reading my blog, I enjoy baking and cooking. Using a new kitchen tool is one of the things that makes cooking so much joy. My life has altered since I recently acquired an air fryer! I’ll show you how to create Air Fryer Herb and Parmesan Bubble Bread in your air fryer in this blog post! It tastes fantastic and is very simple!

Anybody who like a decent piece of bread? And who doesn’t enjoy using an air fryer in the kitchen? Because there’s no need to preheat the oven, this recipe is ideal for cooks on the go. The outcome is an outside layer that is so crispy and crunchy that will make your mouth swim!

Recipe By: Forktospoon

Set Up Time: Fifteen minutes     

Cooking Time: 16 minutes

Thirty-one minutes in total

Eight servings are available


Ingredients For air fryer parmesan and herb bubble bread:


  1. 1/4 cup unsalted, melted butter
  2. One tablespoon of dried parsley
  3. Half a teaspoon of powdered garlic
  4. Two tablespoons of minced garlic
  5. One tsp finely grated Parmesan cheese
  6. Two chilled cookie cans

Instructions For air fryer parmesan and herb bubble bread:

  • In a small mixing bowl, combine the melted butter, minced garlic, dried parsley, parmesan cheese, and garlic powder. Blend thoroughly.
  • Use a non-stick cooking spray on any pan that is safe to use with an air fryer. To ensure that none of the bread sticks, make sure it’s completely coated.
  • Slice one of your biscuits into four pieces.
  • After that, form them into balls and cover them with the butter blend. After coating them, put them in the baking pan that has been buttered.
  • After using all of the dough, finish by placing the pan on the rack or in the air fryer basket.
  • For 12 to 16 minutes, set the air fryer to 330 degrees Fahrenheit.
  • Arrange, present, and savour!


Notes for Recipes:

  1. You can use this recipe with any model of Air Fryer basket or oven. This has also been prepared in the Instant Pot Crisp Lid, GoWise, Emeril Air Freyr, Ninja Foodi, and even the Mealthy Lid. While the cooking time will change, the recipe will stay the same.
  2. This recipe can also be made with frozen bread dough; the results will be the same. You will be using frozen dough, therefore the cooking time will be longer.
    Use a thinner pan for optimal results, but avoid stacking the dough if you have any extra. If not, it won’t cook through.
  3. The dough will cook more evenly in a single layer than in stacks. The dough will stay raw where you stack.
    Bake the dough until it is cooked all throughout. If the dough is still raw in the middle, cover it securely with aluminium foil and lower the air fryer temperature to 300 degrees F. Cook the Air Fryer Parmesan and Herb Bubble Bread until it is cooked through.


Nourishment Facts For Recipe:
Serving: One Gram56 kcal of caloriesOne gram of carbohydrates0.3g of protein6g of fatFour grams of saturated fat0.2g of polyunsaturated fat2g of monounsaturated fatTrans Fat: 0.2 g16 mg of cholesterol49 milligrammes of sodium15 milligrams of potassium0.1g of fibre0.03g of sugar222 IU of vitamin AOne milligram of vitamin C8 mg of calciumIron: 0.1 mg

Banana Wonders

Banana Wonders

Banana Wonders: Age-Old Secrets for Youthful Skin


Did you know that the common banana peel, which is frequently thrown away carelessly, contains a wealth of secrets about beauty? Banana peels are a key ingredient in one of the most amazing natural remedies that have been passed down through the ages for treating wrinkles and revitalising skin. Explore this century-old recipe and find more of the best banana recipes to enhance your natural beauty.


The Wonder of Peeled Bananas

Use Banana Peel to Remove Wrinkles: Banana peels, being high in antioxidants, vitamins, and minerals, can do wonders for your skin. Their capacity to hydrate and encourage skin suppleness, which lessens the visibility of wrinkles, is the key. Regular usage of a banana peel can reveal softer, more luminous skin by gently pressing the interior of the peel on your face for a few minutes before rinsing off.

Top Banana Beauty Recipe

  1. Banana Peel & oats Scrub: Blend oats and banana peels to make a mildly exfoliating scrub. With the use of this natural scrub, dead skin cells can be removed, leaving your skin feeling renewed and rejuvenated.
  2. Hydrating Banana Honey Mask: To create a potently hydrating mask, mash a ripe banana and add a tablespoon of honey. This concoction is ideal for providing dry or parched skin with nourishment and calming, leaving it looking radiant and healthy.
  3. Banana Yoghurt Soothing Mask: To relieve and relax sensitive skin, blend bananas with natural yoghurt. Because yoghurt naturally contains probiotics and bananas have calming properties, this mask works wonders for reducing redness and irritation.
  4. Banana Peel Treatment for Acne: Banana peels’ antibacterial and anti-inflammatory qualities can help lessen acne. To minimise swelling and redness, apply the interior of a banana peel to the affected region and let it work its magic overnight.
  5. Banana Peel tooth Whitening: The potassium in banana peels can aid in tooth whitening. Observe how your smile becomes brighter as you rub the inside of the peel on your teeth for a few minutes every day.


Accepting the ease of use and potency of bananas in your beauty routine is a fun approach to take care of your skin organically. These recipes demonstrate that often the most straightforward beauty secrets are the most effective ones, using a common household fruit while also connecting us to the wisdom of bygone eras.

The Health Benefits of Dates

The Health Benefits of Dates

The Health Benefits of Dates: A Week of Sweet Transformations

Sometimes the nicest and easiest remedies can have the biggest effects when it comes to improving one’s health. Dates are a prime example of those naturally sweet fruits. In just one week, you might see pleasantly surprise changes by including just two dates into your regular routine. Let’s explore the possible health benefits of including dates as a mainstay in your diet.

Powerful Nutrition in Tiny Packages

Not only are dates tasty snacks, but they are also incredibly nutrient-dense. They are high in minerals like potassium, magnesium, and iron, as well as vitamins like vitamin K and B vitamins and fibre. A tiny and easy item like dates can have a big impact on your general health.

A Week of Dates: The Anticipated Changes
Two dates a day can benefit your health in a number of ways:

1. Better Digestive Health: Dates’ fibre helps to maintain a healthy digestive tract. Eat two dates a day to avoid constipation and to guarantee frequent, easy bowel movements.

2. Enhanced Energy Levels: The natural sugars and fibre found in dates give off energy gradually. By doing this, you can maintain a constant level of energy throughout the day and prevent lunchtime slumps.

3. Improved Heart Health: Potassium, which is necessary to keep the heart healthy, is abundant in dates. Frequent drinking can lower the risk of stroke and assist control blood pressure.

4. Improved Bone Health: Dates help maintain healthy bones because of their high calcium and magnesium content. By including dates in your diet, you can help avoid diseases like osteoporosis and strengthen your bones.

5. Naturally Satisfying Sweet Cravings: Dates can serve as a nutritious substitute for sugary treats for people who have a sweet appetite. They can help manage weight and reduce the intake of refined sugars.

Welcome to the Date Joy

Within a week, adopting the small habit of eating two dates a day can make a big difference in your health. Dates are great as an on-the-go snack, chopped into your muesli in the morning or blended into delectable smoothies. Dates are versatile in addition to having several health advantages.

Consistency and balance are crucial while making any dietary changes. So why not make the humble date your travelling partner on the path to better health? It may surprise you to learn that the route is not as sweet as you had imagined.

Grandmas Beetroot Wonder

Grandmas Beetroot Wonder

Grandmas Beetroot Wonder

Recipes that have been handed down through the years have a unique quality. They are treasures on a platter, not just food. I’m thrilled to share with you today a recipe that my granny gave me that has been a family favourite for many years. She prepares this dish three times a week since she thinks beetroot has healing properties. You’ll see why after you give it a try. This dish for beetroot is a favourite of everyone trying to feed their body and soul because it is not only delicious but also full of health benefits.

Ingredients:

  1. 4 small beetroots, chopped and peeled
  2. Two tsp olive oil
  3. To taste, add salt and pepper.
  4. two minced garlic cloves
  5. For a tart twist, add one tablespoon of balsamic
  6. vinegar (optional).
  7. Fresh herbs for garnish, such dill or parsley

Guidelines:

  1. Heat up the oven: Set your oven’s temperature to 375°F (190°C) to start. The inherent flavours and nutrients of the beetroots are preserved thanks to this cooking technique.
  2. To prepare the beetroots, coat them in a mixture of olive oil, salt, pepper, and minced garlic. Add some balsamic vinegar if you want to add even more flavour.
  3. Roast to Perfection: Spread the beetroot pieces in a single layer on a baking sheet. Roast in the preheated oven for approximately 45 minutes or until tender and slightly caramelized, stirring occasionally.
  4. Garnish and Serve: Allow the roasted beetroots to cool slightly, then transfer them to a serving dish. Sprinkle with fresh herbs before serving to add a burst of freshness.


Why It’s Essential Every Week

This dish has several health advantages in addition to being a culinary delight. Beetroot is well-known for increasing vigour, reducing inflammation, and promoting mental wellness. It is evidence that appetising food can be exceptionally nourishing as well.

So, keep grandma’s beetroot recipe in mind the next time you’re looking for a quick, tasty, and healthful food. It’s a hearty and nourishing side dish that serves as a reminder that often the simplest recipes are the most satisfying.

Air Fryer Donuts

donuts a f

Air Fryer Donuts The most delicious yeast-risen doughnuts ever, these air fryer doughnuts have a pillowy, soft texture with a delicious glaze that’s simple to make. On a leisurely weekend, this meal is ideal. Savor them for dessert, brunch, or breakfast. This recipe, which is air-fried for just three minutes, is likely to become a treasure. A variety of flavored donuts pair well with this simple rising dough recipe. This recipe is a culinary staple, whether it is filled with jelly or cream, coated with powdered sugar or cinnamon sugar, rolled in nuts, or glazed with a variety of icing recipes.

INGREDIENTS

  1. One tablespoon plus one tsp of active dry yeast, divided;
  2. one cup of whole milk;
  3. three cups of bread flour;
  4. three egg yolks at room temperature;
  5. one tsp of vanilla extract;
  6. two tablespoons of granulated sugar;
  7. one tsp of salt;
  8. and one-half cup of unsalted butter, slightly melted
  9. 3 cups powdered sugar,
  10. 4 tsp vanilla extract,
  11. 3 tablespoons milk,
  12. ⅛ tsp salt,

and a cinnamon sugar topping of

  1. ¾ cup granulated sugar
  2. and 1 tsp ground cinnamon make up the vanilla sugar glaze.

DIRECTIONS


  • Mix and incorporate. 1 tablespoon yeast with ¾ cup warm milk (110°F)
  • Add ¾ cup of bread flour and stir until smooth.
  • Place a plastic wrap over it and leave it in a warm place for half an hour.
  • The remaining ¼ cup milk (boiled to 110°F) and 1 tsp yeast should be combined in a bowl using a whisk, food processor, or mixer attachment. Add the egg yolks, vanilla extract, and yeast/flour mixture.
  • Blend, chop, or whip until smooth.

Add the salt, sugar, and one cup of bread flour. Stir for thirty seconds.

  • Add the butter and stir for 30 seconds, or until combined.
  • To continue, either use the food processor with the dough hook attachment or by hand, adding ¼ cup of bread flour at a time. Once the dough begins to pull away from the sides and come together, pulse or knead it.using the flour mixture once again. At this point, it might take up to 2-2½ cups. I used roughly a half cup.
  • It will be sticky but soft and wet. It must not be so sticky that rolling it out is impossible.
  • Grease a big basin with butter very lightly.
  • Place the dough in the bowl, cover it with a kitchen towel or plastic wrap, and allow it to rise for half an hour in a warm place.
  • Press down gently to release the air (degas).
  • Recover and chill for a minimum of one hour and a maximum of twelve hours.
  • Place two baking sheets on a liner, dust with flour, and set aside.
  • Dust a spotless, level work surface with flour.
  • Form dough into a ball. Dust the rolling pin and the dough’s surface with a little flour.
  • Roll the dough to Thickness of ½ inch.
  • Cut 3-inch circles with a 1-inch circle in the center (for the donut holes) using a donut cutter, then arrange the donuts 1-inch apart on baking pans that have been prepped.
  • Give the dough 30 to 40 minutes, or until it doubles in size, to prove and rise in a warm place.

TIP:

  • When you gently touch a donut with your fingertip and it springs back slowly, the donut is ready. Dough needs extra time if it bounces back right away. Dough must be rerolled and proofed for 30 minutes if it does not spring back.
  • Set air fryer temperature to 350°F. Apply a thin layer of cooking spray to the donut tops and the basket.
  • Bake donuts entire for 3–4 minutes, or until just starting to brown. For two to three minutes, bake donut holes separately.
  • Proceed to the cooling rack. Whisk ingredients to make glaze. until combined and well-combined.

Air Fryer Spinach, Roasted Red Pepper, and Goat Cheese Omelet

Air Fryer Spinach, Roasted Red Pepper, and Goat Cheese Omelet

Let’s be honest: preparing an omelette on the stovetop might be a little unsettling. While it’s hardly unheard of, let’s just say that an omelette frequently ends up as scrambled eggs. Presenting the air fryer, the infallible method for preparing an impeccable omelette. For a Mediterranean take on the breakfast classic, it’s filled with spinach, roasted red pepper, and goat cheese here. Of course, you can alter the fillings to create your own at-home omelet bar. Would you want some caramelized onions, gruyère, sautéed mushrooms, and chives?

Hot tip: Before it’s completely cooked, the top of this omelet will seem set. Simply put it back in if, after folding it, you find that there is still some runny egg on the bottom.

INGREDIENTS

  1. Cooking spray with olive oil
  2. Three big eggs
  3. Two tablespoons of whole milk
  4. salt that is kosher
  5. freshly ground black pepper
  6. Three tablespoons of well-squeezed, thawed frozen spinach, diced
  7. 3 tablespoons of roasted red peppers, diced fine.
  8. 1 tsp finely chopped goat cheese

Guidelines

  • First Step Spray cooking spray and grease a 7-inch round nonstick cake pan. Eggs, milk, a generous teaspoon of salt, and a few grinds of black pepper should all be thoroughly mixed in a medium-sized bowl.
  • Step 2: Transfer egg mixture into ready-to-use pan. Add spinach and red peppers to the upper half of the egg mixture. Transfer the pan to the air fryer basket with care. Cook for 6 to 8 minutes at 350° until eggs are just set.
  • Step3: Take the pan out of the air fryer. Spread goat cheese over veggies. Fold using a spatula.egg on top of the filling. Transfer the omelet from the pan to a plate


AIR FRYER PRETZEL DOGS

AIR FRYER PRETZEL DOGS

These Air Fryer Pretzel Dogs make a fantastic snack for your upcoming gathering. With these detailed directions, making them in the Air Fryer is simple. How are you going to dip your pretzel dog?

COMPOSITION

  1. 1 1/2 cups heated water (110–115 degrees Fahrenheit)
  2. One tablespoon sugar and two teaspoons kosher salt
  3. One pack of active dry yeast
  4. 4 and a half cups flour (purpose)
  5. Two ounces of melted butter
  6. ten cups of water
  7. two and a third cups baking soda
  8. 1 beaten egg yolk and 1 tablespoon water, with pretzel salt
  9. Eight hot dogs the length of buns

DIRECTIONS

  • In the bowl of a stand mixer with a dough hook attached, combine water, sugar, and salt. After adding the yeast, let it sit for five minutes.
  • Add butter and flour. Mix until well blended on moderate speed. Turn the speed up to medium and knead for about five minutes, or until the dough is smooth and pulls away from the side of the bowl.
  • After the dough has doubled in size, place it in a bowl that has been well-greased, cover it with plastic wrap and a fresh, dry cloth, and leave it in a warm location for 50 to 60 minutes.
  • Put parchment paper on two baking sheets and coat them with nonstick cooking spray. Heat the air fryer to 400 degrees Fahrenheit.
  • Ten cups of water and the baking soda should be combined in a large stock pot or roasting pan and brought to a boil.
  • After transferring the pretzel dough to a lightly oiled board, cut it into eight equal pieces. Each dough piece should be rolled into an 18-inch rope. Make sure to push the ends of the pretzel dough together as you wrap it around the hotdog.
  • Put each pretzel dog in the boiling water one at a time for 30 seconds. Take out of the water and transfer to a baking sheet lined with paper.
  • Sprinkle pretzel salt on top of each pretzel after brushing it with the beaten egg yolk and water mixture. Put three to four pretzels straight into the Air Fryer basket and cook at 400 degrees for five minutes. After 3–4 minutes, flip the pretzel dogs over and continue cooking until they are dark golden brown.

Transform Your Daily Routine: 16 Baking Soda Tricks for Women

Transform Your Daily Routine: 16 Baking Soda Tricks for Women

The common kitchen staple baking soda is a multipurpose powerhouse that, with its ease of use and potency, may completely transform your everyday routine. These 16 clever baking soda hacks will transform your life, ranging from domestic remedies to cosmetic tips.


1. Make Your Smile Shine

To create a DIY toothpaste that shines teeth and supports oral health, combine a small amount of baking soda with hydrogen peroxide.

2. Invigorate Your Breath

Gargle with a solution of baking soda and water to counteract bad breath. It’s a simple and quick mouthwash!

3. Hair Rinse with Clarity

Once a month, use a solution of baking soda and shampoo to get rid of product buildup in your hair, making it cleaner and easier to manage.

4. Mild Face Scrub

Make a paste using baking soda and water to use as a mild exfoliating and skin-rejuvenating face scrub.

5. All-natural deodorant

To eliminate body odor without using harsh chemicals, dab some baking soda under your arms for a quick and efficient deodorant.

6. Aloe Vera Skin Rashes

After shaving or anytime your skin feels dry, a baking soda bath helps relieve irritations and soften the skin.

7. Do-It-Yourself Nail Care

To brighten and exfoliate your nails and cuticles, gently scrub them with a soft paste made of baking soda and water.

8. Ease Bug Bites and Itchy Skin

If you have itchy skin or bug bites, apply a paste made of baking soda and water to relieve the itching and irritation right away.

9. Spotless Cosmetic Brushes

Wash your makeup brushes with a baking soda and water solution to keep them clean and fresh.

10. Increase the Laundry

To achieve cleaner clothes and maximize the performance of your detergent, add a cup of baking soda to your wash.

11. Get Rid of Sneaker Odor

To remove smells and absorb moisture, place a small amount of baking soda inside your shoes.

12. Refresh the closets

To keep the scent of your storage rooms fresh, keep an open box of baking soda in your closet.

13. Treat Your Feet

To soften skin and eliminate odor, soak your feet in a mix of baking soda and warm water.

14. Prolong the Blooming Season

Cut flowers can last longer in a vase if you add a teaspoon of baking soda to the water.

15. Spoiler for the kitchen

To clean surfaces in the kitchen without leaving scratches, use a moist sponge and baking soda.

16. Clear the Drains

To assist in unclogging and deodorizing your drains, pour vinegar and baking soda down them in that order.

Including baking soda in your daily routine can make a lot of things easier for you, like cleaning your home and improving your appearance and health. This low-cost, environmentally responsible fix is a need in any house, demonstrating that sometimes the best things in life really are straightforward.