Taking Care of Your Health with Simple Kitchen Remedies

Taking Care of Your Health with Simple Kitchen Remedies

Hi there, incredible pals! I hope you’re having the best possible day overall. I would want to talk to you about something very essential today: our health! Taking care of oneself is extremely important, and guess what? Sometimes, the simple solutions we need are there in our own kitchens. How awesome is that?

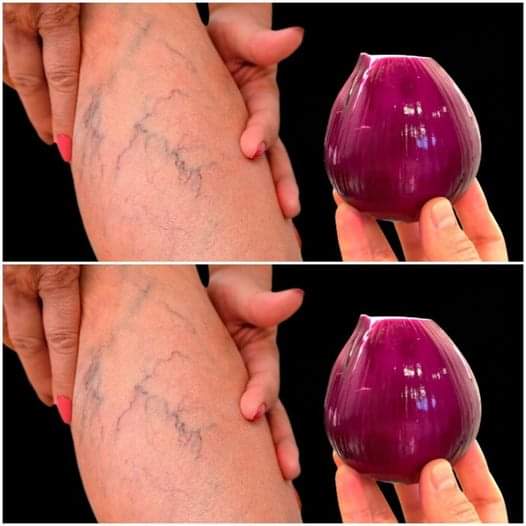
Let’s get started straight now. I’d like to share with you a fantastic remedy that you can make at home with a few simple ingredients. And what do you know? They’re probably in your pantry already. Introducing the amazing pair, red onion and garlic!

What you’ll need is as follows:

  1. One red onion
  2. two to three big garlic cloves
  3. Two tablespoons of vegetable oil
  • Let’s get to work now! Peel and cut that beautiful red onion first. And don’t forget about those flavorful garlic cloves—choose to take two or three!
  • When everything is prepared, combine it all in a blender and give it a thorough blending. Our desired consistency is a velvety blend that is brimming with the flavor of onion and garlic. After you’ve done that, proceed to extract the juice from the onion and garlic mixture. That’s the location of the magic!
  • Take those two tablespoons of vegetable oil and combine it with the juice of the onion and garlic. Ah, do you smell the incredible scents at this point? Eternal happiness, my companions.
  • The finest part is about to happen: it’s time for a little self-care session! On the part of your body that requires a bit more tender loving care, use this delightful concoction. Massage it gently and allow the sweetness of nature to work its magic. You’re in for a treat, I promise.
  • And here’s a little secret: don’t worry if you have any leftover mixture! To use it later, simply place it in the refrigerator. How handy is that? Every time you need it, your very own natural remedy will be at your disposal.
  • Isn’t it amazing that maintaining good health doesn’t always have to be difficult? Sometimes the solutions are there in front of us; we simply need to find them. Thus, let’s
  • utilize the incredible resources that are all around us in practical and easy ways.
  • Recall that your health is your riches, my dear friends. Thus, look after one another and continue to shine like the magnificent stars that you are. Continue to be amazing!

DIY Teeth-Whitening Paste: A Natural Solution for a Brighter Smile

DIY Teeth-Whitening Paste: A Natural Solution for a Brighter Smile

Are you sick of battling tartar accumulation and yellowing teeth? I have an interesting option for you, my friends! I want to share with you today a wonderful recipe that will help fight these dental issues while also making your smile look better. The finest aspect? It’s as simple to produce as normal toothpaste, too!

Cloves are the main component of this handmade paste. Cloves are widely renowned for their ability to whiten teeth and relieve toothaches and gum pain. But relax! This recipe calls for finely ground cloves, which you may grind ahead of time and use any time. To begin, just take one tablespoon of finely ground cloves.

Next up is ginger, another potent component with strong dental advantages and breath-freshening power. Stir in your tablespoon of ginger with your cloves and combine the dry ingredients. It’s now time to add your preferred toothpaste; a medium-sized dollop or a teaspoon will work just fine. Lastly, stir everything together with a tablespoon of water until the mixture resembles paste.

And voilà! You have successfully prepared your own teeth-whitening paste! Put it in a bottle, close it, and use it as part of your regular brushing regimen. Apply it to your teeth like regular toothpaste, making sure to brush them well in the morning and at night. It’s ample to use it twice a day, but if you’d like, you can use it up to three times.

You won’t have to wait long to see effects with frequent use. Bid farewell.

to bad breath and bleeding gums, since this paste is incredibly effective at preventing gum infections and preserving general dental health. Additionally, you should feel free to produce a bigger quantity for continued usage because this paste stores well. Don’t worry about producing too much.

I hope you would try my homemade teeth-whitening paste and let us know how it works. Remember to subscribe to our channel and like the video as a way to show your support. And don’t forget to tell your friends about this tried-and-true formula, which will drastically improve your dental hygiene regimen. Cheers to a happier, more radiant smile!

The Secret to a Sumptuous Avocado Salad

The Secret to a Sumptuous Avocado Salad

Within the realm of salads, there is a recipe that is so delicious, so revitalizing, and yet so unknown to most people. Today, I’m revealing this culinary gem: a delectable avocado salad that combines the creamy avocado sauce that’s absolutely out of this world with the crisp, fresh vegetables and avocado’s richness.

Ingredients for salad dressing:

  1. One mature avocado
  2. One hundred and fifty grams of fresh spinach
  3. One sliced red bell pepper (paprika)
  4. One carrot, sliced with a potato peeler into ribbons
  5. 200 grams of drained canned corn
  6. one chopped cucumber

Regarding the Avocado Sauce

  1. The meat from one mature avocado
  2. three tablespoons of yogurt
  3. Triple-tested extra virgin olive oil (tray).
  4. Three tablespoons of water, adjusted to the appropriate consistency.
  5. two minced garlic cloves
  6. Half of lemon’s juice
  7. To taste, add salt and black pepper.
  8. The Skill of Being Ready:

INSTRUCTIONS

  • Starting with the Salad Base: Give the spinach good wash.
  • Then, using tenderness and hint of affection, tear the leaves by hand into little pieces so that their vivid green color serves as the base for your salad.
  • Add Color and Crunch: Finely chop the cucumber and red paprika and add them to the spinach.
  • The carrot ribbons, which are made with simple potato peeler, provide the salad beautiful visual pop of color in addition to pleasant crunch. Finally, add some drained canned corn over top to add some sweetness and texture.
  • Making the Avocado Sauce: The dressing for this salad is what sets it apart; it’s a creamy mixture made mostly of ripe avocado flesh. To get the right consistency, blend this with yogurt for smoothness, water, and olive oil for richness. Black pepper and salt blend the flavors together, while the minced garlic and lemon juice give the sauce a zesty brightness.
  • Putting It All Together: Use a gentle tossing motion to coat every leaf and slice of the salad with the avocado sauce. The balance of the components, each of which adds a distinct flavor and texture to the dish, is what makes this salad beautiful.
  • The Joy of Sharing: Packed with of healthful ingredients and flavor, this avocado salad is more than just dish; rather, it’s an ode to delicious flavors and health. It’s ideal as the star of the show as side dish, at summertime get-together, or for casual lunch. This recipe may not be well known, but once people taste it, they will definitely ask for more.
  • So enjoy creating and serving this delicious avocado salad.
  • It’s proof of the elegance of basic components coming together to make something genuinely unique.

Air Fryer Crispy Honey Mustard Chicken

Air Fryer Crispy Honey Mustard Chicken Crispy Honey Mustard Chicken from the Air Fryer is delicious! This is a fantastic method for air-frying chicken to perfection while adding flavor!

Crispy Honey Mustard Chicken from the Air Fryer is delicious! This is a fantastic method for air-frying chicken to perfection while adding flavor!

Crispy Honey Mustard Chicken in an Air Fryer

I genuinely enjoy a delicious piece of chicken, and this dish is no exception. This is a really tasty recipe for chicken, made with a light and fluffy batter. Additionally, with the air fryer, it cooks up nicely, healthily, and delectably without using a lot of oil!

This is a wonderful version of honey mustard chicken if you enjoy it. You will be pleased to serve your family and friends this tasty and quick chicken dish that is made with just breadcrumbs and spices!

Components

  1.  Two skinless, boneless chicken drumsticks, thighs, or breasts
  2. One cup mustard honey
  3. one cup of breadcrumbs
  4. 1/8 cup parsley, fresh or dried
  5. Two tsp of melted butter
  6. one tsp powdered garlic
  7. One tsp salt
  8. half a teaspoon of black pepper

Guidelines

  • First, give the chicken a thorough cleaning, making sure to remove any visible fat. After rinsing, chop the chicken into 6-inch pieces.
  • Drizzle the chicken with a large amount of honey mustard.
  • In a small bowl, combine the breadcrumbs, parsley, melted butter, garlic powder, salt, and pepper.
  • Next, submerge the chicken that has been coated in honey mustard in the breadcrumb mixture. Put them in the air fryer basket as you coat them.
  • Once the chicken has been thoroughly breaded, generously mist it with cooking spray.
  • For 10 to 12 minutes, set the air fryer to 370 degrees Fahrenheit.
  • Examine your fowl with a meat thermometer. Remove the chicken when the thermometer reaches 165 degrees Fahrenheit.
  • Arrange, present, and savor!

Air Fryer Honey BBQ Chicken Tenders

Air Fryer Honey BBQ Chicken Tenders

Explore the delicious world of Air Fryer Honey BBQ Chicken Tenders. This recipe achieves the ideal crispiness that an air fryer can only provide by combining the delectable sweetness of honey with the smokey depth of BBQ sauce!

This recipe retains all the flavor and texture of deep-fried chicken tenders while being a healthier option. These chicken tenders will tantalize your taste senses and are perfect for hectic weeknights, informal get-togethers, or anytime the need arises for something delectably cozy.

This is a guilt-free pleasure because the air fryer fries them to perfection and cuts down on the additional fat.

These Honey BBQ Chicken Tenders are going to become a fast favorite for anyone, whether they are an experienced air fryer user or a novice.favorite dish you’ve prepared.

Components

  1.  One pound of chicken strips, or tenders
  2. Two to three tsp BBQ spice
  3. half a cup of cornflakes
  4. One big egg, beaten
  5. Barbecue sauce with honey Components:
  6. one-third cup barbecue sauce
  7. one-third cup honey
  8. Serving size: 1 tsp chopped chives

Guidelines

  • Use barbecue seasoning to season the chicken tenders.
  • Coat the chicken tenders with coating, dunk them in egg wash, and then coat them in cornflakes.
  • Arrange the breaded chicken tenders in a single layer within the air fryer basket. Make sure there is enough room between them so that they cook evenly.
  • Preheat the air fryer to 350 degrees Fahrenheit. Use the air fryer setting to cook the chicken tenders for 8 to 10 minutes, turning them over halfway through.
  • Cook the chicken until the thickest section reaches an internal temperature of 165 degrees Fahrenheit.
  • In a small saucepan, mix the honey and the BBQ sauce. Reduce the heat to medium-high and simmer until all the ingredients are well combined.
  • Combine the honey BBQ sauce with the cooked chicken tenders.
  • After they are cooked, move the chicken tenders to a platter. To ensure that the tenders stick, sprinkle the chives over them while they are still hot, if using.

Before serving, let the chicken tenders sit for a few minutes. The tenders become even more flavorful and tender after this brief period of resting, which allows the juices to redistribute.

Air Fryer Lemon Turnovers

Air Fryer Lemon Turnovers

These turnovers combine the convenience and health benefits of air-frying with the zesty freshness of lemon, making them ideal for a light dessert, brunch treat, or sweet snack.

In this recipe, we use the air fryer to create that perfect golden crispiness without the superfluous oil of traditional frying while adding a zesty twist to a classic favorite. These lemon turnovers, with their wonderful flavor and flaky texture, will impress any baker, experienced or novice. Try these delicious, healthy, and simple air fryer lemon turnovers to get you baking!

Amazing Air Fryer Lemon Turnovers! One of my favorite breakfasts is lemon, and it tastes even better because it was made in an air fryer!

How to Keep Things

  • If you have any leftover turnovers, store them in an airtight container after allowing them to cool to room temperature. When kept at room temperature, they will last for roughly one or two days.
  • Before storing, you may always reheat them in the air fryer until they’re warm.

Methods for Freezing 

  • Nothing compares to having delicious snacks in a well-stocked freezer. These lemon turnovers freeze really well, so feel free to double or quadruple the recipe.
  • Place the turnovers on a baking sheet covered with parchment paper to freeze. Once they are frozen solid, place the baking sheet in the freezer. After removing them, put them in a freezer bag. They’ll endure for one to two months, roughly. Frozen lemon turnovers can be air-fried by simply placing them in the air fryer basket, freezing them, and then cooking them at 350 degrees for ten to twelve minutes.

Components

Lemon Turnovers:

  1. 1 sheet of thawed puff pastry
  2. Half a cup of lemon curd or lemon pie filling
  3. 1/2 cup powdered sugar for icing
  4. three to four teaspoons of milk

Guidelines

  • Place the thawed puff pastry on a level surface to begin. Divide the sheet in half lengthwise.
  • Spoon roughly 2 tablespoons of the pie filling onto the center of the puff pastry.
  • Forming a triangle, fold the pastry over. Press the dough together with your fingers. Use a wet finger to run over the edges of the pastry if you are having trouble closing it.
  • Apply cooking spray or brush with egg wash on the top.
  • Place them in the air fryer tray or basket (both should be coated with cooking spray to stop sticking).
  • Once the food is halfway cooked, place it in the air fryer and cook for an additional three to five minutes at 400 degrees Fahrenheit.
  • Beat together the powdered sugar and milk in a small mixing dish while the turnovers are frying.
  • Over the turnovers, drizzle the frosting.
  • Arrange, present, and savor!

Air Fryer Quick Lemon Pastry

Air Fryer Quick Lemon Pastry

These Lemon Air Fryer Pastries are amazing! This will quickly become one of your favorite Air Fryer Desserts if you adore things lemon!

This recipe, which only requires a few ingredients, will keep you wanting more! For the ultimate Air Fryer Dessert, nothing beats a warm, lemony interior with a crispy, buttery exterior!


This is a terrific recipe to try baking in your Air Fryer if you haven’t already, and it will only take you around ten minutes from start to finish!

Components

  1. Crescent Dough Sheets, 1 roll
  2. 21 ounces of handmade or canned lemon pie filling
  3. 1/4 cup of sparkling sugar

Guidelines

  • Grease your muffin tins first.
  • Keeping in mind that you will fold the crescent dough over, measure your muffin tray and cut it slightly larger than the opening.
  • Place a small amount of pie filling in the center of the crust.
  • Make sure to fold the dough over to create a lovely pocket.
  • Add a sprinkling of the sugar mixture.
  • Place in the air fryer basket or tray and air fry at 320 degrees Fahrenheit for 6 to 8 minutes.
  • Take a nap. Keep in mind that they are HOT when you take them out of the air fryer!
  • Arrange, present, and savor.

Tools

  • Cooking spray for air fryers, 
  • air fryer baskets, 
  • or air fryer ovens Pan for Muffins, 
  • or Muffin Tin

Serving of nutrition: 

1g125 kcal of calories

31g of carbohydrates

0.01g of protein

0.5g of fat

0.01g of saturated fat

0.004g of polyunsaturated fat

0.01g of monounsaturated fat

13 mg of cholesterol

184 mg of sodiumPotassium: 

0.2 mgFiber:

 0.004 g27g of sugar

0.001 IU of vitamin ACalcium: 

0.1 mgIron: 0.01%

air fried oreos with crescent rolls

air fried oreos with crescent rolls

Crescent-style fried Oreos with You can prepare rolls, a common carnival food, at home! Fried Oreos in the air fryer are incredibly tasty without using a lot of oil. They’re going to be so adorable!

Pro Tip: Make use of your favorite dough. Crescent rolls, biscuit dough, or even pancake batter can be used to make fried Oreos! To save time, I like to buy refrigerator tubes, but you can use a homemade mix if you’d rather.

Avoid stuffing the basket. To ensure even cooking and prevent them from sticking to one another, allow room between each Oreo wrapped in dough.

Work in groups. You might have to create a couple at a time if the basket on your air fryer is small. Between preparing each batch of cookies, wrap the excess immediately and store it in the refrigerator

Finally, add the butter and cinnamon. Just before you fry some Oreos in the air fryer, do this. If not, the dough will absorb the butter and the cookies won’t be as crispy or flaky.

Try a variety of Oreos. You can use ordinary, Double Stuf, Mega Stuf, and even flavored types of Oreos with this air-fried recipe. I also enjoy using the holiday variations as a vibrant surprise.

Components

  1.  One bag of crescent doughnuts
  2. Eight Oreos of any kind
  3. Three teaspoons of melted butter
  4. two tsp finely ground cinnamon
  5. Three tsp of powdered sugar

Guidelines

  • First, spread the dough out.
  • Inside the dough, encase the Oreo cookie.
  • Prepare every box of Oreos.
  • Coat them with cinnamon and melted butter.
  • Apply some cooking spray to the basket. After rolling them to perfection, put them in the air fryer basket.
  • For 8 minutes, set the temperature to 380 degrees Fahrenheit.
  • Dust them with confectioners’ sugar.
  • Arrange, present, and savor!

Coffee Cookies ‘N’ Cream Ice Cream

Coffee Cookies ‘N’ Cream Ice Cream

To make a batch of homemade ice cream, all you need is a strong arm and a little creativity. For a little caffeine boost, we added Oreos, caramel sauce, and a tiny bit of instant coffee here. But you can modify this recipe in any way you like.

Ingredients

  1. 3. hefty cream
  2. One 14.5″ can of condensed milk with added sugar
  3. Chopped Oreos, two cups
  4. 2 tablespoons instant coffee
  5. One-fourth cup caramel sauce

Guidelines

Step 1: Beat heavy cream with a hand mixer or a stand mixer fitted with a whisk attachment until stiff peaks form.

Step 2: Gently fold in Oreos, instant coffee, and sweetened condensed milk. Finally, stir in caramel sauce.

Step 3: Pour mixture into a 9″ x 5″ loaf pan and freeze for at least five hours, or until solid.

Step 4: Let soften in the space 15 minutes at room temperature before scooping.

what do i serve with ratatouille

what do i serve with ratatouille

Ratatouille is traditional French vegetable meal that is made easier when made in an air fryer. This method allows for faster cooking time without sacrificing the rich flavors and textures of the fresh vegetables. Here’s simple recipe for air fryer ratatouille:

With its variety of zucchini, eggplant, bell peppers, and tomatoes, ratatouille is stand-alone star. However, the topic of what to serve with ratatouille to elevate it from plain dish to memorable feast is one that comes up frequently. The secret to elevating your weeknight supper or throwing classy dinner party is to pair the dish’s flavors and textures with the appropriate side dishes. This guide will go over many possibilities to pair with your ratatouille, ranging from grains to proteins, so that every mouthful is as good as the last and your table becomes gourmet experience that highlights the finest of French cuisine.

Components

  1. One little eggplant, sliced into half-inch piecesT
  2. wo little zucchinis, sliced into halves of an inch
  3. One bell pepper of any hue, cut into slices, 
  4. one medium onion,
  5.  two tomatoes, 
  6. and two tablespoons of olive oil
  7. single tsp of dried thyme
  8. one-tsp salt, according to taste
  9. to taste,half teaspoon of black pepper
  10. two minced garlic cloves

Guidelines

  • Prepare the Veggies: In big bowl, toss the eggplant, zucchini, bell pepper, onion, and tomatoes with olive oil, chopped garlic, dried thyme, salt, and pepper, making sure to coat each piece thoroughly. Warm up the air fryer.
  • For around three to five minutes, preheat your air fryer to 375°F (190°C). In order to cook the vegetables uniformly, preheat them.
  • In the Air Fryer, arrange: Arrange the seasoned veggies in single layer within the air fryer basket. It might be necessary to cook them in batches to prevent crowding and guarantee that every piece cooks to perfection.
  • CookTo achieve tender and slightly browned vegetables, air fry them for 15 to 20 minutes. Shake the basket halfway through to ensure equal cooking.
  • ServeAfter the ratatouille is cooked, carefully take it out of the air fryer. Before serving, add some fresh basil leaves as garnish and adjust the seasoning as needed.