air fryer chicken burrito bowl packs

air fryer chicken burrito bowl packs

air fryer chicken burrito bowl packs

Making Air Fryer Chicken Burrito Bowl Packs is a tasty and easy way to whip up a filling supper quickly. With the help of this recipe, you can put up single servings that are simple to cook in the air fryer, giving you tasty chicken and veggies that are perfect to eat on their own or with rice.

Ingredients for Air Fryer Chicken Burrito Bowl Packs:

  1. One pound of skinless, boneless chicken breasts, diced into small cubes
  2. One sliced red bell pepper, one sliced green bell pepper,
  3. one sliced yellow bell pepper, one sliced red onion
  4. One tablespoon of olive oil
  5. One tablespoon of taco seasoning
  6. To taste, add salt and pepper.
  7. frying spray or mister with oil
  8. Not required Bowl Parts:
  9. cooked quinoa or rice
  10. Dark beans
  11. Kernels of corn
  12. shredded spinach or lettuce
    Salsa
  13. or pico de gallo
  14. Avocado slices or guacamole
  15. Cheese in shredded form
  16. Greek yogurt or sour cream
  17. slices of lime
  18. chopped fresh cilantro

Guidelines:

  • First step: Get the veggies and chicken ready.
    Warm up the air fryer.
  • For around five minutes, preheat your air fryer to 380°F (190°C).
  • Put the Packs Together:
    The chicken cubes, sliced red onion, sliced bell peppers, olive oil, taco seasoning, salt, and pepper should all be combined in a big bowl. Until everything is covered evenly, toss.
  • Separate into Groups:
    Separate the combination of chicken and vegetables into separate foil or parchment paper containers. Make sure the quantity of chicken and veggies in each pack is the same.
    Step 2: The burrito bowl packs are air-fried.
  • Cook in Groups:
    The size of the air fryer basket will determine how much you need to Cook in groups.
  • Make sure there is room around each packet for air to circulate before placing one at a time into the air fryer basket.
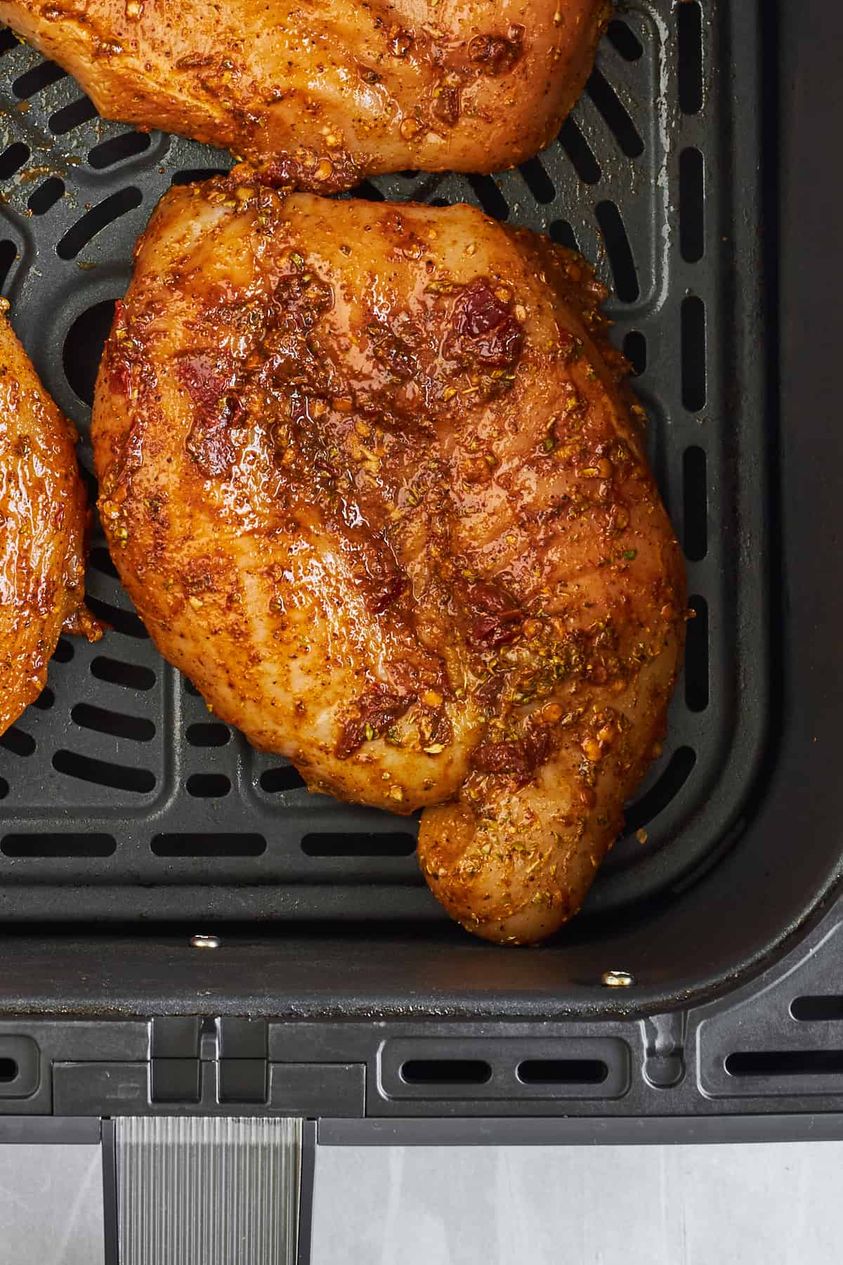
  • Air Fry: Cook the chicken for 15 to 18 minutes at 380°F (190°C), shaking the basket halfway through, or until the chicken is thoroughly cooked and the veggies are soft and gently browned.
  • Verify Doneness:
    To ensure that the chicken is cooked completely, carefully open one package (internal temperature of 165°F or 75°C).
  • Step Three: Put the Burrito Bowls together.
    Assemble the parts:
    Prepare your preferred bowl ingredients, such as rice or quinoa, black beans, corn, lettuce or spinach, salsa, guacamole, cheese, sour cream or Greek yogurt, lime wedges, and fresh cilantro, while the burrito bowl packs are cooking.
  • After cooking, gently open the packages and serve. Spoon the contents into dishes for serving.
    Top the air fryer chicken burrito bowl packs with your preferred garnishes and toppings and serve them over quinoa or rice.

Success Advice:

  • Personalization: You are welcome to alter the flavor and veggies to suit your tastes. You may vary the veggies according on what you have on hand or add more heat with cayenne or chile powder.
  • Foil Bundles: To capture steam and cook the contents uniformly, make sure the foil or parchment paper packages are packed securely.
  • Cooking Time: Depending on the size and thickness of the chicken cubes, cooking durations may vary somewhat. Make any adjustments to guarantee the chicken is cooked thoroughly.
  • Meal Preparation: You can put together these burrito bowl packs in advance and keep them in the fridge. They’re great for meal prep because they keep well until cooked.

Easy to personalize and assemble, Air Fryer Chicken Burrito Bowl Packs are a tasty and nutritious supper choice. Savor the flavorful fusion of soft chicken, vibrant veggies, and your preferred garnishes for a filling dinner right out of your air fryer!

Air Fryer Salmon In 6 Minutes

Air Fryer Salmon (In 6 Minutes!)

This is a simple recipe for Air Fryer Salmon that takes just 6 minutes to prepare, so you can have a delicious, properly cooked supper in no time at all:

Overview
Air-Fryer A quick and healthful method to cook this nutrient-dense fish is with salmon. Thanks to the miracle of the air fryer, you can enjoy flaky, delicate salmon fillets with a wonderfully crispy exterior that require very little prep or cooking time.

Components

  1. Two skin-on salmon fillets,
  2. each weighing around 6 ounces
  3. One tablespoon of olive oil
  4. To taste, add salt and pepper.
  5. Not required: Lemon wedges and fresh herbs for garnish,
  6. such as parsley or dill

Guidelines

First step: Get the salmon ready.
Warm up the air fryer.

  • Set your air fryer’s temperature for three to five minutes at 400°F (200°C).
  • Toss the salmon with seasoning. Massage both sides. olive oil over the salmon fillets. Use plenty of salt and pepper to season, making sure to coat everything.
  • Step 2: Let the salmon air fry
  • Fill the Air Fryer Basket with:
    Make sure the skin-side down seasoned salmon fillets do not overlap when placed in the air fryer basket.
  • Air Fry: Sauté the salmon for six minutes at 400°F, or 200°C. The wattage of your air fryer and the thickness of your salmon fillets will affect how long they take to cook. You might need to cook the fillets for an extra minute or adjust the doneness as necessary if they are thicker.
  • Step Three: PresentVerify Doneness:
    Take care to ensure the salmon is cooked through. With a fork, it should be easily flakeable and opaque.
  • Serve and garnish:
    Take the salmon out of the sky. fryer and give it a minute to rest. If preferred, top with fresh herbs and lemon slices and serve hot.

Advice and Adaptations

  • Seasoning: You are welcome to add your own preferred herbs and spices, such garlic powder, lemon pepper, or paprika, to the seasoning.
  • Skin Removal: After cooking, the skin may be easily peeled away from the flesh if that is your preference.
  • Adjoining Plates: For a full supper, serve your air fryer fish with rice, fresh salad, or steamed veggies.

In summary
A quick and easy method to enjoy this heart-healthy fish with the least amount of hassle and the most taste is to air fry it. This recipe guarantees tender and juicy salmon every time, whether you’re making it for a weekday supper or a filling lunch. Accept the Enjoy the ease of use and deliciously cooked salmon fillets in just 6 minutes when you use an air fryer!

Those searching for a quick and healthful approach to eat this well-liked fish will be delighted by this recipe for air-fried salmon.

Air fryer baby back ribs

Air fryer baby back ribs

Welcome to your one-of-a-kind resource for air fryer baby back ribs that are juicy and fall off the bone! This comprehensive recipe will guide you through each step, guaranteeing a delectable result that will leave your visitors wanting more. Take a seat and relish the trip to the ideal ribs.

Components

What you’ll need to make this delicious dish is as follows:

  1. Two racks of baby back ribs weighing a combined 3–4 pounds
  2. one-fourth cup olive oil
  3. Half a cup of your preferred brand of barbecue sauce
    Chopped fresh parsley (for garnish)
    Dry Rub:
  4. One-fourth cup brown sugar
  5. Twice as much smoked paprika
  6. One spoonful of powdered garlic
  7. One tablespoon of powdered onion
  8. One tablespoon of powdered chilies
  9. One tsp black pepper
  10. One tsp salt
  11. Half a teaspoon of cayenne (optional; add heat)
  12. one tsp finely ground mustard

Detailed Instructions

  • First step: Getting the Ribs Ready
  • Eliminate the Membrane: Begin by eliminating the thin membrane situated below the ribs. Lift a corner of the membrane with a knife, then pick it up with a paper towel and peel it off. Tender ribs are ensured by this process.
  • Cut the Ribs: You may need to cut the racks into smaller portions, depending on the size of your air fryer. For most air fryers, cutting them into three to four rib portions works great.
  • Step 2: Using the Dry Rub
  • Mix the Rub: Put all of the dry rub ingredients in a dish. To guarantee that the flavors are distributed evenly, thoroughly mix.
  • Coat the Ribs: To ensure the spices stick, coat the ribs with olive oil. Sprinkle the dry rub on both of them generously. pressing the spices into the flesh on the sides of the ribs. Allow the ribs to steep in the flavors for around half an hour at room temperature.
  • Step 3: Get the Air Fryer Ready
    Warm up: Start the air fryer at 375°F, or 190°C. By preheating, you can guarantee that the ribs cook through quickly.
  • Organize the Ribs: Cooking spray should be used sparingly on the air fryer basket. Place the pieces of ribs in a single layer. Don’t crowd the pan; cook in batches if needed.
  • Step 4: Let the Ribs Cook
  • First Half: Bake the ribs for 15 minutes at 375°F. Using tongs, carefully turn the ribs after the first fifteen minutes.
  • Second Half: Simmer for an additional ten to fifteen minutes. Verify the doneness by checking the internal temperature; the ribs should be tender. at least 145°F, or 63°C.
  • Step 5: Applying the BBQ Sauce Brush both sides of the ribs with your preferred BBQ sauce when they are fully cooked. This sauce layer aids in the creation of a caramelized surface and provides taste.
  • Final Cook: Put the ribs back in the air fryer and heat them up to 375°F for five more minutes. This stage makes sure the barbecue sauce solidifies and gets a little sticky.
  • Step6: Last-Minute Details
    Allow the ribs to rest for a few minutes after cooking. This makes the flesh even softer by redistributing the liquids.
  • Garnish: To add a burst of color and a bit of freshness, sprinkle some freshly chopped parsley over the ribs before serving.
  • The Ultimate Guide to Ribs Membrane Removal:  Don’t remove the membrane; it can significantly alter the texture.
  • Dry Rub: You are welcome to alter the dry rub to suit your preferences. A distinctive taste character may be produced by combining several spices.
  • Rest Period: To keep the ribs moist and tasty, always give them a rest after cooking.

Suggestions for Pairing

Add any of these delectable side dishes to your meal:

  • Coleslaw: The richness of the ribs is complemented by a crisp, zesty coleslaw.
  • Sweet and smoky baked beans are a traditional side dish for ribs.
  • Cornbread: BBQ ribs go great with this moist, slightly sweet cornbread.

Last Words
We hope that this comprehensive instruction has given you the assurance and understanding necessary to prepare the greatest baby back ribs in an air fryer. Cooking is a fun and exciting journey that every Every step you take will get you closer to being a great chef. Happy cooking, and enjoy your properly cooked ribs!

Cooking chicken thighs in an air fryer

Cooking chicken thighs in an air fryer

Using an air fryer to cook chicken thighs is a terrific technique to get crispy skin and juicy, delicious meat. Here’s a simple method to help you make tasty chicken thighs in the air fryer:

Ingredients for Air Fryer Chicken Thighs

  1. Four bone-in, skin-on chicken thighs
  2. and one tablespoon of cooking spray or olive oil
  3. To taste, add salt and pepper.
  4. Not required: Garlic powder, paprika, and/or other ingredients to taste

Guidelines

First step: Get the chicken thighs ready.

Warm up the air fryer:

  • Set your air fryer’s temperature for five minutes at 400°F (200°C).
  • Put some seasoning to the chicken. Using paper towels, pat dry the chicken thighs to absorb any remaining liquid. This aids in getting skin that is crispy. Give the thighs a liberal amount of salt, pepper, and any extra spices, such as garlic powder or paprika.
  • Apply a coat of Oil: Use cooking spray or a little olive oil brush to coat the chicken thighs. This facilitates the skin’s crisping up when cooking.
  • Step 2: Cook the chicken thighs by air fry
  • Cook in Batches: Lay out the chicken thighs, skin side down, in a single layer in the air fryer basket. To prevent crowding, you might need to cook them in batches, depending on how big your air fryer is.
  • Air fry: For ten minutes, cook at 400°F (200°C). After flipping the chicken thighs, air fried them for a further 10 to 12 minutes, or until the exterior is crispy and golden brown and the interior temperature reaches 165°F (74°C).
  • Rest and Serve: After taking the chicken thighs out of the air fryer, give them some time to rest. minutes prior to being served. This makes the meat more juicy by allowing the fluids to disperse.

Advice and Adaptations

  • Crunchy Skin: To get crispy skin, make sure the chicken thighs are dry before seasoning and frying.
  • Seasoning: Adjust the seasoning to taste. For extra taste, you may add spices like cayenne pepper or smoky paprika, or herbs like rosemary or thyme.
  • Security: To make sure the chicken thighs are cooked through, always use a meat thermometer to check the internal temperature.

Serving Ideas

  • Serve these hot chicken thighs from the air fryer with your preferred sides, such a crisp salad, mashed potatoes, or roasted veggies.
  • They work well for meal prep as well and may be used all week long in salads, wraps, and sandwiches.

In summary
Air-fried Chicken A tasty and easy method to savor crispy skinned, juicy, and tender chicken are thighs. You may quickly prepare a filling dinner with little preparation or cooking time. Savor the succulent crunch of these air-fried chicken thighs immediately!

With this recipe, you can be confident that your chicken thighs are tasty and cooked to perfection, giving them a flexible option for any dinner. Enjoy preparing and eating these delicious chicken thighs from an air fryer!

Honey Pineapple Salmon

Honey Pineapple Salmon

Here is the whole recipe for a delectable, tropical Honey Pineapple Salmon! You will be captivated and enthralled with this unique dish from beginning to end. Let’s explore this delicious dish’s salty and sweet tastes.

Components

What you’ll need is as follows:

  1. Four fillets of salmon (6 oz each)
  2. One cup of fresh pineapple, cut finely
  3. 1/4 cup of honey
  4. One-fourth cup soy sauce
  5. Two tsp olive oil
  6. Lime juice, two teaspoons
  7. two minced cloves of garlic
  8. one tsp finely grated ginger
  9. Half a teaspoon of optionally spicy red pepper flakes
  10. To taste, add salt and pepper.
  11. Finely chopped fresh cilantro (for garnish)
  12. slices of lime (for serving)

Detailed Instructions

  • Step 1: Get the marinade ready
  • Mix the marinade. Ingredients: Whisk together the olive oil, lime juice, honey, and soy sauce in a medium-sized bowl. grated ginger, chopped garlic, and (if desired) red pepper flakes.
  • Prepare the salmon by marinating it. The salmon fillets should be put in a big, resealable plastic bag or a shallow plate. Coat every salmon fillet thoroughly with the marinade by pouring it over them. Let the food marinate for a minimum of half an hour and a maximum of two hours.
  • Step 2: Get the Pineapple Topping Ready
    Cut the pineapple into pieces. Cut the fresh pineapple into tiny pieces using a sharp knife. Before baking, this will be used to top the salmon.
  • Step 3: Get the Oven Ready
  • Warm up the oven: Set oven temperature to 400°F, or 200°C. For easier cleanup, line a baking sheet with parchment paper or aluminum foil.
  • Step 4: Salmon Baking
  • Organize the Salmon: After removing the salmon fillets from the marinade, let any leftover fall off. Put the fillets onto the baking sheet that has been ready. To taste, add salt and pepper for seasoning.
  • Add a pineapple on top: Evenly distribute the finely diced pineapple on top of every salmon fillet using a spoon.
  • Bake: The salmon should be baked for 15 to 20 minutes, or until it is cooked through and flake readily when tested with a fork. At 145°F (63°C), the inside temperature should be reached.
  • Step 5: Concluding Details
  • Garnish: Take out the cooked fish from the oven. Serve with lime wedges on the side and sprinkle with freshly chopped cilantro

Advice for Making the Best Honey Pineapple Salmon

  • Raw Pineapple: For the most flavor and texture, use fresh pineapple. While fresh pineapple is preferred, canned pineapple may be utilized in a pinch.
  • Time to Marinate: If you marinate the salmon for more than two hours, the acidity of the lime juice may cause the fish to become overcooked.
  • For An Additional Caramelized Top: During the final two to three minutes of baking, move the oven to broil. Watch carefully to avoid burning.

Suggestions for Pairing

Serve these mouthwatering sides to go with your Honey Pineapple Salmon:

  • Coconut Rice: The tropical tastes of the meal are accentuated by the creamy coconut rice.
  • Steamed Vegetables: Asparagus, snap peas, or broccoli cooked just a little bit offer a nutritious touch.
  • Mango Avocado Salad: A light salad of mango and avocado works well with a lime vinaigrette.

Last Words
We really hope that our comprehensive recipe guide has given you a great recipe and motivated you to love cooking. Setting up a Every stage of preparing a meal, from marinating to garnishing, is an artistic endeavor. Savor your mouthwatering Honey Pineapple Salmon and never forget that the most exquisite dinners are ones prepared with love and care. Have fun in the kitchen!

Mixing Apples and Nuts A Delectable Apple Pie Recipe

Mixing Apples and Nuts A Delectable Apple Pie Recipe

Imagine that you have a sweet tooth for a decadent, but comfortable dessert. You don’t need to search any farther since we have the ideal remedy: a delicious apple pie loaded with healthy nuts. We’ll walk you through every step of making this delicious dessert in this post. So let’s begin baking and put on your apron!

Ingredients:

  1. 260g all-purpose flour; for a unique touch, use oat flour.
  2. One hundred grams of raisins
  3. 120 milliliters of oil
  4. 120 milliliters of water
  5. 50g of finely chopped walnuts
  6. 180g regular sugar or 90g stevia sweetener
  7. 12 grams of baking powder

Four apples

  • three eggs
  • One lemon’s juice
  • One tsp vanilla sugar
  • One tsp vanilla extract
  • A small amount of salt
  • A little amount of butter to grease
  • crushed cinnamon
  • Dusting sugar for icing

Getting the Apples Ready

  • clear and Cube: After washing, cut the apples into little cubes without peeling them, and remove the cores. To keep them from browning, put them in a bowl and drizzle with lemon juice.
  • Sweeten and Spice: Mix the apples with water, sugar, and vanilla or stevia sweetener. To uniformly coat them, thoroughly mix. Add the chopped walnuts, raisins, cinnamon, and a hefty amount of salt after that. Give the flavors ten minutes or so to meld.

Blending the Cake

  • Mix the Alkaline Substances: Whisk together the eggs, oil, and vanilla extract in a separate basin. Mix it well until it’s smooth.
    Add the dry ingredients and stir. Add the baking powder and flour to the wet mixture gradually. Once everything is well mixed and the batter is smooth, stir gently.
  • Blend the Flavors: Gently fold the apple mixture into the batter, making sure that the apples and nuts are distributed evenly.
  • Putting Butter on the Mold
  • Grease it Up: Apply a liberal amount of butter grease to a rectangle glass mold. This will help to keep the pie from crusting over the edges.
  • Spread the Joy: Using a spoon, smooth the top and distribute the batter evenly into the oiled mold.
  • Baking to a Perfect Finish
    Pre-heat the oven to 180°C before baking. When the oven is hot, place the mold inside and bake for 40 to 45 minutes, or until the pie is golden brown and a toothpick inserted in the center comes out clean.
  • Dust and Delight: After baking, take the pie out of the oven and let it to cool down a little. Dust the top with powdered sugar to add a last flourish of sweetness and eye appeal.
  • Providing and Gratifying
  • The finest part is about to happen: enjoying what you’ve made.
  • Cut the pie into large pieces, and then serve it warm. For a decadent treat, serve it with a scoop of vanilla ice cream.
  • Savor the moment: Take a nibble and let your taste to be delighted by the flavors. This apple pie is sure to satisfy everyone, whether it’s being served at a gathering with loved ones or on a chilly night at home.

Why Nuts and Apples?

One may question why apples and nuts are together. Now, allow us to educate you:

  • The dynamic duo of almonds and apples adds a delicious crunch and natural sweetness to the pie. nuttiness.
  • Nutrient Powerhouse: This dessert is not only tasty but also nutrient-dense because apples and almonds are both rich sources of fiber, vitamins, and minerals.

Success Advice

  • Select the Correct Apples: For the finest flavor and texture, use firm, somewhat sour apples, such as Granny Smith or Honeycrisp.
  • Don’t Overmix: To avoid a firm crust, combine the batter gently and don’t overmix.
  • Check to See If It’s Done: To test for doneness, stick a toothpick into the middle of the pie. Either a few damp crumbs or a clean result should be obtained.

The Famous Bread That Drives the Whole World Crazy Recipe in 10 Minutes

The Famous Bread That Drives the Whole World Crazy Recipe in 10 Minutes

Have you ever been amazed at how a basic loaf of bread can bridge cultural divides and unite people? In this post, we’ll go into the realm of bread baking and discover a recipe that’s not only tasty but also quite simple to prepare. Prepare yourself for a gastronomic adventure that will make your taste senses happy!

Getting the Ingredients Ready

Let’s begin by gathering our main participants. What you’ll need is

  1. 3.4 fl oz, or almost 100 ml heated water
  2. 3.4 fl oz, or almost 100 ml heated milk
  3. two tsp sugar
  4. Eight grammes of dry yeast
  5. two medium-sized eggs
  6. 500 grams, or 17.6 ounces, of wheat flour
  7. One tsp salt
  8. 20 milliliters of vegetable oil


Get ready For preparation

  • For crust that is golden brown: One egg and one cup of milk
    Blending the Enchantment
    Right  Now that we have all the necessary materials, let’s get magical. Mix the heated milk, sugar, dry yeast, and water in a bowl. After giving it a thorough stir, let it sit for a few minutes to foam.
  • Creating the Perfect Knead
    When the yeast mixture is done, stir in the eggs, vegetable oil, wheat flour, and salt. Start kneading the dough with a spatula until it begins to come together. Add flour a little at a time until the dough is elastic and smooth.
  • Allowing it to Ascend
    Spread some vegetable oil in a bowl, add your dough, and cover with a fresh dishtowel. Let it rise for about fifty minutes, or until doubled in size, in a warm location. Here’s where As the yeast does its job, something magical happens!
  • Forming and Reposing
    Punch down and divide the dough into four equal halves after it has risen. After forming each part into a ball, give them another 20 minutes to rest so the gluten may relax.
  • Getting Ready for Baking
    Using a rolling pin, flatten each ball of dough into a round. Arrange them, with space between them, on a baking pan covered with parchment paper. It’s time to use your imagination now!
  • Applying the Last Touches
    In the dough, create tiny holes with a sushi stick or any other thin instrument. Add a small amount of butter to each hole to add even more flavor. In a different dish, combine an Mix the egg with a small amount of milk, then apply this mixture onto the dough. Add a scattering of sesame seeds to the top for the ideal finishing touch.
  • Baking to a Perfect Finish
    Turn the oven on to 180°C (356°F) and place the bread inside. Bake for twenty to twenty-five minutes, or until the crust is crunchy and delightfully golden brown. It will smell so good, the scent of freshly made bread filling your house!
  • Providing and Gratifying
    Try not to eat your bread soon away when it comes out of the oven. Let it cool down a little before cutting into it. Watch how it vanishes in a matter of minutes when you serve it warm with butter or your preferred spread!

In summary
With just ten minutes of deliberate planning, you’ve produced a work of art that will delight even the most discerning bread critics. This bread’s soft inside, tempting taste, and golden-brown exterior will make it a kitchen mainstay. So go ahead, indulge in a slice of handcrafted perfection and let your inner baker come out.

The Perfect Recipe Delicious Fried Oatmeal Patties with Banana and Yogurt

The Perfect Recipe Delicious Fried Oatmeal Patties with Banana and Yogurt

Imagine waking up to the scent of hot, freshly made oatmeal patties, preparing to entice your palate. This post will go over a straightforward yet wonderfully tasty recipe for fried oatmeal patties that is enhanced by the smoothness of yogurt and the sweetness of banana. These patties are certain to become a family favorite, whether you’re searching for a filling snack or a healthy breakfast alternative.

Components

Gather the following materials for this culinary adventure:

  1. two eggs
  2. Eighty grams, or one-third cup, of plain yogurt
  3. 60 grams, or half a cup, of oats
  4. One ripe banana
  5. One spoonful of flour
  6. Olive oil for frying
  7. Taste, honey

Getting Ready

Let’s begin by completing these easy steps:

  • Crack the eggs and beat them.
  • smooth by placing the eggs in a big dish and beating them.
  • Pour in the white yogurt and stir in the beaten eggs to combine it with the oatmeal. Next, add the oatmeal little by little while stirring all the time.
  • Add Mashed Banana: Mash the banana and stir it into the mixture until it’s thoroughly mixed.
  • Sprinkle Flour: Until you have a homogenous batter, evenly distribute the flour over the mixture and stir everything well.

Forming and Chilling

The batter is now prepared, now form the patties and cook them to golden perfection:

  • get the pan ready: In a frying pan, warm up some olive oil over medium heat.
  • Form the Patties: Spoon out parts of the batter and form them into patties using a spoon.
  • Fry till it becomes golden. Gently put the patties into the pan and cook over low heat, turning them over from time to time, until the outsides are crispy and golden brown.
  • drizzling honey
    When the patties are perfectly done, move them to a platter and pour honey over them. The patties’ tastes are exquisitely complemented by the honey’s wonderful sweetness.
  • Providing loving service
    Serve these delicious oat cakes with love, and see how quickly they go. These patties are sure to fulfill everyone’s cravings, whether they are eaten as a filling snack or as a delicious morning dish.

Advantages for Health

These oatmeal patties have several health advantages in addition to their delicious taste:

  • Because oatmeal is high in nutrients and fiber, it helps support heart health and during digestion.
  • Probiotics included in yogurt help to maintain intestinal health and strengthen immunity.
  • Vitamins and potassium abound in bananas, providing a natural energy boost.

Success Advice
If you want more sweetness and taste, use ripe bananas.
To avoid burning and to make sure the patties are cooked through, cook them over low heat. Try a variety of toppings, such chopped almonds or fresh berries, to provide some variation.

Crispy Coating Air Fryer Crab Cakes

Crispy Coating Air Fryer Crab Cakes

Crispy Coating Air Fryer Crab Cakes This recipe for Air Fryer Crab Cakes is tasty, simple to make, and has a crispy outside and a soft, savoury within.

Ingredients For Crispy Coating Air Fryer Crab Cakes:

  • 1 pound of well-drained lump crab meat
  • 1/4 cup of mayonnaise
  • One big egg
  • One spoonful of mustard dijon
  • One spoonful of sauce from Worcestershire
  • 1 tsp Old Bay seasoning (modify according to flavour)
  • 1/4 tsp salt, or according to taste
  • 1/4 tsp black pepper, or according your taste
  • Half a cup of Panko breadcrumbs
  • 1/4 cup of freshly chopped parsley
  • 1 tablespoon of optionally chopped chives
  • Cooking mist

Instructions For Crispy Coating Air Fryer Crab Cakes:

First, make the crab cake mixture:

  • Ingredients: Gently mix lump crab meat, mayonnaise, egg, Worcestershire sauce, Old Bay seasoning, salt, and black pepper in a large mixing dish. Use a spatula or your hands to gently combine the crab meat, taking care not to break it up too much.
  • Add the herbs and breadcrumbs: Once thoroughly mixed, fold in the Panko breadcrumbs, chopped parsley, and chopped chives, if using. Forming the mixture into patties should keep it together.

Second, Form the crab cakes and refrigerate:

  • Form into Patties: Divide the crab mixture into equal parts, then form each into a patty that is around one inch thick. Transfer the crab cakes to a parchment paper-lined plate or baking sheet.
  • Relax: Before cooking, place the crab cakes in the refrigerator for at least half an hour to solidify. This improves their ability to maintain their form when air-frying.

Third, Let the crab cakes air fry:

  • Preheat the Air Fryer: Give your air fryer a five-minute warmup period at 375°F (190°C).
  • Cook in Groups: Cooking spray should be used sparingly on the air fryer basket. Leaving room between each crab cake for air circulation, arrange the crab cakes in the basket in a single layer.
  • Air fry: Preheat the oven to 375°F (190°C). Cook the crab cakes for 10 to 12 minutes, turning them halfway through, or until they are well roasted and have a crispy, golden outside.

Forth, Present:

  • Serve Hot: Before serving, take the crab cakes out of the air fryer and let them a few minutes to rest. Serve hot with your preferred dipping sauce, tartar sauce, or slices of lemon.

Advice and Adaptations:

  1. Crab flesh: For the finest flavour and texture, use premium lump crab flesh.
  2. Crushed gluten-free crackers or gluten-free breadcrumbs are good substitutes if you’d rather go gluten-free.
  3. Herbs: To change up the flavour, use other herbs like cilantro or dill.
  4. Make Ahead: The crab cakes may be made in advance and chilled until cooking time.

In summary
Air-fried crab cakes offer a healthier substitute for typical frying techniques, while still allowing you to savour the delicious flavours of lump crab flesh with a crispy crust. These crab cakes will wow guests with their mouthwatering flavour and texture whether they are served as an appetiser, entrée, or component of a seafood feast. Savour the crispy perfection of air-fried crab cakes by creating this recipe and enjoying it!
Fans of seafood who want to use their air fryer to eat crab cakes in a healthy but still delicious way should find this recipe appealing.

Irresistible Cornet Pogona A Timeless Family Recipe You’ll Crave Every Day

Irresistible Cornet Pogona A Timeless Family Recipe You’ll Crave Every Day

Our family has been enjoying the delicious pastry known as cornet poaches for many generations. This pastry, which comes from my grandmother’s special recipe, is so delicious that we find ourselves cooking it once a week and lusting for its rich flavor every day. It’s an appealing delicacy because of the creamy, sweet filling and the soft, fluffy batter. We’ll lead you through every step of creating this delectable Cornet PogaÍa in this comprehensive tutorial, so you can make this beloved dish in your own home.

Components of the Dough:

  1. 250 ml, or one cup, warm milk
  2. One spoonful of sour cream
  3. Salt, half a teaspoon,
  4. two teaspoons (30 g) sweets
  5. Two tsp (ten grams) arid yeast
  6. One egg, room temperature
  7. Oil, 1/2 cup (100 ml) 3 500–
  8. 500 g, or 1/2–4 cup, of flour

Regarding the Filling:

  • Six 1/3 ounce (180 g) of young,
  • unsalted cheese or cream cheese
  • two tsp sugar
  • One tablespoon of cornflour
  • 70 g or 2 1/2 oz of raisins

Regarding the Crumb Finishing:

  • two tsp sugar
  • two tsp of flour
  • 1/4 cup (50 g) butter or margarine
  • Regarding the Coating:
  • One yolk from an egg
  • One spoonful of milk

Guidelines

Setting Up the Dough

  • Blending the Wet Components:
    The warm milk, sour cream, sugar, salt, egg, dry yeast, and oil should all be combined in a big mixing basin. Beat the mixture with a hand whisk until all the ingredients are well mixed and dissolved.
  • Including the Flour: Add the flour to the mixture little by little. Mix first with a spoon, and then knead with your hands. the dough. The dough ought to be tender and detach from the bowl’s edges. To get the right consistency, add a bit extra flour if the dough is too sticky.
  • Fermenting the Dough: After the dough is prepared, return it to the bowl after giving it a quick greasing. Once the dough has doubled in volume, cover the bowl with a fresh kitchen towel or plastic wrap and allow it to ferment in a warm location for around half an hour.
  • Getting the Filling Ready
    Preparing the Filling: Take a separate dish and mix together the sugar, cornstarch, raisins, and cream cheese (or young cheese). Make sure all the ingredients are properly combined by giving the mixture a good stir. While working with the dough, set aside the filling.

Forming the Dough 

  • Dividing the Dough: Gently knead the dough to get rid of any air bubbles once it has risen. Shape the dough into balls by dividing it into nine equal halves. After covering the dough balls with a moist cloth or plastic bag, allow them to rest for ten to fifteen minutes.
  • Getting Ready for the Crumb Topping: Using your fingers, combine the flour, sugar, and margarine (or butter) in a separate basin until the mixture forms coarse crumbs. Put aside.
  • Rolling Out the Dough: Using a rolling pin, take one ball of dough and roll it out into a thin, circular crust. Grease, butter, or margarine should be brushed over the whole surface of the crust. Pinch the edges of the folded crust together.
  • Into the Dough: Spoon in a heaping tablespoon of the  It should ferment for around 20 minutes, or until its volume doubles once more, in a warm location.

Preparing the Pogonia Cornet

  • To coat the dough, heat the oven to 340°F, or 170°C. Combine the egg yolk and milk in a small bowl. Drizzle the rising dough with this mixture. Evenly distribute the crumb topping over the whole area.
  • Baking: After preheating the oven, place the Cornet PogaÍa inside and bake for 25 to 30 minutes, or until the crust is cooked through and the top is golden brown.

Getting in touch

  • After baking, take the Cornet PogaÍa out of the oven and allow it to cool in the pan for a short while. After transferring it, let it cool fully on a wire rack.
  • To enjoy: Warm or room temperature Cornet PogaÍa should be served. It goes well with a cup of tea or coffee or just on its own. It’s the ideal dessert for any occasion because to its buttery crumb topping and luscious, creamy interior.

In summary

More than just a pastry, Cornet Pogača is a symbol of the Balkan region’s culinary history and a tradition. Given its rich filling and light, fluffy dough, it’s no surprise that this recipe has endured over time. As much as we enjoy producing and enjoying this delectable delicacy, we hope you do too.