Put aluminum foil in your toilet

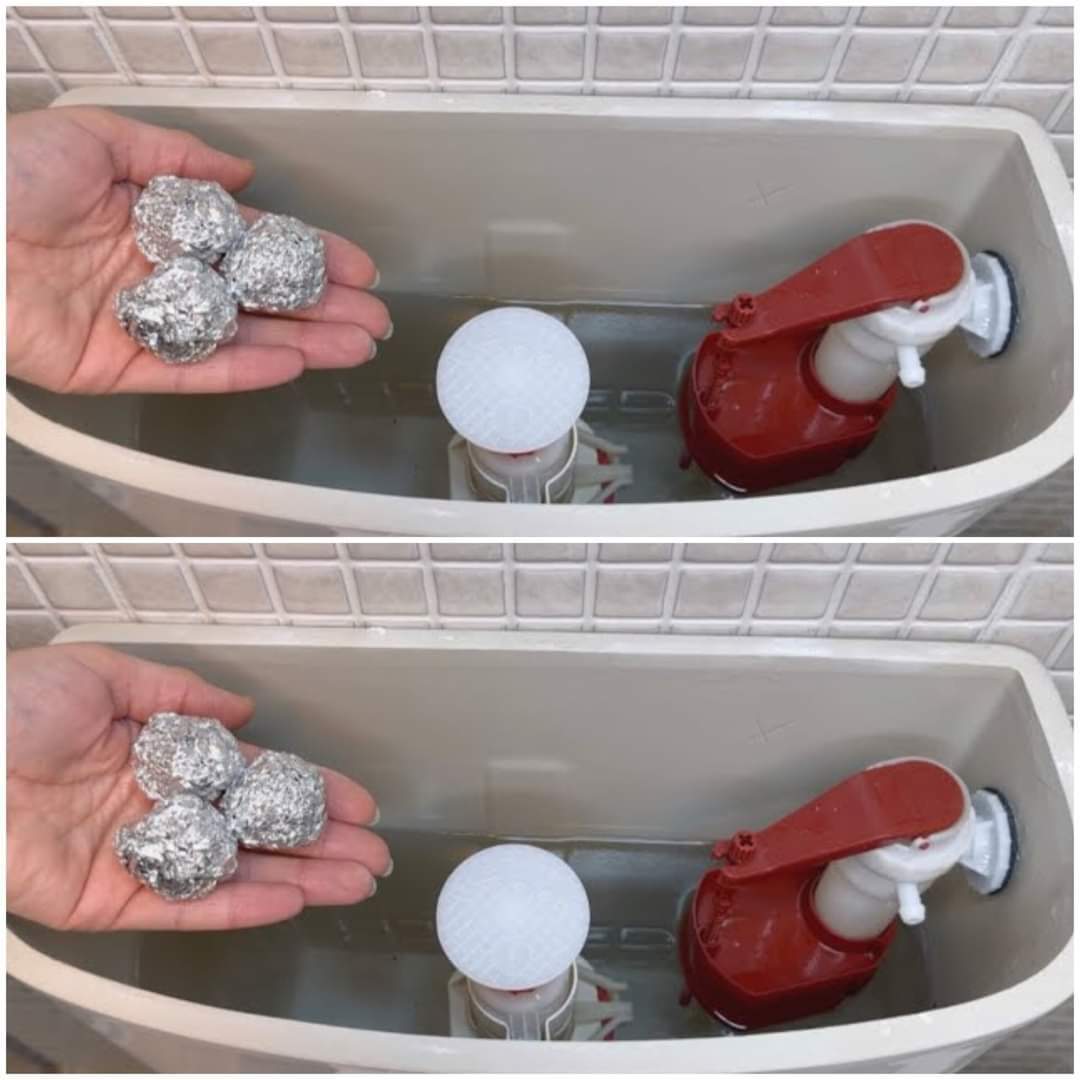
Put aluminum foil in your toilet! once and after 5 minutes you will be surprised by the result

Aluminum foil is known for its versatility in the kitchen, but its use extends far beyond wrapping leftovers. When it comes to cleaning, the foil’s texture and chemical properties can help in ways you might not have imagined, especially in tackling the tough stains and rings in your toilet bowl.

How to Use Aluminum Foil in Your Toilet

  1. Prep Your Foil: Tear off a piece of aluminum foil, about a foot in length, and crumple it into a ball. The crumpling increases the surface area and texture, which is essential for this cleaning hack.
  2. Glove Up and Go: Wearing gloves for hygiene, dip the aluminum foil ball in water. If you’re dealing with stubborn stains, sprinkle some baking soda on the foil for an extra cleaning boost.
  3. Scrub Away: Use the foil ball to scrub the inside of the toilet bowl, focusing on any stains, rings, or hard water buildup. The foil, in combination with the water (and baking soda, if used), creates a mild abrasive effect that helps lift stains without scratching the porcelain.
  4. Wait for the Magic: After giving the bowl a good scrub, let it sit for about 5 minutes. This waiting period allows the chemical reaction to do its magic, further enhancing the cleaning effect.
  5. Final Flush: After the brief wait, give your toilet a flush. You’ll be surprised at how clean and shiny the bowl looks, almost like new.

Benefits

This method is not just effective; it’s also eco-friendly and economical. Aluminum foil is a staple in most homes, making this hack accessible without the need for harsh chemicals or expensive cleaners. It’s a win-win for anyone looking for a quick, easy, and environmentally conscious way to tackle toilet cleaning.

Wrap-Up

So, the next time you’re gearing up for bathroom cleaning, reach for that roll of aluminum foil. This simple yet surprising hack might just change the way you view toilet cleaning forever. Give it a try, and prepare to be amazed by the shiny, clean results. Happy cleaning!

Fruits like berries, apples, and peaches come packed with natural sugars that caramelize

Fruits like berries, apples, and peaches come packed with natural sugars that caramelize beautifully when cooked, offering the perfect base for a no-sugar jam. For our recipe, we’ll focus on berries for their antioxidant properties and vibrant flavor, but feel free to get creative with your fruit choices.

Ingredients:

  1. 2 cups of fresh or frozen berries (such as strawberries, raspberries, or blueberries)
  2. 2 tablespoons of chia seeds
  3. 1 tablespoon of fresh lemon juice

Optional: A drizzle of honey or pure maple syrup for extra sweetness

Instructions:

  1. Prepare the Fruit: If you’re using fresh berries, rinse and chop them as needed. Frozen berries can be used directly.
  2. Cook the Berries: Place the berries in a saucepan over medium heat. As the berries warm up, they will start to break down and release their natural juices. Use a fork or potato masher to help them along.
  3. Add Lemon Juice: Stir in the fresh lemon juice. The acidity will enhance the natural flavors of the fruit and add a lovely brightness to the jam.
  4. Thicken with Chia Seeds: Once the fruit has softened and created a saucy texture, add the chia seeds and stir well. Chia seeds are not only healthy but also act as a natural thickener. Reduce the heat and let the mixture simmer for a few minutes until it reaches a jam-like consistency.
  5. Cool and Serve: Remove from heat and allow the jam to cool. It will continue to thicken as it cools. Store in an airtight container in the refrigerator.

This no-sugar jam is a testament to the fact that you can enjoy the sweeter things in life without the added sugar. Whether spread on a slice of whole-grain toast, swirled into your morning oatmeal, or dolloped on top of Greek yogurt, this jam is sure to add a burst of joy and health to your breakfast table. Enjoy the freshness, flavor, and simplicity of homemade jam any day of the week!

The Incredible Health Benefits of Euphorbia Hirta

The Incredible Health Benefits of Euphorbia Hirta: Nature’s Powerful Herb

For ages, traditional medicine has employed Euphorbia Hirta, sometimes referred to as snake plant or asthma weed. Widely recognised for its remarkable therapeutic qualities, this powerful plant provides several health advantages. Let’s explore the amazing properties and applications of Euphorbia Hirta.

1. Respiratory Health

Benefits: Euphorbia Hirta is well renowned for its capacity to effectively cure respiratory ailments like coughs, bronchitis, and asthma. It helps to relax the airways and facilitate better breathing by acting as a bronchodilator.

How to Use:

  • Boil the dried leaves and stems of Euphorbia Hirta in water to make a tea.
  • Sip the tea two to three times daily to ease respiratory problems.

2. Health of the Digestive System

  • Benefits: This herb can help calm the digestive tract because of its strong anti-inflammatory and anti-spasmodic qualities. It aids in the treatment of dysentery, diarrhoea, and other gastrointestinal issues.

How to Apply:

Steep the dry herb for ten to fifteen minutes in boiling water to create an infusion.
To promote digestive health, take one or two servings of the infusion every day.

3. Antibacterial and Antifungal Properties

Benefits: Euphorbia Hirta is useful in healing wounds, fungal diseases including athlete’s foot, and skin infections due to its potent antibacterial and antifungal properties.

How to Apply:

Directly apply a paste prepared from crushed leaves to the injured region.
As an alternative, use a topical tincture that has been diluted.
4. Strengthens Immunity Advantages: Euphorbia Hirta, which is abundant in antioxidants and other nutrients, supports a stronger immune system and shields the body from a range of illnesses and infections.

How to Apply:

As advised by a healthcare provider, include supplements or extracts of Euphorbia Hirta in your regular regimen.
5. Benefits for Pain Relief and Anti-Inflammation:

Euphorbia Hirta is a useful treatment for lowering pain and inflammation brought on by illnesses like arthritis and muscular soreness because of its anti-inflammatory qualities.

How to Use:

Drink For alleviation, infuse the afflicted region with Euphorbia Hirta tea or apply a poultice prepared from the leaves.
6. Benefits for Skin Health: Euphorbia Hirta helps with eczema, psoriasis, and acne, among other skin issues. Its restorative and calming qualities encourage better skin.

How to Apply:

Apply a diluted extract topically or make a paste out of the fresh leaves.

7. Menstrual Health

Benefits: This herb has been shown to lessen cramping during periods and assist regulate menstrual cycles. It has the potential to alleviate premenstrual syndrome (PMS) symptoms.

How to Apply:

To reduce symptoms, drink Euphorbia Hirta tea on a daily basis during your menstrual cycle.
8. Promotes Benefits for Heart Health:

Euphorbia Hirta has the potential to decrease blood pressure and enhance heart health. Its anti-inflammatory qualities aid in improving heart health as well.

How to Apply:

For heart health advantages, take supplements of Euphorbia Hirta as directed by a physician.
In summary
A potent plant with several health advantages is Euphorbia Hirta. This powerful herb may be a great complement to your natural health routine for anything from skin care and immunological support to respiratory and digestive health. Before beginning any new herbal therapy, always get medical advice to be sure it’s safe and appropriate for your particular requirements. Accept the amazing advantages of Euphorbia Hirta and discover the therapeutic potential of this potent plant found in nature.
Recipe created by:AnnaMAria


How to Make a Delicious Oatmeal and Apple Cake A Simple Recipe

How to Make a Delicious Oatmeal and Apple Cake A Simple Recipe

With this simple recipe, you may savor the delicious flavors of handmade oatmeal and apple cake. This cake is ideal for any occasion because it blends the sweetness of fresh apples with the hearty richness of oats to create a delicious treat that will leave you wanting more.

Overview
Have you ever had a cake that was so amazing it took your breath away? Prepare to taste exactly that with this delicious recipe for oatmeal and apple cake. This cake, which is bursting with taste and goodness, is sure to win over your family and friends.

Ingredients You will need the following to make this delicious treat:

Regarding the dough:

  1. Four eggs
  2. Four teaspoons of sweetener (or caster sugar)
  3. One teaspoon of vanilla essence or sugar
  4. One pinch of salt
  5. Sunflower vegetable oil, 100 milliliters
  6. Two bowls of oats
  7. One-teaspoon baking powder

Regarding the filling:

  1. Two apples
  2. Three tablespoons of corn flour
  3. One cup of walnut kernels
  4. One cup of apricots, dried
  5. One or two tablespoons of cranberries, dry.

Technique of Preparation

  • Get the dough ready: Crack the eggs into a large bowl first. After adding the caster sugar, salt, and vanilla sugar, use a mixer to whip the mixture until it becomes light and fluffy. Stir in the vegetable oil gradually.
  • Include the oatmeal: Using a spatula, stir in the oatmeal. Cover the bowl and let the mixture to hydrate for 20 minutes.
  • Get the filler ready: Slice, peel, and core the apples. Coat them by tossing them with cornstarch.

Get the dried fruits and nuts ready:

  • The walnut kernels should be finely chopped and dried over medium heat in a pan. Cut up the dehydrated apricots.
  • Put the cake together: On a prepared tray, distribute half of the oatmeal dough. After scattering half of the walnuts, arrange half of the cranberries, apples, and apricots on top. Continue using the remaining components.
  • Bake: Cook the cake for 55 to 60 minutes at 170°C, or until it is cooked through and golden brown.
  • Have fun: After baking, take out of the oven, cut into slices, and serve.

Success Advice

  • Use fresh ingredients: For optimal results, use ripe, fresh apples and premium oats.
  • Modify sweetness: Change the sugar content to suit your desired level of sweetness.
  • Be imaginative: Feel free to customize the filling by adding your preferred nuts or dried fruits.

contact.
Before taking the cake out of the oven, make sure it is done by inserting a toothpick into the center and making sure it comes out clean.

Serving Ideas
This tasty oatmeal and apple cake is perfect either as a dessert after a filling dinner or as a nice afternoon treat with a cup of tea or coffee. For an even more decadent treat, you may add drizzle some caramel sauce or put a dollop of whipped cream on top.

In summary
To sum up, this recipe for oatmeal and apple cake is a real winner in terms of flavor and ease of preparation. All you need are a few staple ingredients and simple instructions to make a dessert that will look and taste amazing. Why then wait? Make some baking and enjoy a slice for yourself. of bliss right now!

Unique Cheeseburger Stuffed Pastry Recipe

Unique Cheeseburger Stuffed Pastry Recipe

Enjoy this delicious take on the traditional cheeseburger!

ingredients

Regarding the Dough:

  1. One cup (200 ml) of warm milk
  2. – One white egg
  3. Five grams of rapid yeast (one-half pack)
  4. 20 grams (one tablespoon) of sugar
  5. 240 grams (two cups) of flour
  6. Five grams (one-half teaspoon) of salt
  7. – 25 grams (1 teaspoon) of butter

Regarding the Filling:

  1. – One onion
  2. – One garlic clove
  3. – 30 ml (3 teaspoons) of vegetable oil
  4. 120 grams of ground beef
  5. – 1 teaspoon of thyme, or 2 grams
  6. – 1 teaspoon of black pepper, or 2 grams
  7. – 4 grams (1 teaspoon) of salt
  8. – 30 grams (2 teaspoons) of ketchup
  9. – 30 grams (2 tablespoons) of mayonnaise
  10. One tomato
  11. – 40 grams of cheddar cheese

Regarding the Topping:

  • One yolk from an egg
  • 20 ml (2 teaspoons) of milk
  • – Seeds from sesame

Guidelines:

  • 1. Place the egg and the heated milk in a mixing dish. sugar, white, and quick yeast. Until it foams, let it sit for a few minutes.
  • 2. Include the butter, flour, and salt in the mixture. Work the dough until it becomes smooth. For about an hour, cover and allow it to rise.
  • 3. Heat the vegetable oil in a skillet and cook the finely chopped onion and garlic until they become transparent.
  • 4. Include the salt, black pepper, thyme, and ground meat. Cook the beef until it takes on color.
  • 5. Remove from heat and stir in mayonnaise and ketchup.
  • 6. Set the oven’s temperature to 180°C (356°F).
  • 7. After rolling out the dough, cut it into squares.
  • 8. Top each square with a piece of tomato, a spoonful of the beef mixture, and some cheddar cheese.
  • 9. Fold each square. form a triangle, then seal the corners.
  • 10. To make the topping, whisk together the egg yolk and milk, then drizzle it over each pastry and garnish with sesame seeds.
  • 11. Bake for 15 minutes, or until golden brown, in a preheated oven.

Savor your special cheeseburger-filled pastries! Tell people about your culinary exploration

Delicious Christmas Plum Cake Recipe

Delicious Christmas Plum Cake Recipe

Continue the custom by serving your mother’s beloved Christmas cake!

Components:

Regarding the Soak Mix:

  1. Dried fruits and nuts (dates, raisins, sultanas, cashew nuts, dried papaya pineapple bits, candied peel pieces, red glazed cherries, and dried cranberries) 600g (4 cups)
  2.  Approximately two tablespoons of spices (cardamom powder, allspice, and cinnamon)
  3. Three tablespoons of brandy or rum;
  4. three tablespoons of golden syrup;
  5. two teaspoons of vanilla extract;
  6. one teaspoon of optional rose essence
  7.  One teaspoon of optional lemon essence

Regarding the Cake

  •  4 tablespoons (30 grams) Simple Flour: 90g, or ½ cup Sorghum – 100g / ½ cup Sugar: 110g, or ½ cup Three eggs and butter Two egg whites and two yolks
  • Three tablespoons Strawberry jelly or jam Extra:
  • – Baking pan – 240 ml measuring cup 20 by 20 centimeter square pan

Guidelines:

  • Set the oven’s temperature to 160°C, or 320°F.
  • 2. Within a huge Add all the nuts, spices, brandy or rum, golden syrup, vanilla extract, and optional essences to a bowl and mix well. After thoroughly mixing, let it soak for several hours or overnight.
  • 3. Beat the butter and sugar in a another bowl until they are light and fluffy.
  • 4. Add the egg yolks one at a time, thoroughly combining each time.
  • 5. Stir in semolina and regular flour.
  • 6. Gently incorporate the egg whites into the batter after beating them until firm peaks form.
  • 7. Include the strawberry jam or jelly and the soaking fruit combination. Blend until thoroughly blended.
  • 8. Spoon the mixture into a 20 x 20 cm square baking tray that has been lined and oiled.
  • 9. Bake for 30 minutes at 160°C (320°F) in a preheated oven, then turn down the heat.
  • Bake at 140°C (284°F) for a further 50–60 minutes. If necessary, cover with foil halfway through baking.
  • 10. Allow the cake to cool fully before cutting it into slices and enjoying the festive flavor!
  • Savor your delicious Plum Cake and make more treasured Christmas memories.

Irresistible Generous Cake Recipe

Irresistible Generous Cake Recipe

A dessert experience that surpasses apple pie is about to happen!

ingredients

  for the cake batter

  1. 2 eggs
  2. 5-tablespoons sugar (100g)
  3. – 4 tablespoons oil (40 ml) 🫒
  4. – 2 tablespoons butter (40 g)
  5. – 4 grams of baking powder
  6. – 3 big cups of flour (300 g)
  7. – A butter-greased cake pan with a 26 cm diameter

For the Charitable Filling:

  • Five tablespoons (100g) sugar –
  • One egg
  • – 4 tablespoons cornstarch (60g)
  • – Grated half-lemon peel
  • – 500 milliliters milk
  • – 1 tablespoon butter (20g)
  • – 1 tablespoon lemon juice

To Adorn:

  • – Sugar
  •  – Egg yolk
  • 1 tsp milk

Guidelines:

  • Set the oven’s temperature to 180°C (356°F).
  • 2. Beat two eggs, sugar, vanilla sugar, and a little amount of salt together in a bowl.
  • 3. Include the butter, oil
  • , and baking powder flour. Mix until a smooth dough forms.
  • 4. Evenly distribute the dough in a 26 cm cake form after greasing it with butter.
  • 5. Beat one egg, sugar, cornstarch, lemon peel, and lemon juice in a another bowl.
  • 6. While whisking, gently add heated milk to the egg mixture.
  • 7. Cover the cake batter in the mold with an ample amount of filling.
  • 8. To decorate, beat the egg yolk and milk together in a small dish and pour it over the top.
  • 9. Add a sugar dusting.
  • 10. Bake until golden brown, 35 to 40 minutes.

Savor this cake’s generosity! Show off your work to

Melt in Your Mouth Tender Beef with Roasted Vegetables

Melt in Your Mouth Tender Beef with Roasted Vegetables

Transform even the hardest beef into a delectable work of art! Here’s how to do it:

Ingredients:

  1. 1 kilogram of any cut of beef
  2. 400 grams of onions,
  3. 100–120 grams of butter,
  4. 50 milliliters of water,
  5. 3 garlic cloves,
  6. 1½ to 2 teaspoons of salt
  7. , and black pepper
  8.  2-3 eggplants
  9.  1 tsp apple cider vinegar
  10. One or two zucchini; salt
  11. – Frying oil
  12. – One big onion –
  13. One or two peppers
  14. – Two tomatoes
  15. – One tsp Khmeli Suneli (a spice combination)
  16. – Black pepper
  17. – One or two cloves of garlic
  18. – To taste, fresh cilantro, parsley, and dill

Guidelines:

  • 1. Melt butter in a saucepan over medium heat, then add onions and cook until they become translucent.
  • 2. Include the meat, apple cider vinegar, salt, black pepper, garlic, and water.
  • 3. Simmer the beef, covered, for 60 to 90 minutes, or until it is very soft and melts in your mouth.
  • 4. Cut zucchini and eggplant into slices, season with salt, and refrigerate for fifteen minutes. Dry with a pat.
  • 5. Fry the zucchini and eggplants till golden brown.
  • 6. Saute the tomatoes, peppers, and onions in a separate pan until they are tender.
  • 7. Add garlic, black pepper, and Khmeli Suneli; simmer for a little while.
  • 8. Add fresh herbs to the cooked veggies.
  • 9. Serve the fragrant vegetable mixture beside your tender meat.

New Dessert in 5 Minutes Try These Delicious No-Bake Treats

New Dessert in 5 Minutes Try These Delicious No-Bake Treats

The delight of biting into a rich dish without having to wait for it to bake comes to mind. That’s what makes these simple, no-bake sweets so delicious! You may quickly and easily make a magnificent mixture that will sate your sweet tooth in a matter of easy steps.

Components

  1. 350 grams of biscuits
  2. 85 grams of peanuts, ground
  3. 85 grams of sugar
  4. A 180-milliliter sweet cream
  5. One 10-gram bag of vanilla sugar (optional)
  6. 45 grams of powdered cocoa
  7. One hundred and ten grams of butter
  8. Regarding the glaze:
  9. 90 grimes of milk chocolate
  10. 30 grams of dark chocolate
  11. 30 grams of vegetable oil
  12. 70 grams of ground peanuts

Method:

Blending the Components

  • Break apart the biscuits: Using your hands or a pestle and mortar, break the biscuits into small bits first. with a blender.
    Mix in the ground peanuts by grinding them and adding them to the broken biscuits.
  • Get the chocolate mixture ready by: In a saucepan, combine sugar and cocoa powder; whisk until well combined. Add the sweet cream gradually, stirring constantly, until the mixture is smooth.
  • Forming the Sweets
    Add butter and sugar for vanilla extract. To the chocolate mixture, add the butter and vanilla sugar, and whisk until smooth and melted.
  • Mix in biscuit mixture: After adding the chocolate mixture to the dish with the crushed biscuits and peanuts, thoroughly mix everything together.
  • Putting something in the freezer
  • Form the sweets: Press the mixture into a mold, roll it into balls, or pour it into silicone molds of your choosing. Make sure the mixture is compacted to prevent voids.
  • Put in the freezer to chill: Location the desserts in the freezer to set for approximately one hour.

Creating the Glaze
Get the glaze ready: Combine vegetable oil, milk chocolate, and dark chocolate to melt them. Blend in the ground peanuts until smooth.
Last Words
Cover the sweets: After removing the cold desserts from the molds, drizzle the glaze over them.

Serving Ideas
Take pleasure in your creations: Present these delicious candies on a tray and savor their rich, chocolaty flavor. For the perfect dessert, serve them with a scoop of vanilla ice cream or a glass of cold milk.

In summary
You can prepare a batch of these delicious no-bake sweets in a matter of minutes, and they will make your taste buds dance with joy. Whether you’re merely indulging yourself or throwing a party Treat yourself to something delicious; these candies will wow. Why then wait? Get inventive in the kitchen and experience the charm of handmade treats without having to deal with the cleanup!

The Perfect Recipe for Irresistible Melt in Your Mouth Cookies

The Perfect Recipe for Irresistible Melt in Your Mouth Cookies

Who can resist the irresistible taste of freshly made cookies, especially when they are so delicious that they melt in your mouth? With only a few basic ingredients, this recipe promises to be both tasty and simple to create, making it an ideal treat for any cookie lover. Come on, let’s get in the kitchen and make some magic!

Overview
Cookies are the ideal comfort food, and it’s a win-win when they’re easy to prepare and delicious to consume! This post will go over a straightforward yet tasty recipe for cookies that satisfy everyone. They are quick to prepare, taste great, and are easy to put together.

Getting the Ingredients Ready

Before beginning your baking endeavor, gather your ingredients. What you’ll need is

  1. two eggs
  2. half a cup of sugar
  3. half a cup of oil
  4. One tablespoon jam
  5. half a cup of yogurt
  6. Zest of lemons
  7. A dash of salt
  8. 15.9 ounces of soft wheat or durum semolina
  9. A single spoonful of powdered sugar
  10. One and a half cups of sugar powder

Blending the Cake

Blending the Tastes

  1. Crack two eggs into a mixing dish
  2. and add the 1/2 cup sugar,
  3. 1/2 cup oil,
  4. 1 tablespoon jam,
  5. and 1/2 cup yogurt
  • . Until the components are wonderfully blended, give it a thorough whisk.
  • Zing Zest one lemon and grate it into the mixture. This gives the cookies a burst of freshness that wonderfully balances their sweetness.
  • Establishing the Base
    Stirring constantly, gradually incorporate the durum or soft wheat semolina into the mixture. As you go, be sure to incorporate 1 tablespoon of baking powder. mixed. To balance the tastes, add a sprinkle of salt at the end.
  • Forming and Covering
    Entering a state of bliss
    Shape the dough into little spheres and coat them with icing sugar. This gives the cookies a lovely, crumbly texture in addition to a hint of sweetness.
  • Baking to a Perfect Finish
    Preheating the Oven For the best baking conditions, preheat your oven to 392 degrees F before placing your cookies in.
  • It’s Baking Time
    Your sugar-coated dough balls should bake for 10 to 15 minutes in a preheated oven when placed on a baking pan covered with parchment paper. Watch them closely; you want them to be enticing and golden brown.

Providing and Gratifying
After they have cooled and come out of the oven Gently place your cookies on a platter and prepare to enjoy. For the ultimate delight, serve them with a steaming hot cup of tea or a glass of cold milk. Savor each bite of these delicious treats that melt in your mouth.