Grandmother’s Secret: Chickpea Recipe That Will Conquer Everyone

Grandmother’s Secret: Chickpea Recipe That Will Conquer Everyone!

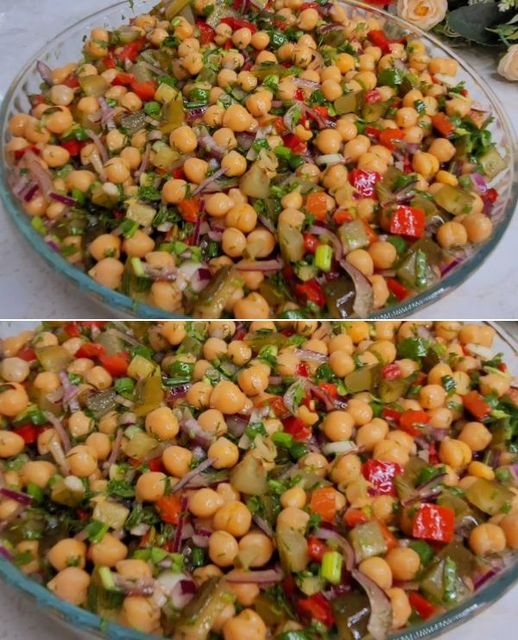
Chickpeas are a unique component of Middle Eastern cuisine’s colorful tapestry. Known by many as “garbanzo beans,” this popular legume is a main ingredient in many traditional recipes. A colorful chickpea salad is one such dish that has been handed down through the years, taught to me by an Arab grandma. This meal is a visual feast for the eyes as well as a feast for the senses. This dish is perfect for any occasion and will win over everyone’s taste buds and hearts.

Components:

1 pound of chickpeas

One red pepper
One red onion
One spring onion
Coriander
Dill
Juice from pomegranates
Juice from lemons
Oil made from vegetables

Directions for Salt

  • The Chickpeas: Soaking and Cooking
    Let the Chickpeas Soak: To start, put the chickpeas in a big pan with high sides. Pour hot water into the pan until the chickpeas are completely immersed. Soak them for approximately six hours. This is an important step since it shortens the cooking time and softens the chickpeas.
  • Cook the Chickpeas: Place the pan on the burner and bring the water to a boil after the beans have been soaking. There may be surface froth formed while the chickpeas boil. To verify that the cooking liquid is clear, remove this froth with a spoon. Cook the chickpeas for about three hours, or until they are very soft.
  • Getting the Vegetables Ready: Dice and Sauté the Red Pepper: While the chickpeas are cooking, finely cut the red pepper. Vegetable oil is heated in a pan over medium heat. Chop the red pepper and fry it for They should be somewhat softened but remain crunchy after around 3 minutes. After cooking, move the peppers to a dish and reserve.
  • Cut Up Any Other Vegetables: Chop the dill, coriander, spring onion, and red onion finely. These fresh herbs and veggies give the salad a vibrant splash of color and taste.
  • Putting the Salad Together: After the chickpeas are cooked, rinse them and transfer them to a sizable mixing basin.
  • To the bowl, add the chopped red onion, spring onion, coriander, and dill, as well as the fried red peppers.
    Toss the salad with seasoning.
  • Add a teaspoon of salt to the salad to season it. Combine one tablespoon of pomegranate juice and one and a half tablespoons of lemon juice in a small bowl.
  • Pour this tart concoction. above the salad. Make sure the spice coats the veggies and chickpeas well by giving everything a little toss.
  • Serve: You may now proceed to serve your chickpea salad. This dish is a flexible complement to any dinner because it may be eaten warm or cold.
    Nutritional Information Packed with nutrition, this chickpea salad is equally delightful. The nutritional information for each serving is broken down as follows:

210 calories
10g of protein
35g of carbohydrates
8g of fiber
6g of fat
35% of the Daily Value (DV) for vitamin C
15% of the DV is iron.

How to Make the Ideal Chickpea Salad

  • Time to Soak: Make sure to soak the chickpeas for at least six hours; however, for a softer texture, soaking them overnight is preferable.
  • Use fresh herbs, such as dill and coriander. for optimal taste. While they work in a hurry, dried herbs don’t have the same bright flavor.
  • Taste the salad before serving and adjust the amount of salt and lemon juice to suit your taste.
  • Serving Ideas: This salad is a great side dish for grilled fish or meats, or it may be eaten by itself as a light dinner.

In summary
The Middle Eastern cuisine’s nutritious ingredients and rich tastes are exemplified in this chickpea salad. This recipe is wonderfully nutritious and simple to prepare, and it’s sure to wow and please. This chickpea salad is an excellent option for both a filling main meal and a nutritious side dish.

Vegetable Frites

Today we will create a great and nutritious vegetable fritter dish using cheese, carrot, potato, and zucchini. A light lunch or snack would be ideal for these fritters; we will combine them with a sour cream and cucumbers dip. Let us get going!

Getting ready time
Time for preparation: twenty minutes
Cooking times: fifteen minutes
35 minutes total time
Materials for the Fritters

  1. One grated zucchini
  2. Taste: Salt to suit
  3. one grated carrot
  4. two eggs
  5. One hundred fifty grammes of cheese, grated
  6. Fresh parsley, finely chopped
  7. one potato, grated
  8. 2 minced cloves of garlic
  9. Ground black pepper, to taste
  10. Taste of Italian herbs
  11. Taste of paprika
  12. 4 tablespoons of oats
  13. Two tablespoons bread flour
  14. For fried food, olive oil

For the Dip:

  1. One tablespoons sour cream
  2. One teaspoon of mayonnaise
  3. One finely chopped cucube
  4. A sloshful of salt

Guidelines
Regarding the Fritters:

  1. Get ready the veggies by Grate potatoes, carrot, and zucchini. To release extra moisture, toss the shredded zucchini in a strainer, sprinkle with salt, then let it rest for ten minutes. Press the extra water out.
  2. Combine. Combine in a big bowl the grated zucchini, carrot, potato, cheese, minced garlic, chopped parsley, eggs, crushed black pepper, Italian herbs, paprika, oats, and flour. Till all the components are equally mixed,
    Form fritters from a small amount of the mixture into a patty. Proceed with the remaining mixture.
  3. Fry here For fritters: In a big skillet set over medium heat, warm olive oil. On each side, fry the patties for three to four minutes, or until cooked through and golden brown. Remove then drain on paper towels.
  4. In the Dip
    Get ready for Dip by… Combine in a small bowl the sour cream, mayonnaise, finely diced cucumber and a little of salt. Beat thoroughly.
  5. Serving Suggestions
  6. Present the veggie fritters hot beside the sour cream and cucumber dip.
  7. Add more chopped parsley as a fresh garnish.

Cooking Techniques

  1. To stop the grated zucchini from getting too soggy, make sure you press out as much water as you can.
  2. To fit your taste, you may use various herbs or spices to the fritter mixture.

Dietary Value

  1. Low in calories, zucchini is high in vitamins A and C.
  2. High in beta-carotene, fiber, and antioxidants is carrot.
  3. Potato: Excellent source of fiber, potassium, and vitamins C and B6.
  4. Cheese gives calcium and protein.

Information about Diet

  1. Vegetarians should find this dish appropriate.
  2. Choose oatmeal and gluten-free flour.

Tips for Storage

  1. Store any remaining fritters, in an airtight container, in the refrigerator for up to three days.
  2. Reheat in an oven until heated through or in a skillet set over medium heat.

Why You’ll Love This Dish

  1. Fresh veggies, herbs, and cheese taken together provide a wonderful and filling meal.
  2. Packed with vitamins, minerals, and protein, these fritters are a sensible option.
    Perfect for meal planning, versatile for breakfast, lunch, or supper.

ConclusionMade easily and enjoyed, these vegetable fritters with a cucumber and sour cream dip are a great and healthy dinner. This dish will satisfy you whether your taste is for a light dinner or a fast snack. Savish the tastes and the nutritious advantages of this great meal! Bon appetit!


Sugar-Free Banana Cream for Cakes

Sugar-Free Banana Cream for Cakes

Components:

  1. Five bananas or plantains (500g)
  2. and 50g of butter
  3. Half a lemon (30 milliliters)
  4. 300ml of hot or cold milk,
  5. 50g of cornstarch (or 100g of flour)
  6. and 3 egg yolks
  7. One tsp vanilla extract
  8. 500ml of really cold cream (vegetable or milk)

Guidelines:

  • Butter should be melted in a pot
  • Add the mashed bananas to the melted butter.
  • Add some lemon juice
  • Make a paste by combining cornstarch (or flour)  with a tiny amount of milk in a different bowl.
  • Whisk in the remaining milk  gradually until the paste is smooth.
  • After adding the milk mixture, thoroughly whisk the banana mixture.
  • Beat egg yolks  and add vanilla essence  in a separate dish.
  • Stir continuously as you add the egg yolk mixture into the banana mixture.
  • Heat the blend. stirring constantly over low heat until it thickens.
  • Turn off the heat and let it to cool.
    Whip the very cold cream  in a separate dish until firm peaks form.
  • Once the banana mixture and whipped cream are thoroughly blended, fold them gently together.
  • Use this delectable and nutritious sugar-free banana cream to garnish and fill cakes!

1 Cup Oatmeal! Better Than Pizza! Clean, Healthy Recipe

1 Cup Oatmeal! Better Than Pizza! Clean, Healthy Recipe

Discovering a tasty and nutritious substitute for your preferred comfort meal may be a game-changer in the fast-paced world of today. We have the ideal recipe if you enjoy pizza but still want to meet your fitness and health objectives! This post will walk you through the steps of creating a delicious, nutritious, and healthful oatmeal pizza that is also quite yummy. Let’s begin this extraordinary gastronomic journey.

How to Begin Making Oatmeal Pizza
Although pizza is a popular food all over the world, classic pizza can be heavy in fat and calories. This recipe for oats pizza is going to come to your rescue. It’s easy, full of nutrition, and really tasty. Let’s examine the process step-by-step.

Ingredients Required:

  1. 1 mug of oatmeal
  2. One little onion, diced finely
  3. two eggs
  4. two tsp yogurt
  5. One tsp salt
  6. Add thyme to taste.
  7. 50 milliliters of water at first
  8. 50 milliliters of extra water
  9. Cooking oil
  10. Cheese mozzarella (optional)

Method by Method Instructions for Cooking

  • To begin, put the oats in a bowl and fill it with fifty milliliters of water. Once the oatmeal has absorbed the water, stir thoroughly and let it sit for a few minutes.
  • Beat the eggs in a another bowl and then stir them into the soaking oats. Blend until well blended.
  • To the oatmeal mixture, add the yogurt, finely diced onion, salt, and thyme. Mixing doesn’t stop until the batter is evenly distributed.
  • Add a little amount of oil to a nonstick pan and heat it over medium heat. Pour. To make a pizza crust, spoon a ladleful of the oats mixture into the pan. Cook on one side until golden brown, then turn and cook the other side.
    Continue with the remaining oatmeal mixture, adding frying oil as required.
  • If you’re a cheese enthusiast, top your oatmeal pizza with some mozzarella and put a lid on it; let the cheese melt for a minute or two.
  • You may now serve your oatmeal pizza! Cut it like a typical pizza and savor its nutritious deliciousness.
    Also check out this 3-Ingredient No-Bake Milk Pudding Dessert!

The Advantages of Oatmeal Pizza for Health

  • A great source of fiber that aids with digestion and keeps you feeling full is oatmeal.
    Eggs offer
  • vital vitamins and proteins that support general health and muscle repair.
  • Yogurt enhances your food with probiotics, which is good for your intestines.
  • Onions have several anti-inflammatory and antioxidant qualities.
  • In addition to being a taste enhancer, thyme may also have antibacterial and anti-inflammatory effects.

Changes and Personalizations
Go ahead and add some creativity to your oatmeal pizza! Add your preferred toppings, such tomatoes, bell peppers, spinach, or mushrooms, to make it uniquely yours. Try blending various herbs and spices to create distinctive taste combinations.

Serving Ideas
For added taste, pair your oatmeal pizza with a side salad or a sprinkle of olive oil. It’s a great way to satisfy your desires for pizza without sacrificing your health. It makes a great lunch or supper choice.

Irresistible Crispy Potato Wedges

Irresistible Crispy Potato Wedges

Components:

  1. To make the Potato Wedges, take 3 potatoes (30 oz / 840 grams).
  2. Half a tablespoon of salt
  3. two tsp of vegetable oil
  4. 200 grams (7 oz) of potato or cornstarch

Regarding the Cheese Sauce:

  1. 30 grams (1 oz) of butter
  2. Three to five garlic cloves
  3. Half a spoonful of flour
  4. 150 ml (5 fl.oz) of liquid cream
  5. 45 grams (1.6 oz) of Parmesan cheese
  6. Pepper, black
  7. Fresh parsley Sunflower oil

Guidelines:

Wedges of potatoes:

  • Peel and wash the potatoes. Cut them into pieces that resemble wedges.
  • For approximately five minutes, parboil the potato wedges in boiling water with a dash of salt. After draining, pat them dry.
  • For a uniform coating, toss the wedges in cornstarch or potato starch.
  • In a pan, heat the vegetable oil. Potato wedges should be fried till crispy and golden. Take out and let dry on paper towels.
  • Add a little salt.while they’re still warm.

Cheese-based sauce:

  • Melt butter in a different pan over a low heat.
  • When aromatic, add the minced garlic and sauté it.
  • Add the flour and cook, stirring, for one minute, until a paste forms.
  • Add the liquid cream gradually while stirring constantly until the mixture thickens.
  • When the cheese is melted and the sauce is smooth, add the Parmesan and stir some more.
  • Add a dash of black pepper and parsley for garnish.
  • Present the cheesy garlic sauce beside the crunchy potato wedges. This dish will be in high demand from your neighbors!

lemon loaf made in the air fryer

lemon loaf made in the air fryer

“An easy-to-make, tasty, and refreshing lemon loaf with a moist, soft crumb—all baked in an air fryer! A delicious taste combination that is guaranteed to wow is created when the sweetness of the sugar balances the sharpness of the lemon zest and juice. The air fryer’s accurate temperature control guarantees a beautifully cooked loaf with a golden crust, and the lemon glaze gives it a sweet and tart final touch. For springtime, summer, or any other occasion when a burst of citrus flavor is needed, this delightful lemon loaf is ideal.”

Ingredients:

  1. – Two teaspoons of baking powder
  2. – One cup of granulated sugar
  3. – One cup of all-purpose flour
  4. – 1/2 teaspoon salt
  5. – 1/2 cup melted unsalted butter
  6. – Two sizable eggs
  7. – Two tsp freshly extracted lemon juice
  8. – One tsp of vanilla extract

Guidelines:

  • – Set the air fryer’s temperature to 320°F.
  • – Combine the flour, sugar, baking powder, and salt in a medium-sized basin.
  • – Beat the butter and sugar in a large mixing basin until they are light and creamy.
  • – One egg at a time, adding and beating well after each addition.
  • Add the vanilla essence and lemon juice, and stir.
  • – Mixing until just incorporated, gradually add the dry ingredients to the wet ones.
  • – Fill an air fryer cake pan that has been well-greased and dusted with the batter.
  • – Cook the pan in the air fryer that has been prepared for A toothpick put into the middle should come out clean after about 20 to 25 minutes.
  • – After letting the loaf set in the pan for ten to fifteen minutes, glaze it and serve it.

Air Fryer Crunch wrap Supreme

Air Fryer Crunch wrap Supreme

You have to try this homemade crunch wrap supreme air fryer meal; it’s a hit with everyone!

Why drive past Taco Bell when you can make this easy-to-make at-home version of a crunch wrap? A delicious, portable treat that resembles takeout is made by wrapping seasoned meat, lettuce, tomatoes, and cheese and then topping it with sour cream and nacho cheese sauce!

Ten minutes for preparation
20 minutes for cooking
thirty minutes in total

Ingredients for the Ultimate Air Fryer Crunch Wrap:

  1. Five large tortillas
  2. one-third cup of water and one pound of ground beef
  3. 3 tsp taco seasoning
  4. ⅔ cup of cheese sauce for nachos
  5. Two cups of tortilla chips or four tostadas
  6. one cup of iceberg lettuce, shredded
  7. a single cup of tomatoes, diced
  8. Two cups of blended shredded cheese
  9. Half a cup of sour cream

The Air Fryer Crunch Wrap Supreme Instructions:

  • Adjust the temperature of the air fryer to 400°F.
  • Medium heat should be used to brown the ground beef in a big pan. Once the fat has been rendered out, add ⅓ cup water and taco seasoning to the pan. Simmer for five minutes.
  • Cut a tortilla in half lengthwise. The remaining four tortillas should be microwaved for 20 seconds to avoid shattering.
  • Place a quarter of a cup of meat in the center of the tortilla.
  • Top with cheese sauce, sour cream, lettuce, tomato, and tostada shells shredded.
  • Place a quartered tortilla piece in the center, then fold the tortilla over to enclose it.
  • Once the tortillas are smeared with vegetable oil, raise them into the air.
  • seam side down in the frying basket.
  • Cook for 3 to 4 minutes, or until golden brown. Flip the wrapper over and continue frying after 3–4 minutes.

Observations:

  • To avoid spillage, make sure the tortilla shells are not packed too full before air-frying!
  • Use toothpicks to secure the wrap while it is folded.
  • Remove right away, then put the seam side down in the air fryer.
  • For an additional crispy crunch, lightly coat the wraps with cooking spray and respray them in the air fryer.

Deluxe No-Bake Chocolate Cake

Deluxe No-Bake Chocolate Cake

Regarding the Cake Base:

For the Cake Filling,

  1. 500 cocoa cookies
  2. One yolk
  3. One egg
  4. 60g cornflour and 150ml chilled milk
  5. 100g sugar, 25g powdered cocoa
  6. 250 milliliters of milk
  7. 50 grams of butter
  8. 50g of plums

Regarding the Ganache de Chocolate:

  1. 70 grams of dark chocolate
  2. 70 milliliters of cream (33%).
  3. 5g of butter 👩‍🍳

Guidelines:

  • Cake Substance: Using a food processor or rolling pin enclosed in a plastic bag, finely crush the cocoa biscuits into crumbs. To make a crust, press the cookie crumbs into the bottom of a cake pan or springform pan.
  • Cake Filling: Whisk the yolk, egg, cornstarch, and cold milk together until they are smooth in a saucepan.
    Mix in the milk, sugar, and cocoa powder and whisk constantly over medium heat until the liquid thickens.
    Take off the heat,
  • When the butter has melted and the mixture is smooth, add the plums and stir.
  • Evenly distribute the filling over the cookie crust in the pan after pouring it on.
  • Ganache with chocolate: Heat the cream in a microwave or on the stovetop until it’s heated through but not boiling.
  • Transfer the heated cream onto the butter and dark chocolate in a heat-resistant basin. After a minute, give it a quick swirl to make it smooth.
    Putting together: Evenly distribute the chocolate ganache over the cake filling as you pour it over.
  • The cake should be chilled for several hours or until it solidifies.
    Savor this delicious Deluxe No-Bake Chocolate Cake, which is hidden!

Delicious and Healthy: Oatmeal Diet Cake Recipe

Delicious and Healthy: Oatmeal Diet Cake Recipe

Who says giving up delicious treats is part of dieting? This is not the case with our oatmeal diet cake recipe. This delicious dessert is simple to make and a guilt-free treat. It’s a filling and healthful treat that combines the benefits of yogurt, oats, plus a few additional ingredients.

Components

  1. 130 grams of oat flour
  2. Yogurt weighing 120 grams
  3. Two oranges
  4. Thirty grams of stevia sweetener (or sixty grams of sugar, erythritol, or maltitol)
  5. two eggs
  6. 240 milliliters of steaming water
  7. One tsp vanilla essence
  8. One-tsp each of vinegar and baking soda
  9. Just enough avocado oil
  10. Ginger, grated (enough)
  11. Minimal amounts of cinnamon

Steps in Preparation

  • To begin, put the oat flakes in the glass of the blender, pulse until they are finely ground, then pour them into a bowl, pour in the water, stir, and Give them five minutes to rest.
  • As the oats are resting, peel and chop the oranges into segments. Put the segments in the blender with the yogurt. Blend until the yogurt is well combined. Transfer the liquid into the oat flakes.
  • Add the eggs, vinegar-infused bicarbonate of soda, sweetener (or sugar), grated ginger, and vanilla essence. Using a hand whisk, combine all ingredients to create a smooth and uniform texture.
  • When the batter is done, use avocado oil to butter a tiny donut form. The dough should then be added, and it should be lightly tapped on the table to ensure fair distribution.
  • Finally, bake at 180°C for 50 minutes in an oven that has been prepared. When it’s finished, take the cake out of the mold, place it on a dish, and serve.

Why Opt for Oatmeal?
For good reason, the main ingredient in this diet cake is oatmeal. It’s an excellent source of dietary fiber, which promotes better digestion and prolongs feelings of fullness. Oatmeal is also a great option for a healthy diet because it is full of important nutrients.

Advantages of Diet Cake Made with Oats

  • Calorie-conscious people will love this cake because it is low in calories.
  • High in fiber: Oats provide all the fiber required for a gut that works properly.
  • Natural sweetness: The cake maintains its sweetness without the addition of sugar thanks to the use of stevia sweetener or sugar replacements.
  • Nutritious and satisfying: This cake will provide you the necessary nutrients and fulfill your sweet desire.
    Value Nutritionally

A brief summary of the nutritional content per serving is provided below. of our dessert for the oatmeal diet:

About 180 kcal in calories
26 g of carbohydrates
5 g protein and 3 g fiber
6 g of fat

Changes and Advice
You are welcome to alter this recipe to your preference. For added taste, you can add almonds, dried fruit, or a drop of honey. To preserve the health advantages, don’t forget to modify the components as necessary.

Magical New Year’s Cake! Simple and Delicious Recipe

Magical New Year’s Cake! Simple and Delicious Recipe

Buttercream ingredients:

  1. Three eggs from chickens
  2. A little amount of vanilla extract
  3. 40 grams of sugar
  4. 40 grams of corn starch
  5. 180 milliliters of milk
  6. 150g of room temperature butter

Items needed to make the dough:

  1. Four eggs from chickens
  2. 25 grams of sugar
  3. 35 milliliters of vegetable oil
  4. A little amount of vanilla extract
  5. 45 milliliters of milk
  6. 75 grams of flour
  7. one-third tsp baking powder
  8. 70 grams of sugar

What’s needed to make Chocolate Ganache:

  1. 130g of dark chocolate with 54-56% cocoa content
  2. 130ml (33%), of hot cream

Components Needed to Soak the Cake:

  1. 30 gram of vanilla extract
  2. 50 milli gram  of sugar
  3. A little of hot water

📜 Decoration Ingredients:

  1. Nine or ten cranberries
  2. A rosemary sprig

Guidelines:

Buttercream:

  • Beat the eggs and a little amount of vanilla essence together in a bowl until thoroughly blended.
  • Combine cornstarch and sugar in a separate basin.
    Whisk continually as you gradually add the sugar-cornstarch mixture to the eggs.

Warmth

  • the milk until it’s heated through without coming to a boil, then gradually add it to the egg mixture while continuing to whisk.
  • Pour the ingredients into a saucepan and simmer, stirring frequently, over medium heat until the mixture thickens and forms a pastry cream.
  • Take it off the stove and let it to come to room temperature.
  • Beat the room temperature butter until it becomes creamy in a separate bowl.
  • When the pastry cream has cooled, gradually add it to the butter and mix until smooth and fluffy.
    Dough
  • 9. Set the oven temperature to 175°C, or 350°F. Put parchment paper into a baking pan.
  • Mix the eggs, sugar, vegetable oil, and vanilla essence well in a bowl.
  • Add the milk to the egg mixture after heating it until it’s hot but not boiling.
    In a different dish, sieve
  • combining the baking powder and flour.
  • Mixing until smooth, gradually incorporate the dry ingredients into the wet ones.
  • whisk the egg whites until foamy in a clean basin, then gradually add the sugar and whisk until firm peaks form.
  • Till the batter is thoroughly blended, gently fold in the beaten egg whites.
  • When a toothpick put into the center comes out clean, bake the mixture for about 25 to 30 minutes in the baking pan that has been prepared.
  • Allow cake to cool in pan.

Ganache with chocolate:

  • Finely chop the dark chocolate and transfer it to a heat-resistant dish.
  • Pour the heated cream over the chopped chocolate once it has reached a temperature of just below boiling.
  • After a minute, mix until the chocolate is well incorporated. smooth and the ganache has melted.

Putting together:

  • Cut the cake into two horizontally equal layers when it has cooled.
  • Combine sugar, vanilla essence, and warm water to soak.
    Dip each layer of cake into the sugar syrup.
  • Over the initial layer of cake, spread a layer of buttercream.
  • After putting the second cake layer on top, use the leftover buttercream to cover the edges and top of the cake.
  • Drizzle the cake’s top with chocolate ganache, letting it run down the edges.
  • Add some cranberries and a rosemary sprig for decoration.
  • This enchanted dessert for Christmas and New Year’s is prepared to wow your visitors! Have fun!