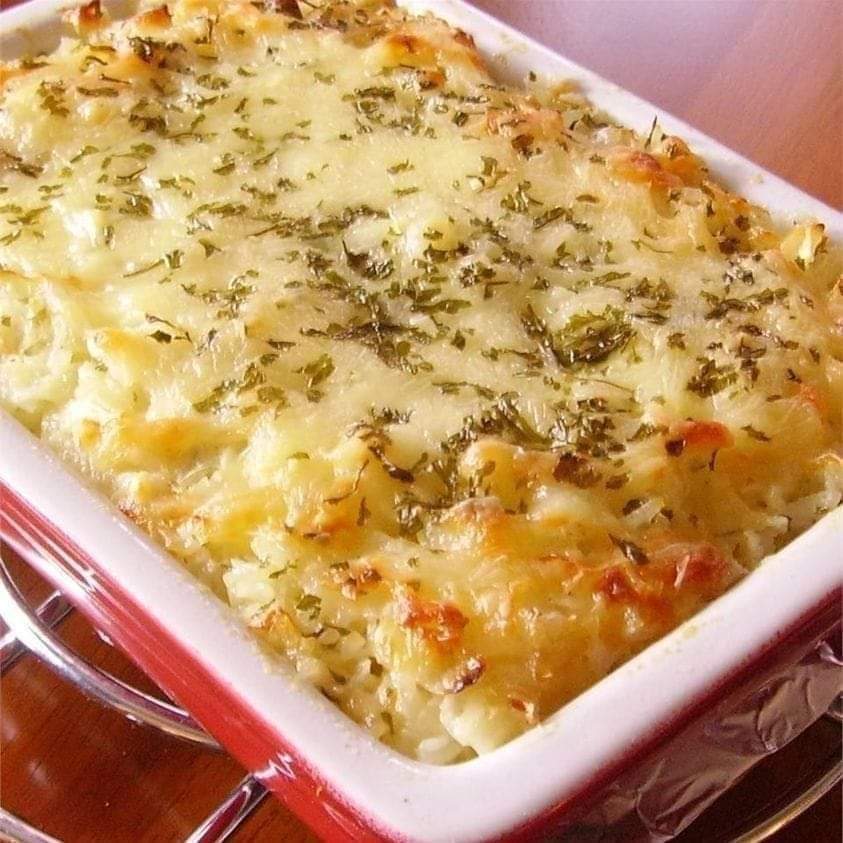
layerd pasta salad

layerd pasta salad

A classic summertime recipe, layered pasta salad is great for potlucks, picnics, and barbecues. This well-liked summertime mainstay is elevated by the flavorful ham, crunchy veggies, colorful layers of pasta, and zesty dressing. Plan beforehand to streamline the entertaining process or guarantee a seamless exit from your event without compromising on presentation or taste.

INGREDIENTS

Getting dressed:

  1. one-half cup mayonnaise
  2. one-third cup sour cream
  3. Two tsp white wine vinegar
  4. One teaspoon each of sugar and Dijon mustard
  5. One-half tsp Worcestershire sauce
  6. Half a teaspoon of salt
  7. half a teaspoon of pepper, black

 salad

  1. Three cups of cooked and drained macaroni pasta
  2. Chopped romaine lettuce, three cups
  3. Half a red bell pepper, chopped
  4. 1/4 cup finely diced red onion
  5. 1/2 cup thawed frozen green peas
  6. one-third cup finely chopped celery
  7. 1/3 cup black olives and 1 1/2 cups chopped ham
  8. Half a cup of shredded cheddar cheese

Instructions

  • Mix the mayonnaise, sour cream, sugar, Dijon mustard, Worcestershire sauce, white wine vinegar, salt, and black pepper in a small bowl until thoroughly blended. Put aside.
  • Layer the ingredients (lettuce, cooked and drained macaroni pasta, diced red bell pepper, finely sliced red onion, thawed green peas, chopped celery, diced ham, black olives, prepared dressing, and shredded cheddar cheese) in a large trifle bowl or glass dish.
  • As desired, repeat the layers, making sure Every layer is spread equally. After assembling all the components, securely cover the dish with lid or plastic wrap and place it in the refrigerator for minimum of five hours to let the flavors combine and the salad cool. Toss the salad gently just before serving to make sure the dressing gets to all of the layers.
  • This delicious Layered Pasta Salad has layers of flavor that are nice to eat cold. NoteThis salad is great make-ahead dish for any summer get-together because it can be made up to 24 hours in advance.

weight watcher apple cinamom cake

weight watcher apple cinamom cake

Fall meal is made of apples, spices, and all the good stuff. All of it is included in this Weight Watchers apple cake without going over your daily calorie allotment. Even if you’re not usually into low-calorie baking, this recipe is simple to make because it only calls for “regular” baking ingredients—neither aspartame nor artificial sugar. It’s flavorful without being excessively sugary, and it works well as a dessert after dinner or as a breakfast treat.

Components:

CAKE:

  1. One package of sugar-free two-layer white cake mix
  2. 1 teaspoon powdered cinnamon
  3. One cup nonfat sour cream
  4. three eggs
  5. One (21 oz) can of sugar-free apple pie filling an
  6. d 1/4 cup of water

GLAZE:

  1. One cup of sugar replacement powder
  2. 1–1 1/2 tablespoons of skim milk or unsweetened almond milk

Guidelines:

  • Set oven temperature to 350°F.
  • The fat-free sour cream, eggs, water, ground cinnamon, and sugar-free cake mix should all be combined in a big basin. Using a mixer, blend until smooth.
  • Grease a 9 x 13-inch baking dish and transfer the batter into it.
  • Cover the entire surface of the batter with spoonfuls of the no-sugar apple pie filling.
  • A toothpick put into the center should come out clean after 40 minutes of baking.
  • To make the glaze, combine the almond milk and powdered sugar replacement in a small bowl.
  • Drizzle the glaze over the cake after it has cooled.
  • With less points, savor your delectable W/W Apple Cinnamon Coffee Cake.

Carrot Cake Recipe

Carrot Cake Recipe

We’re going to share our go-to carrot cake recipe with you today! The flavours of the carrots, spices, pecans, coconut, and crushed pineapple combine to create an incredible scratch recipe.

Ingredients:

  1. 2 ½ cups (325g) all-purpose flour
  2. One and a half teaspoons baking soda
  3. one and a half teaspoons baking powder
  4. two teaspoons ground cinnamon
  5. one and a half teaspoons salt
  6. two cups (400g) sugar
  7. four large eggs
  8. one cup vegetable oil
  9. two teaspoons vanilla extract
  10. two cups (180g) grated (small pieces) carrots (do not use packaged pre-shredded carrots, they are too dry)
  11. one and a half cups (50g) sweetened coconut (we used Baker’s Angel Flake sweetened coconut)
  12. one and a half can crushed pineapple placed in a strainer and allowed the liquid to drain off
  13. one eight ounce can of pineapple.I use a fork to squeeze out some of the liquid, but not all of it.

FOR THE CREAM CHEESE FROSTING (IF YOU PLAN TO DO A LOT OF PIPING

YOU CAN EASILY DOUBLE THIS RECIPE)

  1.  Two sticks (226g) of softened, unsalted butter
  2. 16 ounces of cream cheese (two 8-ounce containers were used) (Not fat-free)
  3. Two teaspoons (8g) of vanilla essence
  4. one-half teaspoon (2g) of salt
  5. six to six and a half cups (690g to 747g) of confectioners’ sugar

Instructions

 For making the carrot cake

  1. Heat the oven to 350°F.
  2. Grease the bottoms of 3 (8-inch) or 2 (9-inch) round pans with shortening, line the pans with parchment paper or wax and flour the paper and pans to make turning them out easier.Use the parchment paper; carrot cake tends to stick.
  3. Mix the flour, baking powder, baking soda, cinnamon, and salt for 30 seconds. Put Aside.
  4. Add 2 cups sugar, 4 eggs, 1 cup oil, and 1 tsp vanilla to the bowl of your mixer. At medium speed, mix for two to three minutes until well combined and light in colour.
  5. Once the flour mixture is moistened, add the coconut, crushed pineapple, pecans, and carrots. Stir with a spoon.
  6. After inserting a toothpick into the centre, bake for 35 minutes at 350 degrees until it comes out clean.
  7. The cake may sink slightly in the centre if you open the oven door too soon or check the doneness of the cake by touching the centre until very close to the finish of baking.
  8. Yields a batter of 6 ½ cups.
  9. After 10 minutes of cooling on a wire rack, remove the cake layers from the pan. Before icing, let everything cool fully.

For the frosting of cream cheese

  1. Slice up the butter and put it to the mixing bowl. Beat the butter until it becomes smooth and soft, using a low to medium speed.
  2. After chopping the chilled cream cheese into small bits, mix it with the butter and beat on low to medium speed until combined. You might need to soften the cream cheese a little bit more if you’re using a hand mixer.
  3. Include the vanilla. Add the powdered sugar gradually and beat on low speed until well combined.
    Up the speed of the mixer and mix until frothy. Avoid overbeating, as it may turn out overly tender. Simply chill it for a little period of time to slightly firm it up if it gets too soft.
  4. When applied while still refrigerated, this frosting will pipe more easily. It can be prepared ahead of time, chilled, and then let to soften slightly (do not microwave) before remixing when needed.
  5. Frost an 8-inch cake with three layers.

Air Fryer Zucchini Bread Recipe

Air Fryer Zucchini Bread Recipe

Zwiebel bread cooked in the air fryer is light and crunchy on the outside. You’ll adore this sweet little batch breakfast or dessert.You could certainly use your own recipe for zucchini bread if you have one. Just keep in mind that the basket of your air fryer can only hold a Zucchini Muffins . The baking time for the latter would be approximately same.

Prep Time: 15minutes 
 Cook Time: 30minutes 
 Servings:12

Ingredients

  1. 1/2 tsp baking powder
  2. 1.5 c all-purpose flour
  3. One-half teaspoon baking soda
  4. Half a teaspoon of salt
  5. Half a teaspoon of cinnamon
  6. 1/4 teaspoon of nutmeg
  7. two eggs
  8. One cup of sugar
  9. One-half cup vegetable oil
  10. 2 c zucchini shredded, press gently inside paper towel to absorb excess moisture
  11. One teaspoon vanilla

Instructions:

  1. Mix all of the dry ingredients together in a small bowl. Whisk together eggs, sugar, oil, and vanilla in a separate basin. Combine thoroughly.
  2. Stir the dry ingredients into the wet mixture gradually until thoroughly mixed. Finally, carefully fold in the zucchini shreds.
  3. Coat two small loaf pans with nonstick cooking spray. Between then, divide the batter in half.
  4. After 5 minutes of preheating to 310 degrees Fahrenheit, place the loaves inside and bake for 30 to 35 minutes. Use a toothpick to check the centre at 30. Once there are only crumbs remaining and no more moist batter in the centre, remove.

In what way is zucchini bread best stored?

First, let it to reach room temperature. After that, take them out of the pan and wrap them in plastic wrap; do not cut the portions you plan to store. Place that in a freezer bag or foil and store it in the freezer or on your counter for up to four days.

How much time is needed to cool zucchini bread?

Ten minutes is a fantastic place to start. Take out of the heated tray and place on a cooling rack. To ensure it doesn’t cook any longer, I like to remove it from the pan completely after 10 to 15 minutes and place it on the rack.
Equipment:

Zucchini Muffins

Zucchini Muffins: the easy and healthy muffin recipe

You can prepare these zucchini muffins quickly and easily during the summer. It’s the ideal choice for a quick snack or to carry in lunchboxes because it’s full of healthy vegetables. Savoury in flavour, the zucchini bread muffins are airy and moist. Just a few basic cupboard ingredients—zucchini, red pepper, eggs, cheese, flour, baking powder, salt and pepper—are needed to prepare them. Just combine the ingredients for the batter, transfer it into the moulds, and bake it! Since these muffins are a spin on the traditional zucchini bread, they can be eaten as a light lunch, a snack or even as a side dish. It’s a fantastic method to consume extra veggies! It’s so simple to create that everyone.

Ingredients:

  1. One ZUCCHINI
  2. 1/4 one red pepper
  3.  EGGS Two
  4. Gratted Cheese One cup, 200 grammes
  5. 4 g (1 tsp) SALT
  6. 4 g (1 tsp) of pepper
  7. 125 g (1 cup) of flour
  8. Baking Powder  5 g (one teaspoon

Directions:

  1. Place two eggs in a bowl, season with salt and pepper, and whisk.
  2. Add the grated zucchini to the bowl.
  3. Add the shredded cheese and diced red pepper.
  4. Add the flour and baking powder after mixing.
  5.  Thoroughly combine and transfer to a muffin pan.
  6. Bake for 25 minutes at 180°C. Assist.

For Air fryer:

  1. Set the air fryer’s temperature to 400°F, or 200°C.
  2. Muffins are air-fried for four minutes at 400°F/200°C.
  3. Avoid opening the air fryer once the cooking time has elapsed. After lowering the temperature to 320°F/160°C, air fried the cake for a further 14–16 minutes, or until a toothpick or cake tester comes out clean.
  4. After taking the muffins out of the air fryer, place them on a cooling rack to cool.

Notes :

Warm the muffins in the microwave or serve them at room temperature.

Storage Ideas for Zucchini Muffins

The zucchini bread muffins can be kept for up to five days at room temperature in an airtight container. Alternatively, you might wrap each one separately in plastic wrap.

Tips for Making Zucchini Bread Muffins

Because they are loaded with vegetables, these muffins are nutritious. They are therefore ideal for toddlers!

  • Any other cheese, such as feta, cheddar, or even ricotta, will work.
  • A mixture made with ¾ cup flour, ½ cup sugar, ¼ tsp baking powder, baking soda, ground cinnamon, and salt, one egg, ¼ cup canola oil, one cup grated zucchini, ½ cup walnuts, and ¼ cup cranberries or currants can also be used to make sweet zucchini muffins. You can also add chocolate chips, dried banana chips, lemon extract, or even a chocolate drizzle to this batter.
  • Mix the liquid ingredients (1/4 cup melted coconut oil, ¼ cup coconut sugar, ¼ cup maple syrup, 1 ½ egg replacements, 1 tsp vanilla extract) with the dry ingredients (2 cups oat flour, ½ tsp baking soda, 1 tsp baking powder, 1 tsp ground cinnamon, and ¼ tsp salt) to make a vegan and gluten-free muffin. Add one cup of vegan chocolate chips and one cup of grated zucchini.
  • Use a kitchen towel to drain out the extra water from the grated zucchini for best results!
  • Measure out scoops using an ice cream scoop to ensure muffins are precisely the right size.

Recipe for Zucchini Muffins:

Grate the zucchini first, and then mix it with the other ingredients to make a batter. Fill muffin liners with batter, then bake for golden brown. Present and savour!

Equipment:

Paula Deen’s 5-Minute Fudge

Paula Deen’s 5-Minute Fudge

Without fudge in the house, the holidays are not the same. I will admit that the time it takes to make fudge is the reason I gave up on it. But now there’s fudge that you can make in % of the time.

You should try this dish and make sure it is on hand. You can have fudge whenever you’d like and make this at any moment.

INGREDIENTS

  1. 1/2-2/3 cups white sugar
  2. 2.3 cups of dried milk
  3. One tablespoon of butter without salt
  4. 1/2 tsp salt
  5. One package (6 ounces) of milk chips of chocolate
  6. sixteen huge marshmallows
  7. One teaspoon of real vanilla extract
  8. 1 cup of almonds, chopped

DIRECTIONS

  • In a medium saucepan, mix together the sugar, milk, butter, and salt. Bring to a boil and simmer, stirring constantly, for 5 minutes.
  • Add chocolate chips and heat through.
  • Take off the heat and mix in the nuts, vanilla, and marshmallows. Blend thoroughly.
  • Transfer to an 8-inch pan. Once cooled, cut into squares.

Frozen Fruit Salad

Frozen Fruit Salad

A delicious and cool dessert, frozen fruit salad is ideal for warm weather or as a sweet palette cleanser following a meal. This meal usually starts with a vibrant spread of fruits, frequently consisting of a combination of berries such as blueberries, strawberries, and raspberries, along with slices of banana, pineapple, and juicy grapes. These fruits are picked because they freeze well without becoming mushy, and because their flavours and textures go well together.

Usually, a creamy ingredient is used with the fruit to give the salad body and richness. Cream cheese, whipped cream, or whipped topping are common additions to this creamy combination. Yoghurt or condensed milk are occasionally added for sweetness. Additionally, some recipes call for micro marshmallows, which add a distinctive sweetness and soft texture.

In order to guarantee fair distribution and avoid crushing the more fragile fruits, the creamy mixture is gently mixed into the fruit when assembling the salad. After that, the blended mixture is transferred into a mould or baking dish. For a more structured look, some variations of this salad arrange the fruit and cream individually.

Ingredients:

  1. Two cups of mixed berries (strawberries, raspberries, and blueberries)
  2. one cup of diced pineapple
  3. one cup of sliced banana;
  4. Half a cup of grapes
  5. 8 ounces of cream cheese
  6. 1 cup of condensed milk
  7. ½ cup of mini marshmallows
  8. ½ cup of lemon juice
  9. and 2 tablespoons Garnish with ¼ cup of fresh mint leaves and chopped nuts, if desired.

Direction:

Fruit Preparation:

  1. Start by cleaning all of the pineapple, grapes, and berries. Pat them dry gently.
  2. Cut the pineapple into bite-sized pieces, quarter the strawberries, and cut the grapes in half.
  3. To keep the banana from browning, cut it into slices and sprinkle them with lemon juice.

Preparing the Creamy Mixture:

  1. Beat the cream cheese until it’s smooth in a big basin.
  2. Condensed milk should be added gradually until the mixture is smooth and well-combined.
  3. Be careful not to deflate the whipped cream as you gently incorporate it into the cream cheese mixture.
  4. Blending Fruits with Creamy Concoction:
  5. To the cream mixture, add the small marshmallows and the prepared fruits.
  6. To prevent breaking the fruit, gently fold everything together.

Freezing:

  • Pour the batter into a mould or baking dish of your choosing.
  • If you like stacked salads, layer the fruit first, then the cream, and so on.
  • Place cling film over the top and freeze for a minimum of 4 hours, or until solid.

Serving Tip

  • About 20 to 30 minutes before serving, take the frozen fruit salad out of the freezer.
  • Scoop into dishes or cut into wedges.
  • If preferred, garnish with a dusting of chopped nuts and fresh mint leaves.

This frozen fruit salad has a thick, creamy texture along with the sweetness and tang of the fruits, making it the ideal summertime treat. This is a flexible recipe that lets you change ingredients to suit your tastes or the fruits that are in season. Serve it at your next BBQ or family get-together, or just savour it as a delicious dessert on any day!

CUBED STEAK, ONION GRAVY

CUBED STEAK, ONION GRAVY

One of our favorite meals is cubed steak with onion gravy. This is a simple and quick recipe for cubed beef and gravy. Add the salad, bread, and side dish. This could be served with rice. If there are any leftovers, they are excellent reheated. The recipe can be doubled. I usually make this recipe because it’s a great, low-cost weekday supper that you can quickly put together with a few simple side dishes. I love onions so much and use them in so many recipes since they are so flavorful. I predict that you’ll make this one again and again!

INGREDIENTS

  • 1.5 to 2 pounds of steak cubes
  1. 1/4 cup flour,
  2. 1/4 tsp salt,
  3. 1/4 tsp pepper,
  4. 1/4 tsp garlic powder
  5. half a cup of oil
  6. One 14-oz can of beef broth
  7. One onion, sliced into rings
  8. One container of dried onion soup mix

DIRECTIONS

  • In a shallow bowl, combine the flour, salt, pepper, and garlic powder. Apply the flour mixture on the cubed steak. Heat up some oil in a skillet, then cook the steak for five minutes on each side, or until it’s brown and cooked through. Take the steak out of the pan.
  • Cook the onions in the pan with the beef stock and dry onion soup mix until they are soft. If desired, you can use some of the leftover flour to thicken the gravy.
  • Pour gravy over steak or serve as an accompaniment. 4 servings

steaks Fajita

 steaks Fajita

Recipe for Steak Fajitas: quick and simple dish that’s great for weekend get-togethers or weeknight dinners! served with pile of warm tortillas and toppings, and made with meat, peppers, and onions. They are consistently favored!

Ingredients:

  1. Two pounds of ½-inch-thick pieces of skirt, flank, sirloin, or hanger steak
  2. One red pepper, seeded and thinly sliced
  3. One green or yellow pepper, thinly cut and deseeded
  4. One medium onion, peeled and thinly sliced
  5. Three teaspoons of olive oil
  6. One tablespoon of lime juice
  7. Half a teaspoon of red pepper flakes
  8. One teaspoon of cumin powder
  9. a dash of cayenne
  10. One-half tsp Kosher salt
  11. half a teaspoon of freshly ground black pepper
  12. two minced garlic cloves
  13. 6–8 warmed tortillas

Guidelines:

first step:

Put the meat in a bag that can be sealed. Transfer the onion and peppers to a different resealable bag. To a jar with a screw top or tight fitting lid, add the olive oil, lime juice, chili powder, ground cumin, cayenne pepper, salt, black pepper, and garlic.

In a stripslid. Shake until thoroughly mixed. Transfer half of the marinade onto the steak, then distribute the remaining half among the vegetables. Keep the marinade in the jar until you’re ready to cook the steak fajitas. Refrigerate for a minimum of one hour or overnight after securely sealing the bags.

step two

When cooking time comes, put a big skillet over medium-high heat. Add the vegetables to the skillet and cook for about 5 minutes, or until they are barely crisp and tender. After removing the veggies from the skillet and placing the steak strips back in, cover the skillet. Return the vegetables to the skillet with the marinade that was set aside after the steak has cooked through, which should take 7 to 10 minutes.

step three

Serve hot tortillas beside any chosen extra garnishes.

Air Fryer Hot Pockets

Air Fryer Hot Pockets

The bottom line is that hot pockets are a delectable convenience. In less than ten minutes, you may enjoy a full supper by taking the portable cheese-filled bundle and heating it up. The bread-like wrapper somehow complements any mix of gammon, cheddar, bacon, egg, cheese or imitation pizza. I found that crescent dough sheets marked “pop and fresh” need very little work—all you have to do is roll. Continue reading for some homemade hot pocket recipe ideas.

Filling:

A few of our selections are quite simple to prepare. The individual recipes shown below yield enough filling for twelve hot pockets, but feel free to experiment by varying the proportions. Call you.

The Buffalo chicken stuffing consists of cheddar cheese, broccoli, and your preferred Buffalo sauce. The combination of mozzarella and Pecorino cheeses gives the spinach-artichoke mixture a cheesy, garlicky taste. Parmesan is also an option. Lastly, tomato sauce, mozzarella, and pepperoni pieces make up the pepperoni cheese filling. Add some dried oregano to give it a pizza-like flavour.

Storage:
Once air-fried, hot pockets keep best for three days in the fridge. You may use the oven or air fryer to warm them as well. Additionally, you can stuff them and freeze them uncooked for up to two weeks.

Components :

BUFFALO CHICKEN FILLING

  1. Two tablespoons of extra virgin olive oil, split
  2. 2 c.florets of broccoli
  3. Cut three (8-ounce) chicken breasts into 1/2″ pieces and sprinkle with 3 tsp of kosher salt.
  4. One-third cup buffalo sauce
  5. 2 1/4 tsp. honey
  6. 12 thin slices cheddar cheese

FILLING: SPINACH-ARTICHOKE

  1. Two tablespoons extra virgin olive oil
  2. Sixth grade packed baby spinach
  3. Chopped artichoke hearts, 3/4 cup
  4. 1/4 teaspoon kosher salt
  5. 1 tablespoon plus 3/4 teaspoon of garlic powder, separated
  6. Cream cheese, six ounces
  7. 1 1/2 cups of mozzarella whole-milk shredded
  8. Grated Pecorino Romano, 3/4 cup

Filling: Pepperoni Cheese

  1. 1 1/2 cups of mozzarella whole-milk shredded
  2. 96 pepperoni slices
  3. Tomato sauce, 3/4 cup
  4. 3/4 teaspoon of dried oregano
  5. ASSEMBLY 3 (8 oz.) Crescent dough sheets from Pillsbury
  6. One big egg
  7. Cooking spray with olive oil
  8. (Optional) coarse salt

Directions

CHICKEN BUFFALO HOT POCKETS

First Step
One tablespoon of oil should be heated in a big skillet over medium heat. Add 1 1/2 teaspoons of kosher salt to the broccoli and simmer, turning periodically, for 5 to 7 minutes, or until the broccoli is soft and lightly browned. Move to a large bowl.

Step Two
Rub the chicken with the last tablespoon of oil after seasoning it with the remaining 1 1/2 teaspoons of kosher salt. Cook chicken in same skillet over medium heat, rotating periodically, until cooked through, about 6 minutes, or until an instant-read thermometer inserted into thickest section registers 165°. Place in the bowl with the broccoli. Stir together the honey and Buffalo sauce. Allow to cool.

Step Three:

To make a total of twelve, divide each dough sheet into four (6″ by 3) rectangles. On one half of each rectangle, arrange the filling lengthwise, leaving a small border all the way around. Add cheese on top.
Step Four
Whisk the egg with a splash of water in a small bowl. Apply egg wash to the dough’s edges. Rectangular long side folded over; press edges to secure. Apply egg wash to the dough’s surface.

Step 5:

Use cooking spray to coat the air fryer basket. Fill the prepared basket with a single layer of filled dough, working in batches. Cook for 4 to 5 minutes at 375° until golden brown. If used, sprinkle with coarse salt.

Artichoke-Spinach Hot Pockets

First Step
Heat the oil in a medium-sized skillet over medium heat. Saute the spinach, artichokes, kosher salt, and one tablespoon of garlic powder for approximately five minutes, stirring from time to time, or until the spinach wilts.

Step 2:

Turn off the stove. Add Pecorino, mozzarella, and cream cheese and stir. Allow to cool.

Step 3:

To make a total of twelve, divide each dough sheet into four (6″ by 3) rectangles. On one half of each rectangle, arrange the filling lengthwise, leaving a small border all the way around.
Step Four
Whisk the egg with a splash of water in a small bowl. Apply egg wash to the dough’s edges. Rectangular long side folded over; press edges to secure. Apply egg wash to the dough’s surface. Add the final 3/4 tsp of garlic powder on top.

Step 5:

Use cooking spray to coat the air fryer basket. Fill the prepared basket with a single layer of filled dough, working in batches. Cook for 4 to 5 minutes at 375° until golden brown. If used, sprinkle with coarse salt.

Spiced Cheddar Hot Pockets

First Step
To make a total of twelve, divide each dough sheet into four (6″ by 3) rectangles. Place one tablespoon of cheese lengthwise on half of each rectangle, allowing a small space for the edges, then place eight pepperoni slices on top. Transfer 2 tablespoons of sauce onto the pepperoni and top with 1 tablespoon of cheese.

Step 2:

Beat the egg with a splash of water in a small bowl. Apply egg wash to the dough’s edges. Rectangular long side folded over; press edges to secure. Sprinkle oregano over dough and brush with egg wash.
Step Three;

Apply cooking spray to the basket of an air fryer. Fill the prepared basket with a single layer of filled dough, working in batches. Cook for 4 to 5 minutes at 375° until golden brown. If used, sprinkle with coarse salt.