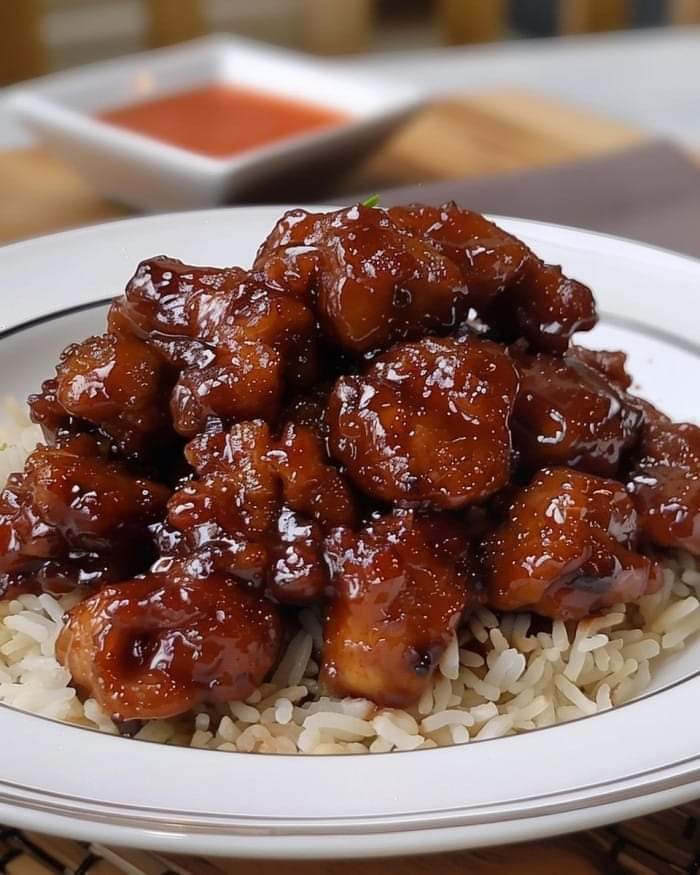
strawberry cheesecake donut holes

strawberry cheesecake donut holes

In order to make amends and in light of Valentine’s Day quickly approaching, these 52-calorie strawberry cheesecake donut holes had to step forward and take centre stage. No, it’s not as simple as realising that you’re gaining 20 pounds just by staring at them! Oh, yeah. Thank me later. They’re low fat, low calorie, and safe. They’re also compatible with weight watchers.

INGREDIENTS

  1. One cup self-rising flour (or plain/all-purpose flour) is required for donut holes.
  2. Two teaspoons of sugar (raw, coconut, or white)
  3. Half a teaspoon baking powder (or half a teaspoon baking soda if using plain or all-purpose flour)
  4. ¼ teaspoon salt
  5. Two tablespoons of melted coconut oil, canola oil, or olive oil
  6. One big egg
  7. Two tsp finely ground vanilla extract
  8. Half a cup of unsweetened almond milk (or skim or low-fat milk)
  9. 1/4 cup sugar for coating, or a sweetener with a moderate flavour

filling

  1. 1/3 cup (70g | 2 12 oz)cream cheese with less fat, spreadable or in a block
  2. Two teaspoons of icing sugar powder
  3. Two tablespoons of strawberry jelly or jam, or topping, if desired

Instructions:

  1. Set oven temperature to 176C/350F. Apply cooking oil spray to a 24-count mini muffin pan; use a paper towel to remove any excess and set aside. As an alternative, use a cake pop maker or tray.
  2. Combine all the dry ingredients in a big bowl and mix them together. In the centre, create a well and pour in the milk, egg, vanilla, and oil. Beat the mixture until it’s lump-free and smooth.
  3. Pour approximately two teaspoons of batter into each muffin hole, filling it to a quarter of the way. A toothpick put into the centre of a donut should come out clean after baking for 10 to 15 minutes, or until they are brown in colour. Give them a full five minutes to cool. Gently roll each donut hole in the sugar while it’s still warm.
  4. While the donuts are baking, make the cheesecake filling. Combine the cream cheese together in a small bowl with the sugar. Beat until smooth and combined. Add the strawberry jam,jelly or topping and mix through slowly until creating an almost marble/swirl effect (if using jam, make sure any bigger fruit pieces are removed before using, or they will get jammed in the nozzle).
  5. Fill a piping bag with the cheesecake filling, and using a narrow nozzle, fill each donut with the strawberry cheesecake until they puff up and expand (not too much or the donuts will overflow).

Equipment:


Vegan Air Fryer Crumble with Blueberries and Apple

Vegan Air Fryer Crumble with Blueberries and Apple

Any time of year is a good time for a fruit crumble, but I particularly enjoy adding frozen or fresh berries.

Apple and blueberries are combined in this vegan air fryer crumble. If you want to live large, you can also add a small pinch of cardamom.

Is Sugar Necessary for Making This Air Fryer Crumble? You can use any sweetener to taste in this and lot of other recipes. That means you should taste it without added sugar at first because your fruit may have enough sweetness on its own. Next, add roughly half of the substitute sweetener, or just small quantity if you’re using concentrated sweetener like monk fruit or stevia. Taste and make more adjustments till it to your preferences!

INGREDIENTS

  1. one medium apple, chopped finely
  2. half a cup of blueberries, frozen peaches or strawberries
  3. One tablespoon + one-fourth cup brown rice flour
  4. two tsp sugar
  5. half a teaspoon of cinnamon powder
  6. Two tsp of dairy-free butter

DIRECTIONS

  • For five minutes, preheat the air fryer to 350°F. Put the apple and frozen blueberries in a ramekin or baking pan that is safe to use in an air fryer.
  • Butter, sugar, cinnamon, and flour should all be combined in a small basin. Over the fruit, spoon the flour mixture. Add a tiny bit more flour on top of anything to hide any fruit that is visible. Bake for fifteen minutes at 350°F.

HOMEMADE PANCAKES

Home made pancakes I found this pancake recipe in my Grandma’s recipe book. Judging from the weathered look of this recipe card, this was a family favorite.

Perfect pancakes are easier to make than you think. This pancake recipe produces thick, fluffy, and all-around delicious pancakes with just a few ingredients that are probably already in your kitchen (and it’s so much better than the boxed stuff).

Ingredients:

  1. 2 cups flour
  2. 1 cup of milk
  3. 3 spoonfuls of sugar
  4. One egg
  5. 1 teaspoon royal
  6. 2 butter spoons
  7. 12 teaspoon nutmeg
  8. 1 teaspoon ground cinnamon
  9. honey to taste
  10. 1 pinch of salt

Preparation:

1. Separate the white from the yolk and beat the white until stiff; then we add the sugar and continue beating well, we separate.

2. In a bowl, we put flour, salt, royal and the egg yolk, and we add the milk little by little without stopping beating; there should be a fine dough without lumps.

3. Then we add the clear and mix with surround movements, and add the nutmeg and cinnamon.

4. Heat a skillet over medium heat and grease with butter.

5. With the help of a spoon, we pour the mixture into the pan and spread it so that it is as uniform as possible.

6. We cook on one side until golden and then on the other.

7. We continue doing the same until the entire mixture is complete

8. Then we serve with honey and butter.

Never throw away this part of the banana: here’s why it’s popular at home

Never throw away this part of the banana: here’s why it’s popular at home

A common fixture in many kitchens, bananas are prized for both their sweet flavor and their health advantages, including being an excellent source of potassium. Even while we enjoy the fruit, the peels—especially the stiff ends—often wind up in the trash. Unbeknownst to many, these underappreciated parts contain a secret that has the potential to completely change the way we cultivate.

Examining Banana Diversity: The banana family is diverse, even though most people are only familiar with the traditional yellow banana. The different ripening processes of the bananas are said to impart a vanilla aroma to some varieties, while the sweeter red bananas are another kind. Whatever the variety, banana peels have untapped worth that home gardeners are beginning to recognize, especially the stiff ends.

Fertilizer Made from Banana Peels: A Wonder


The rigid tip

The magic happens on the banana peel. Here’s how and why green thumbs are taking notice of it:

Drying Process: The craze was sparked by internet videos that suggested preserving the stiff end of bananas after they were peeled. Before sun-drying, it is advised to cut the stem open to reveal the fibers inside. These fibers undergo a transformation into a powerful plant growth promoter after being exposed to sunlight for many hours.

Direct Application: These dried banana fibers, which are rich in vital nutrients, can be dispersed over flower beds or blended directly into potting soil. They are an excellent natural fertilizer because they give plants a complete nutrition that mixes moisture with the essential nutrients found in banana fibers, encouraging robust and healthy growth.

Eco-friendly Gardening: Using the whole banana, including the peels, promotes a sustainable and environmentally aware gardening philosophy. This technique provides an economical, natural plant nutrition solution with minimal waste.

Gardening enthusiasts can contribute to the creation of more vibrant and sustainable green environments by realizing the full potential of banana peels, particularly the stiff ends. It’s a small act that has a big impact for the environment and our plants, demonstrating the value of reevaluating what we normally regard as garbage.


Swedish Meatball Pasta Bake

Swedish Meatball Pasta Bake

This dish, which we have here today, is similar to Swedish meatballs combined with a casserole. Very cool, huh? Casseroles are usually my preference in the winter. Perhaps it’s because they’re perfect for chilly nights and tend to be thicker. Therefore, if you’re watching your weight, put this recipe on hold for a day when calories aren’t an issue (like the weekend or a vacation).

INGREDIENTS

Items needed to make the meatballs:

  1. 1/4 cup of standard panko bread crumbs
  2. four tsp of butter
  3. 1/3 cup of coarsely chopped yellow onion
  4. two tsp salt
  5. half a teaspoon of pepper
  6. One-half teaspoon of ground allspice
  7. One-fourth teaspoon of nutmeg
  8. three minced garlic cloves
  9. two and a third cups milk
  10. two eggs
  11. 1 pound of ground beef, 85/15 in my case.
  12. three tsp oil

Items needed to make the pasta

  1. Two cups pasta shells

Components of the Sauce:

  1. six tsp butter
  2. Three tablespoons plus 1/4 cup all-purpose flour
  3. Four cups of beef broth (a 32-ounce carton of low-sodium broth, I used).
  4. half a cup of water
  5. One tablespoon * of Worcestershire sauce (see to the note below.)
  6. Three tsp coarsely chopped fresh parsley
  7. Half a cup of heavy cream
  8.  1 tablespoon salt (see to the note below.)
  9. half a teaspoon of pepper, black

Instructions

How to Make the Meatballs:

  • To a sizable bowl, add the panko bread crumbs and put aside.
  • Melt the butter in a skillet over a medium heat.
  • Cook for approximately five minutes after adding the finely diced onion, salt, pepper, allspice, and nutmeg. Stir frequently.
  • After two minutes, add the minced garlic and continue cooking
  • Reduce the heat to medium or low and stir in the milk. After mixing everything thoroughly, bring it to a simmer.
  • After simmering for a while, transfer the onion mixture from the pan to the pan with the panko bread crumbs and mix thoroughly. It will be an extremely thick mixture. This bowl should be left to cool.
  • Transfer the eggs to a different, very big basin and beat them.
  • Add the cooled onion mixture, ground beef, then ground pork after that. Combine all of the ingredients. (Using your hands is the quickest and easiest way to do this; it’s gross.)
  • After forming around thirty balls, refrigerate for thirty minutes.
  • After the meatballs are finished
  • In batches, add the meatballs to the skillet and cook for about 15 minutes, or until browned all over. Because the pan wasn’t overcrowded thanks to batches, it was simpler to turn them and determine when they were done.
  • Move the meatballs to a separate plate and keep them there.

How to Prepare the Pasta:

  • Following the instructions on the box, cook the pasta until it’s al dente, then drain and transfer it to a 9 x 13 oven-safe baking dish.

Instructions for Assembly and Sauce:

  • Start the oven at 375 degrees Fahrenheit. (This isn’t related to the sauce procedures, but by the time you finish these, you should have the oven prepared.)
  • The meatballs should be tucked into the pasta in the baking dish.
  • Melt the butter in a large skillet over medium heat.
  • After about two minutes, add the flour and whisk continuously.
  • Simmer after adding the beef broth, water, Worcestershire, salt, and pepper. Stir frequently.
  • After lowering the heat to medium-low, stir in the heavy cream and parsley. Cook, stirring all the time, until the mixture thickens, about 10 minutes.
  • Pour the sauce over the spaghetti and meatballs with caution.
  • Bake the spaghetti, Swedish meatballs, and sauce for 30 minutes in a preheated oven.

Big Boy Fresh Strawberry Pie

Big Boy Fresh Strawberry Pie

The traditional strawberry pie from Frisch’s Big Boy/Shoneys tastes EXACTLY like this pie! It’s easy to create with just 6 basic ingredients and a premade pie crust!

can’t wait to share this pie with all of you today, people! In Cincinnati, springtime signifies two things… Strawberry pie from Frisch’s Big Boy and Reds baseball will soon be available. However, can now have this pie whenever want to and don’t have to wait. and YOU can as well!

Ingredients:

  1. 1 frozen pie crust (if available, deep dish).
  2. ¼ cup water ·
  3. cup granulated sugar ·
  4. tablespoon cornstarch ·
  5. tablespoon dried strawberry gelatin (approximately 1/2 of a 3 ounce box)
  6. 2 cups of sliced strawberries, cut into quarters or halves depending on the berry size
  7. whipped cream, as an optional garnish

Guidelines

  • Using a fork, prick the bottom and sides of the frozen pie crust, then bake it as directed on the package. Before baking, line the crust with parchment paper and stuff it with roughly a cup of dried beans or rice if you’re concerned about the crust blowing up. Allow to cool.
  • Whisk together the cornstarch, sugar, and water in a small saucepan. Bring to a boil over medium heat, then lower the heat and simmer for a few minutes until the mixture thickens.
  • Stir in the dried strawberry gelatin and let cool, stirring now and again.
  • Strawberries should be cleaned, cut, and added to a chilled pie crust. Cover the strawberries with the strawberry gelatin mixture.
  • Once set, refrigerate for a minimum of 4 hours.
  • If preferred, top cold servings with whipped cream.

Jiffy Cornbread in an Air Fryer

Jiffy Cornbread in an Air Fryer

How to use an air fryer for cornbread. The cornbread fried in the air fryer tastes fantastic, and it’s incredibly simple to make and clean up after.

Items Included:

  1. 1 box of Jiffy Cornbread Mix
  2.  1 large egg
  3. 80 ml semi-skimmed milk

Guidelines

  1. All of the ingredients should be combined in a basin and worked with a hand mixer until the mixture resembles thick cornbread batter.
  2. Transfer the cornbread mixture into a circular silicone baking pan.
  3. Put the cake pan inside the air fryer and cook it at 180 degrees Celsius for 15 minutes.
  4. When the cornbread is cool, take it out of the silicone mould and cut it into pieces for serving.lowering in temperature.

Notes:

If your cornbread seems to require a little more time, leave it in the air fryer after it beeps; it will take an hour for it to complete cooking. You may also keep your cornbread warm with this way.

Q/A

Ways To Prepare Jiffy Cornbread Outside Of An Oven?

Using an air fryer is the best way to cook Jiffy cornbread without using an oven. Using an air fryer, you can bake in the same manner as you would in a traditional oven.

Additionally, you can save money by using an air fryer instead of an oven because it doesn’t require preheating.

Plus, you can get some of these incredible silicone cake rounds to air fry cornbread, and you won’t need to scrub them clean afterward.

Is It Possible to Add Buttermilk to Jiffy Cornbread Mix?

It is possible to add buttermilk to cornbread mix, and the result is even more delicious cornbread.

You can also achieve excellent results by substituting half and half (single cream) for the milk. Just play about with what ingredients you have in.


ONE POT VEGETABLE BEEF SOUP RECIPE

ONE POT VEGETABLE BEEF SOUP RECIPE

Simple ingredients are used to quickly and easily make a one-pot vegetable beef soup recipe on the stovetop. A thirty-minute supper rich in Italian flavors, veggies, and ground beef.

COMPOSITION

  1. One tablespoon of olive oil
  2. 1/2 cup finely chopped onions
  3. One teaspoon finely chopped ginger
  4. 1 tablespoon finely minced garlic
  5. One pound ground beef
  6. Three and a half cups Beef stock, reduced sodium
  7. 10.75 oz can of condensed tomato soup, sometimes known as tomato basil soup.
  8. One 228-oz can of diced tomatoes.
  9. 2 tablespoons tomato paste or ketchup
  10. Two medium-sized potatoes that have been peeled and cut into tiny pieces
  11. half a cup of chopped celery
  12. 1.5 tsp of Italian spice
  13. 1/4 teaspoon optional red chili powder
  14. 1/4 teaspoon optional paprika
  15. Salt, according to taste
  16. Pepper according to taste
  17. One bay leaf
  18. three mugs Mixed and frozen vegetables

DIRECTIONS

  • Heat up the oil in a big nonstick pan over medium-high heat.
  • Add the ground beef, onions, ginger, and garlic, and sauté until golden brown.
  • Eliminate extra fat.
  • Stir in the broth, chopped tomatoes, ketchup, potatoes, celery, Italian seasoning, optional red chili flakes, optional paprika, bay leaf, and salt.
  • Combine all ingredients and boil, covered, for approximately ten minutes.
  • Simmer, covered, for a further 20 to 25 minutes, or until potatoes are soft and consistency is to your liking. Add frozen veggies. Have fun!

NOTES

  • Go over all of my advice above.
  • For up to three days, leftovers should be kept in the refrigerator in a sealed container.

EASY BAKED FRENCH TOAST CASSEROLE

EASY BAKED FRENCH TOAST CASSEROLE

Crusty french bread is used to make this easy baked French toast casserole, a quick breakfast bake recipe. 20 minutes to prepare a homemade dish. Prepare in advance or bake right away. Ideal application of stale bread.

During most holidays, readers and families love this simple baked French toast casserole. These are being made by fans for Mother’s Day, Father’s Day, Christmas, Easter, and even the Fourth of July. Always a must-try, regardless of the season!

INGREDIENTS

  1. One loaf of crusty French or other bread, one day old about 14 and 16 ounces
  2. Six eggs
  3. two glasses of milk
  4. Half and half,
  5. 3/4 cup
  6. half a cup of sugar Refer to Notes
  7. One tablespoon of essence from vanilla
  8. One tsp of cinnamon

Topping

  1. Half a cup of dense brown sugar
  2. 1/4 cup of flour for all purposes
  3. One tsp of cinnamon
  4. One tablespoon of chilled butter

DIRECTIONS

  • Slice or tear bread into little pieces. Line a 9 by 13-inch baking pan with oil. Whisk together the eggs, milk, sugar, vanilla, and cinnamon in a medium-sized bowl. Over the bread in the pan, pour.
  • Refrigerate for two hours or overnight with a cover on.
  • Set the oven’s temperature to 350.
  • Mix the flour, cinnamon, and brown sugar together in a small bowl. Add butter to flour mixture after chopping it up into small bits. Using a fork, stir the butter into the mixture until it resembles tiny crumbs. Sprinkle the mixture over the pan of bread.
  • Bake, covered with foil, for 20 minutes. After 20 to 25 minutes, or until cooked through and golden brown, remove the cover and continue baking. Shake the casserole to make sure. It’s not if it wiggles a much.

Notes

  • Use the crusty or one or two day-old bread specified in the ingredients. A soft (soggy) casserole will come from a soft bread.
  • To crisp the crust on a freshly baked loaf, either leave the bread out for a few hours or bake cubed bread for ten to fifteen minutes at a low temperature (around 200 degrees).
  • This has worked great whether it is chilled for a few hours, baked right once, or left overnight.Please feel free to reduce the sugar. I’ve successfully made it with halving the sugar, and it seems to go unnoticed. As per your personal inclination.

Air Fryer Parmesan Crusted Chicken Recipe

Air Fryer Parmesan Crusted Chicken Recipe

A simple and delectable take on classic chicken parmesan is Air Fryer Parmesan Crusted Chicken.

Air-fried to crispy golden perfection, tender and juicy chicken breasts are divided lengthwise and coated with a cheesy bread crumb mixture!

Components

  1. Two large breasts of chicken, cut in half lengthwise
  2. 1/4 cup of flour for all purposes
  3. half a teaspoon of powdered garlic
  4. Half a teaspoon each of salt and powdered black pepper
  5. One tsp of Italian spice
  6. two eggs
  7. Grate 1 cup of parmesan cheese fresh.
  8. one cup bread crumbs, panko
  9. Spray with olive oil

Guidelines

  • The Chicken’s Bread
  • For five minutes, preheat the air fryer to 400°.
  • Mix the flour, Italian seasoning, salt, pepper, and garlic powder in a large, shallow bowl.
  • Beat the eggs in a second shallow dish that is broad.
  • Combine the panko breadcrumbs and parmesan cheese in a third shallow dish.
  • Coat each side of a piece of chicken thoroughly after dredging it through the flour mixture. Toss away any extra flour.
  • Coat the entire chicken by dipping it in the egg.
  • Next, dip the chicken into the parmesan Panko breadcrumbs and drizzle with the mixture. Onto the chicken, press the mixture. To ensure that the breading is adhered to the entire chicken, turn it over and continue the process.

Air-Fry the Chicken

  • After applying nonstick cooking spray to the air fryer basket, put the chicken inside.
  • Give the chicken a quick spray of nonstick frying spray. After inserting the basket, adjust the temperature to 400°F in the air fryer. Make sure there’s space between each piece of chicken and avoid packing it in too tightly.
  • After 6 minutes of Air Frying, turn the chicken over and give it a quick cooking spray. Simmer for five more minutes.
  • Serve th chicken with your favorite side dish