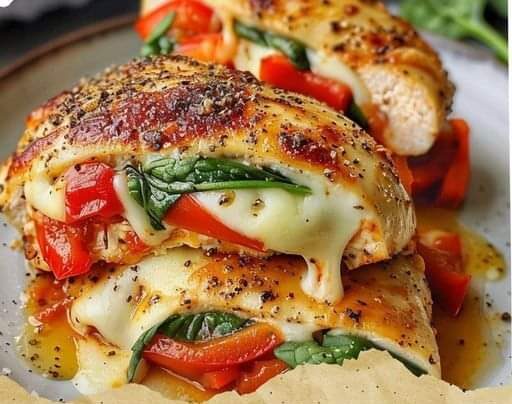
Cheddar Cheese Quick Bread Recipe

Cheddar Cheese Quick Bread Recipe

Cheddar Cheese Quick Bread Recipe Enjoy this tasty fast bread with cheddar cheese on its own or as a great accompaniment to soups and salads. Its fluffy texture and cheesy flavour will make it a favourite recipe in your collection.


Ingredients For Cheddar Cheese Quick Bread Recipe:

  1. Two cups of all-purpose flour
  2. One-third tsp baking powder
  3. Half a teaspoon of salt
  4. 1/4 tsp black pepper
  5. One-fourth teaspoon powdered garlic
  6. 1/4 tspn powdered onion
  7. One cup of sharp cheddar cheese, shredded
  8. One cup of milk
  9. One large egg
  10. 1/4 cup unsalted butter melted


Instructions For Cheddar Cheese Quick Bread Recipe:

  • Set the oven temperature to 350°F (175°C). Line a 9-by-5-inch loaf pan with parchment paper or grease it.
  • Mix the flour, baking powder, salt, black pepper, garlic powder, and onion powder thoroughly in a sizable mixing basin.
  • Add the cheddar cheese shreds and stir until they are well mixed into the flour mixture.
  • Beat the egg, melted butter, and milk together thoroughly in a another basin.
  • Mixing until just mixed, pour the wet components into the dry ingredients. It’s normal to have some lumps in the batter; just take care not to overmix.
  • Transfer the mixture into the loaf pan that has been preheated and level it out.
  • Bake for 45 to 50 minutes in a preheated oven, or until the top is golden brown and a toothpick inserted into the centre comes out clean.
  • After taking the bread out of the oven, let it cool in the pan for ten minutes.
  • Before slicing and serving, move the bread to a wire rack to cool fully.
  • Savour your tasty fast bread with cheddar cheese either warm or at room temperature. Although it is best served fresh, it can be kept for up to three days at room temperature in an airtight container.


Dessert in Minutes!

Dessert in Minutes! You Will Make This Dessert Every Day! Super Yummy. Disappears In A Moment!!

Do you have a sweet tooth but lack the time to indulge? There’s nowhere else to look! In just a few minutes, this simple and quick apple pie recipe will sate your sweet desire. With straightforward

Components

Regarding the Apple Filling:

  1. One apple
  2. Juice from one-half lemon
  3. One teaspoon of sugar
  4. One spoonful of butter
  5. A sprinkling of cinnamon
  6. One tsp of apricot jam

Regarding the Pie Dough:

  1. three eggs
  2. 150 g sugar,
  3. 1 pinch salt
  4. 1 tablespoon of vanilla essence or 8 grams of vanilla sugar
  5. 120 milliliters of oil
  6. 150 milliliters of milk
  7. 250 grams of flour
  8. 16 grams of baking powder
  9. sugar powder (for decorating)

INSTRUCTIONS

  • Apple Filling Preparation: To keep the apple slices fresh, start by slicing them thinly and then pouring lemon juice over them.
  • Melt the butter and sugar in a nonstick pan over medium heat until bubbling.
  • When the apple slices are brown and caramelized, add a dash of cinnamon to enhance the flavor.
  • Toss in the apricot jam at the end to give the apples a glossy finish. Put this delicious concoction aside.
  • Pie Dough and Baking: Beat eggs, sugar, and salt in a bowl until frothy.
  • Mix well after adding the oil, milk, and vanilla sugar or essence.
  • Over the liquid mixture, sift flour and baking powder and stir until smooth.
  • Evenly distribute the dough after pouring it into a cake pan.
  • Decoratively arrange the caramelized apple slices atop the dough.
  • Bake the pie for 20 to 25 minutes, or until it is golden brown and a toothpick inserted into the center comes out clean. Preheat the oven to 180°C (356°F).
  • After baking, allow the pie to cool for a few minutes before adding a final sprinkling of powdered sugar.

Serving and Gratitude

  • The best part is about to happen: enjoy your freshly made apple pie! Slice it up for yourself, top it with whipped cream or ice cream if you’d like, and enjoy every bite of this delicious treat. We promise it’s so delicious that you’ll want to make it every day!

Two-Ingredient Banana Cake:

Two-Ingredient Banana Cake:

This Two-Ingredient Banana Cake is the perfect snack if you’re searching for something quick, wholesome, and helps you lose weight. You may make a tasty and filling dessert that you can eat at home or take to work with just ripe bananas and oat flakes. Prepare a pen and paper so that you can write down the ingredients and easily follow the directions to make this delicious cake.

Ingredients:

  1. 2 ripe bananas
  2.  1 cup oat flakes

Directions:

  • Begin by mashing the ripe bananas until you achieve a smooth consistency. You can use a fork or a potato masher to do this.
  •  Once the bananas are mashed, add the oat flakes to the bowl. Mix well to combine the ingredients thoroughly. The oats will help bind the mixture and provide texture.
  • Grease a baking pan to prevent the cake from sticking. You can use cooking spray or a small amount of oil.
  • Pour the banana and oat mixture into the greased pan, spreading it evenly.
  •  Preheat your oven to 350°F (180°C Place the pan with the batter in the preheated oven.
  • Bake for about twenty-five minutes, or until the cake is golden brown. Depending on your oven, the baking time may differ somewhat, so pay attention to it.
  •  After the cake is done, take it out of the oven and allow it to cool for a little while in the pan.
  •  You can slice and serve the cake after it has cooled. It’s a fantastic choice for an easy and wholesome snack.
  • In conclusion, this is the recipe for a two-ingredient banana cake that is easy to prepare, nutrient-dense, and ideal for anyone trying to keep their weight in check. You may make a tasty and filling treat that can be consumed at work or elsewhere with just ripe bananas and oat flakes.

Enjoy a Delicious and Easy 3 Ingredient Danish Pastry

Enjoy a Delicious and Easy 3 Ingredient Danish Pastry

Enjoy a Delicious and Easy 3 Ingredient Danish Pastry You will enjoy this 3-Ingredient Apple Danish recipe if you enjoy pastries. It’s an easy and quick technique to create a delicious pastry that tastes just like Danish food. Puff pastry, apples, and confectioner’s sugar are all you need.

Fresh apples are sautéed with sugar in this dish and then wrapped in puff pastry. The finished product is a delicate, flaky pastry with a fruity, sweet filling. You can eat it right out of the oven, or you can put it in the refrigerator to reheat it later.

This 3-ingredient apple Danish is excellent as a snack or for breakfast. For a flavorful pairing, try it with your preferred beverage, such milk or coffee. For added indulgence, you can also add some extra toppings, such caramel sauce or vanilla ice cream. For a balanced supper, you could also serve it with some fresh fruit or a green salad.

Recipe By: Recipes Tarika Sahla

Ingredients For Recipe:


  • Two puff pastry sheets
  • Two apples of average size, quartered, cored, and peeled
  • 1/3 cup of confectioners’ sugar + additional for dusting


Instructions For Recipe:


1. Line a baking tray with parchment paper and preheat the oven to 425°F.

2. Cut the apples into quarters and peel them. Simmer them for approximately 4 minutes, or until they are just starting to soften, in a saucepan filled with enough water to cover them. When the apple mixture cools, drain the water, whisk in the sugar, and stir again.

3. After dividing each puff pastry sheet in half, cut each half into three rectangles. In total, you ought to have six parts.

4. Moisten the edges of one rectangle of dough, pour in part of the apple mixture, and then cover with another rectangle of pastry that has some slits cut in it. To seal, press the edges together. To make six apple parcels, repeat with the remaining pastry and apple mixture.

5. After dusting each parcel with a little more sugar, put them on the baking dish that has been ready.

6. Bake for 12 to 15 minutes, until puffed and brown.

7. You can either eat your 3-ingredient apple Danish warm or keep it in the refrigerator for up to two days in an airtight container. Before serving, reheat them for a few minutes in the oven.


Advice on Preparing a 3-Ingredient Danish Pastry:

  • You can use any kind of apple, but tart varieties, like Granny Smith, complement the sweetness of the dough and sugar perfectly. For extra flavour, you may also stir in some nutmeg, cinnamon, or lemon zest with the apple combination.
  • The puff pastry is easily sliced with a pizza cutter or a sharp knife.
  • The apple mixture can be prepared in advance and kept chilled until the pastries are assembled.
  • The unbaked apple packages can be stored for up to a month, at which point they can be baked after adding a few months.

How to Make Delicious Garlic Bread with Homemade Spread

How to Make Delicious Garlic Bread with Homemade Spread

Recipe By Tarika Sahla

A common appetiser or side dish that complements a variety of entrees is garlic bread. It tastes rich and savoury and is quite simple to make. This post will show you how to use a blender and other basic items to produce your own homemade garlic spread for toast. This handmade spread will elevate your garlic toast to a whole new level. It’s aromatic, tangy, and creamy.


The Ingredients for Making Your Own Homemade Garlic Spread for Bread

Ingredients needed to prepare this homemade garlic spread are as follows:

  1.  One lemon’s juice
  2.  Two glasses of cold milk
  3. 8 big cloves of garlic
  4. Vegetable oil until it has the consistency of mayonnaise.
  5. Green onions, oregano, and salt (to taste)
  6. cheese

A blender, a bowl, a spatula, a knife, a cutting board, and your preferred bread are also required. Any type of bread will work, including sourdough, ciabatta, and baguette.

How to Make Breads with Homemade Garlic Spread

It is incredibly simple and quick to make your own homemade garlic spread for toast. Simply adhere to these steps:

First Step:

Garlic cloves should be peeled and chopped. To make this easier, you can use a food processor or a garlic press.

2nd Step:

Place the milk and garlic in a blender and process until smooth. The milk will keep the garlic from being too strong.

Step 3:

Taste and add salt and lemon juice while the blender is running. The spread will gain some acidity and freshness from the lemon juice.

Step 4:
Add oil to the blender a little at a time until the consistency is thick and creamy. Any type of vegetable oil will work, including olive, canola, and sunflower.

Step 5:

Spoon the spread into a bowl, then mix with the green onions and oregano. To alter the flavour, you can also add additional herbs or spices like paprika, parsley, or basil.

Step 6:

Store the spread in the refrigerator until needed. It keeps for up to a week when kept in an airtight container.


You can quickly create garlic bread with your own garlic spread now that you have it. Here’s how to do it:

  1. Preheat your oven to 180°C (356°F) or turn on your grill.
  2.  Slice or tear apart your bread. You have the freedom to adjust their thickness.
  3. Liberally brush each slice or piece of bread with garlic spread. For this, you can use a pastry brush or a knife.
  4. Spread the bread out on a grill pan or baking sheet. If you want to make cheesy garlic bread, you can add some cheese on top.
  5. Bake or grill the bread until crisp and golden, about ten minutes. Keep a close eye on them to prevent scorching.
  6. Savour the warm or hot garlic bread. Serve it with whatever dish you prefer, such as spaghetti, salad, or soup.

A tasty and simple way to eat bread with a homemade spread is with garlic bread. Making your own garlic spread gives you complete control over the components and taste. It can be used as a spread for sandwiches, a dressing, or a dip, among other things. Give this recipe a try and watch how it turns your bread into a delicious treat.

Chicken Alfredo Spaghetti Squash

Chicken Alfredo Spaghetti Squash


Skinny Chicken Alfredo Stuffed Spaghetti Squash will become an instant family favorite. This healthier chicken Alfredo is low carb and high protein, yet tastes just as indulgent as the classic pasta dish.

Recipe By: Making Gore

Ingredients:

  1. One medium spaghetti squash, cut in half lengthwise and seeded
  2. Four tablespoons of extra virgin olive oil, divided with Kosher salt
  3. freshly ground black pepper
  4. Two skinless and boneless chicken breasts
  5. three garlic cloves, cut finely
  6. One and a half cups whole milk
  7. 1 cup heavy cream
  8. 3/4 cup low-sodium chicken broth.
  9. Finely grated 3/4 cup Cheese Parmesan
  10. Crushed red pepper flakes in a pinch
  11. One cup of mozzarella shreds
  12. freshly chopped parsley to garnish


Directions:

  1. Turn the oven on to 400°. Squash with one tablespoon oil drizzled over the cut sides; add black pepper and salt for seasoning. Place the cut sides of the half on a large baking sheet.
  2. Roast squash for 30 to 35 minutes, or until it’s soft. Allow to cool a little. Using a fork, scrape squash strands into a large bowl. Boat halves on reserve. Keep oven on.
  3. Sprinkle black pepper and salt all over the chicken. Two tablespoons of oil should be heated in a big skillet over medium heat. Add the chicken and cook, flipping sporadically, for about 8 minutes on each side, or until golden brown and cooked through. After moving to a chopping board and giving it a five-minute rest, chop it into bite-sized pieces.
  4. The final tablespoon of oil should be heated in the same skillet over medium heat. Add the garlic and stir-fry for approximately a minute, or until fragrant. After adding the milk and broth, simmer. Add red pepper, cream, Parmesan, and salt; season with black pepper and salt. Return to a simmer and cook for about ten minutes, stirring now and then, until thickened.
  5. Add the chicken and sauce to a bowl with the spaghetti squash and toss to mix. Spoon chicken mixture into squash halves that were set aside. Add mozzarella over top.
  6. Bake squash boats for 15 minutes or until the cheese is melted and the squash is warmed through.Place the halves of a squash on a dish. Add parsley on top.
  7. Place the halves of a squash on a dish. Add parsley on top.

Pineapple Quick Bread

Pineapple Quick Bread


With its soft, juicy texture and delicate glaze with hint of pineapple flavor, this pineapple bread is hit with everyone!

This Pineapple Bread is extremely moist and delicately sweet, and it will vanish one piece at time. Your family will love this fluffy, sweet bread, which is flavored with juicy crushed pineapple and finished with pineapple-infused glaze.

ALL PEOPLE DESIRE SLICE!

Everyone in the house goes crazy for this simple pineapple bread, which is why love to make it! can have slice for dessert or take one with me for breakfast because it has the ideal amount of sweetness.

Ingredients

BREAD:

  1. 2 cups flour
  2. 1 teaspoon baking soda
  3. 1 teaspoon salt
  4. 3 oz. cream cheese, softened
  5. 1 cup sugar
  6. 3 teaspoons vanilla extract
  7. 1 large egg beaten
  8. 1/2 cup sour cream
  9. 1 20 oz can crushed pineapple,
  10. drained (save 2-3 Tbsp of the juice for the glaze)


GLAZE:

  1. 1 1/2 cups powdered sugar
  2. 2-3 tbsp reserved pineapple juice


PREPARATION

  1. Preheat oven to 350° and grease a bread pan.
  2. In a medium bowl, combine flour, baking soda, and salt together. In a separate bowl, beat egg, sugar, cream cheese, and vanilla until smooth.
  3. Add flour mixture into cream cheese mixture and stir. Add the sour cream and mix until just combined, then fold in crushed pineapple.
  4. Pour into prepared pan and bake for 55-60 minutes or until a toothpick inserted in the middle comes out clean.
  5. Cool in pan for about 15-20 minutes and then let it cool the rest of the way on a wire rack.
  6. For the glaze, mix powdered sugar and pineapple juice together and drizzle over the cooled bread.

Q/A:

HOW LONG IS PINEAPPLE BREAD GOOD FOR?

This cake stays delicious for up to three days if properly covered and stored in a cool location. However, by the third day, you may notice the bread will start to naturally lose some of its juiciness.


No Yeast Potato Bread

 This quick and simple homemade bread recipe, called No Yeast Potato Bread, is great for deli sandwiches and more!

For Materials:

  1. Two cups of smooth, chilled mashed potatoes
  2. two eggs
  3. one and a half cups whole milk
  4. one-fourth cup vegetable oil
  5. three and a half cups flour
  6. Half a teaspoonful of baking powder
  7. One tsp of high-quality sea salt
  8. One spoonful of sugar
  9. Cooking mist


Instructions:

    1. Preheat oven to 375 degrees. Coat an 8 or 9 inch cast iron pan, glass casserole dish or round cake pan with cooking spray. Set aside.
    2. In a large mixing bowl or the bowl of a stand mixer fitted with the bread hook, combine mashed potatoes and eggs until combined.
    3. Add milk and vegetable oil, blending until just combined.
    4. Sift together flour, baking powder, fine sea salt and sugar. Add to wet mixture.
    5. After dough has come together, blend or mix for an additional 1 minute.
    6. Turn dough into greased cooking vessel. Don’t push too hard, but make sure the dough is flat, not rounded on the top. Score a large “X” in the top. Give a light dusting of cooking spray to the top of the bread.
    7. Bake for 45-50 minutes. If the top starts to brown too much, loosely cover with a leaf of aluminum foil.
    8. Remove and allow to cool before turning out of the baking dish. Wait for bread to nearly cool fully before slicing.
    9. Store wrapped well at room temperature. Bread is best enjoyed within 3 days of baking.

No Yeast Potato Bread

Note:

  • For up to six months, bread can be frozen, carefully covered.
  • To make up for the extra fat, add 1 tablespoon of melted butter if you’re using skim or low-fat milk.


Cinnamon Roll Cake

Cinnamon Roll Cake

Cinnamon Roll Cake is a delectable, ooey cake made from cinnamon rolls! This cake is the best I’ve ever had, swirled with buttery brown sugar, cinnamon, and covered in a sweet glaze!

INGREDIENTS

  1. 3 cups floor
  2. ¼ teaspoon salt,
  3. 1 cup sugar,
  4. 4 teaspoons baking powder,
  5. 1½ cups milk
  6. , 2 eggs,
  7. 2 teaspoons vanilla,
  8. 4 tablespoons melted butter,
  9. and 2 sticks.
  10. 1 cup softened butter; 1
  11. cup brown sugar;
  12. 1 T cinnamon;
  13. ⅔ cups optional nuts

Glaze

  1. (2) cups powdered sugar;
  2. 4-5 T milk;
  3. 1 tsp vanilla;

Guidelines

  • Set the oven’s temperature to 350. Combine the flour, sugar, salt, baking powder, milk, eggs, and vanilla in stand mixer or electric mixer. After that is mixed together, add of melted butter and stir slowly. Fill 13-inch pan that has been oiled with batter.
  • Combine the softened butter, brown sugar, cinnamon, and, if using, nuts in medium-sized bowl. Place the cake mixture into 9-by-13-inch pan and spread evenly. Swirl and marble the cake with knife.
  • Bake for 25 to 30 minutes, or until toothpick inserted in the center comes out almost clean. In medium-sized bowl, combine the powdered sugar, milk, and vanilla to make the glaze.
  • Once smooth, whisk and pour over the warm cake. Warm up or at room temperature. 

How to Keep Leftovers

Do you have any leftovers of that delicious cinnamon roll cake? Don’t worry—the key is to enjoy the deliciousness later! After it cools, carefully wrap it in foil or plastic wrap and store it in the refrigerator. It is useful for three to four days. When you’re ready to dig in, a fast microwave warm-up or a slow oven reheat will restore the flavor of freshly baked goodness

.Advice and Adaptations

  • Prepare to explore the mouthwatering realm of cinnamon roll cakes. This is a very basic dish, but it can benefit greatly from a little insider knowledge. I’ve thus come up with some useful advice and original twists to assist you in making a cinnamon roll cake that you’ll adore!
  • Can My Cake Have Nuts in It? It is possible to add nuts to the butter, cinnamon, and brown sugar mixture in this recipe. For an even better cake, you may add chopped walnuts or pecans!
  • What Is The Sign That the Cake Is Done? Once a toothpick inserted into the middle comes out clean, the process is complete. The edges of the cinnamon roll cake will start to brown slightly.


CASTELLA CAKE

CASTELLA CAKE

Enjoy this incredibly delicate, bouncy, and super-moist Japanese sponge cake with hint of honey! Castella Cake, famous tea-time treat in Japan, is made with just four ingredients and is an ideal hostess or holiday present.

To store erap each item individually in plastic wrap to store for later. Store for maximum of 3–4 days at room temperature, 5–7 days in the fridge, and month in the freezer.

Ingredients:

  1. 4 medium eggs, at room temperature
  2. 110g of sugar
  3. 2-3 tablespoons of honey
  4. 100g of strong flour

Preparation:

  • In a metal bowl, break the eggs, add the sugar and beat with an electric mixer over boiling water on high speed for 6 minutes. The volume of beaten eggs will increase by about 4 times.
  • Add the honey to the egg mixture and beat on medium speed for about 30 seconds.
  • Sift 1/3 of the flour into the mixture, then lightly beat on medium speed, then add another 1/3 of the flour and beat. Add the last 1/3 of the flour and beat until blended, about 1 minute. Do not over mix as this will cause the cake to fall over or go flat.
  • Put parchment paper in a mold and pour the dough into the mold. With a skewer, draw a zigzag line to remove any large air bubbles from the dough. In this way, the cake will have a uniform texture.
  • Bake at 180°C in a preheated oven for 10-15 minutes until the top is deep brown. Then quickly cover with kitchen paper, lower the temperature to 170°C and continue baking. It will take about 55 minutes in total. Try a skewer, when it comes out clean the cake is done.
  • When done, remove the cake from the pan and immediately cover the surface with plastic wrap.
  • Turn the cake onto a flat plate and while it is hot put it in a plastic bag and leave it for 12 hours so that the cake has a moist texture.
  • Before serving, cut the sides of the cake. Accompany with tea or coffee and a spoonful of Chantilly cream for a greater decadence. See less