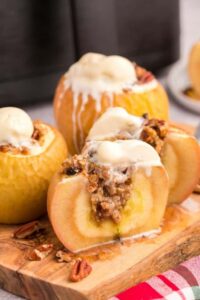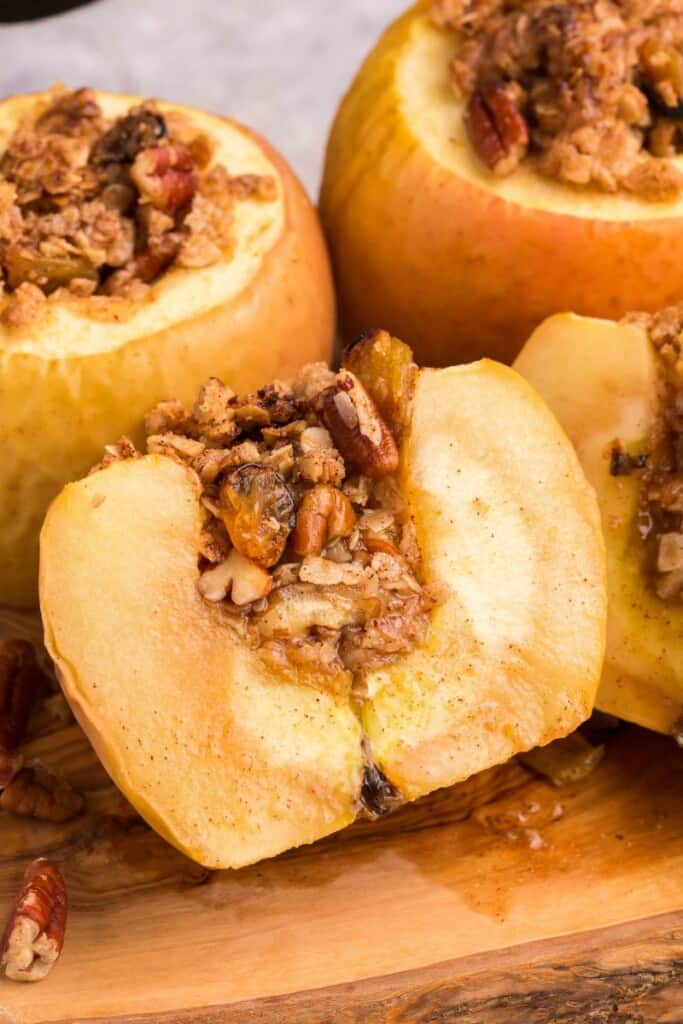
AIR FRYER BAKED APPLES
Enjoy the finest flavours of all with baked apples straight from the air fryer! For an enticing treat, they are packed with oats, raisins, pecans, brown sugar, melted butter, and apple pie spice.
Recipe By: Samantha
Ingredients:
- Four Large apples
- Three teaspoons of instant muesli
- Two tablespoons of golden raisins
- Two teaspoons of pecans, chopped
- Twice as much light brown sugar
- Two tablespoons of unsalted butter, melted
- Half a teaspoon of spice for apple pie
Directions:
- Cut the tops of your apples off to remove the stem. Then also slightly cut the bottom of your apple off so that it is flat on the bottom, so it does not roll in the air fryer.
- Using an apple corer or a paring knife, remove the center of the apple, careful not to go all the way through the bottom. Then your filling will leak out as it cooks. I made the diameter of my cut out about an inch wide. You don’t want to cut too much of the apple out, but you still want all that delicious filling in there.
- In a medium bowl, combine the oats, raisins, pecans, brown sugar, melted butter, and apple pie seasoning.
- Divide the mixture among the 4 apples, filling in the centers.
- Place your apples in the air fryer and bake at 300 degrees for 13-15 minutes, till they are your desired amount of softness.
- Allow them to sit for a few minutes, as they will be very hot to remove. Once you have removed them, serve warm and for an additional treat, top with a dollop of vanilla ice cream.
CHANGES FOR YOUR BAKED APPLES IN AN AIR FRYER
I think brown sugar and apples from an air fryer go together like clockwork. There are lots of ways to get creative and personalise this dish as long as you start with that basic recipe!
Want to make cinnamon apples in the air fryer? Try adding a teaspoon of cinnamon to the filling mixture. A sprinkle of nutmeg will add even more warm spice flavor!
You can also mix up which nuts you use. Chopped walnuts, almonds, or even macadamia nuts would be delicious. Maybe even toss in a few chocolate chips!
SUGGESTIONS FOR Creating the Finest Air Fryer Baked Apples:
- In order to make the apples nice and flat, you want to take off the bottoms. They won’t roll around in the air fryer because of this.
- Take care not to cut through the apple all the way through when coreing it. If not, the filling will seep out while it cooks.
- I suggest cutting your cut with a diameter of approximately one inch. You still want all that delicious filling in there, but you don’t want to remove too much of the apple.
INDICATING WHEN APPLES BAKED IN AN AIR FRYER ARE DONE
Oats should definitely be fine and cooked when using them in the filling of baked apples made in an air fryer. It’s crucial to utilise fast oats in your filling because of this.
After that, just cook the apples until they reach your desired level of softness. It’s all going to depend on whether you like your apples to be super soft or still have a little crunch to them!
Start checking on them around the 13-minute mark, and keep in mind that they’ll keep cooking a bit as they rest in the air fryer basket.