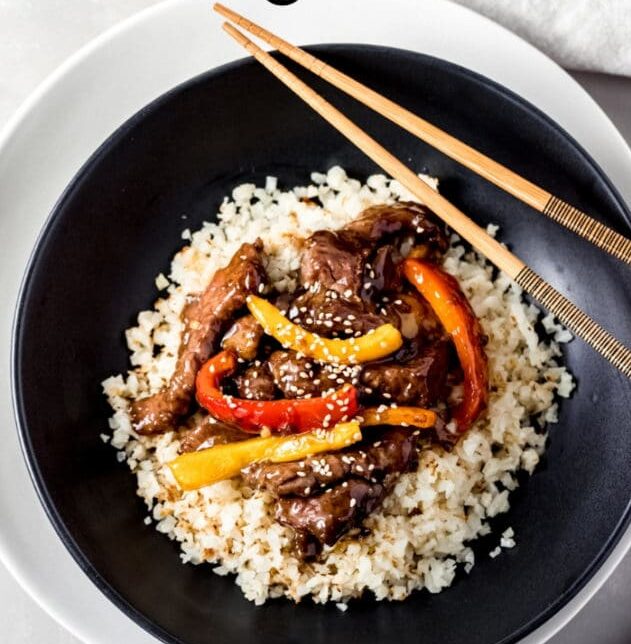
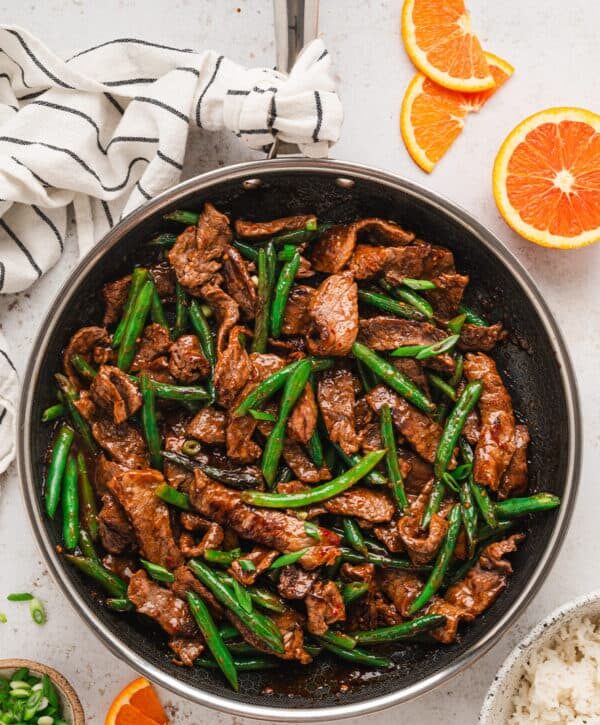
CARAMEL CHOCOLATE CHEESECAKE

CARAMEL CHOCOLATE CHEESECAKE

INGREDIENTS

For the cheesecake:

  1. 2 pkg (8oz each) cream cheese, softened
  2. 2/3 cup granulated sugar
  3. pinch of salt
  4. 2 large eggs
  5. 1/3 cup sour cream
  6. 1/3 cup heavy cream
  7. 1 tsp vanilla
    For the cake:
  8. 1 recipe chocolate layer cake (9inch layers)- homemade or cake mix
    For the frosting:
  9. 1 cup unsalted butter, softened
  10. 1/2 cup caramel sauce (homemade caramel sauce or jarred is fine)
  11. 4 cup powdered sugar
  12. 2 Tbsp milk
  13. 1/2 tsp kosher salt
    For the ganache:
  14. 4 oz dark chocolate
  15. 1/3 cup heavy cream
  16. 2 Tbsp caramel sauce
  17. pinch of kosher salt

INSTRUCTIONS

For the cheesecake:

  • Preheat oven to 325 degrees. Using a large roasting pan on the lower 2/3 of the oven, preheat the pan too!
    Prepare springform pan by wrapping bottom of pan (outside) with double layer of foil. Spray pan with nonstick baking spray and line bottom (inside) with a circle of parchment paper. Meanwhile, boil a kettle of water to use later.
  • Beat cream cheese with granulate sugar for 2-3 minutes until creamy. Add in salt and eggs, one at a time, beating well after each addition.
    Beat in sour cream, heavy cream and vanilla. Pour into prepared 9inch springform pan. Place pan in center of preheated roasting pan in the oven. Pour boiling water slowly into the roasting pan, until there is about an inch of water coming up the sides of the springform pan.
  • Bake cheesecake for 45 minutes. Turn oven off and let cheesecake sit in oven for an additional 30 minutes. Remove and cool completely on counter.
  • When cooled, transfer entire springform pan into the freezer for several hours or overnight. I put it in freezer for about 2 hours. **If using within 24 hours, feel free to just refrigerate cheesecake!
    For the cake layer:
  • Prepare chocolate cake according to package directions for 9 inch cake.
    For the frosting:
  • Beat butter in a large mixing bowl for 2-3 minutes, until fluffy. Add caramel sauce, powdered sugar, milk and kosher salt.
  • Beat for 4-5 minutes until soft and creamy.
    To assemble:
  • On a cake platter, lay one layer of chocolate cake, top with the cheesecake. Then add the other layer of chocolate cake. Spread frosting over entire cake, sides and top.
  • Refrigerate frosted cake while you prepare the chocolate ganache.
    For the ganache:
  • In a microwave safe bowl, combine dark chocolate with heavy cream. Heat 30 seconds. Stir and heat an additional 30 seconds. Whisk for several minutes until smooth. Allow to cool slightly.
  • Once cooled. Spread over top of chilled cake. Drizzle with remaining 2 Tbsp of caramel sauce and sprinkle with a pinch of kosher salt. Refrigerate cake until ready to serve.

Best Southern Fried Chicken

Best Southern Fried Chicken

This recipe for The Best Southern Fried Chicken is the only one you need if you want something insanely amazing to eat. Flavorful, crispy, and simply amazing!

Ingredients

  1. 16 chicken drumsticks (or a combination of drumsticks and thighs)
  2. 1 1/2 cups buttermilk
  3. 1 1/2 tablespoons Tabasco sauce
  4. 2 teaspoons salt
  5. 2 tablespoons black pepper (divided)
  6. 2 cups all-purpose flour
  7. 1 teaspoon cayenne pepper
  8. Vegetable oil (for frying, about 3 cups)

Directions

  •  Heat the warming drawer or oven to 200 F.
  • Pat the chicken with paper towels to dry.
  • In a large bowl, combine the buttermilk, Tabasco sauce, salt, and 1 tablespoon of black pepper. Add the chicken legs to the mixture and toss to coat. Cover and refrigerate with the marinade for at least 1 hour (or up to 24 hours).
  • Remove the chicken from the buttermilk and let any excess buttermilk drip off.
  • Combine the flour, additional 1 tablespoon black pepper, and the cayenne. Shake the chicken legs in the seasoned flour and place on a rack while waiting for the oil to heat.
  • In a large, heavy saucepan or deep skillet or sauté pan, heat at least 3 cups of oil to about 365 F. Fry the chicken legs in batches for about 10 minutes, turning once. To check for doneness, use an instant-read food thermometer inserted in the thickest part of the largest drumstick, not touching bone. The minimum safe temperature for poultry is 165 F.
  • Remove the chicken to paper towels to drain.
  • Place the drained chicken on a baking sheet, cover loosely with foil, and move to the warming drawer or oven to keep warm while frying subsequent batches
  • Serve and enjoy!

Tip

  • In deep-frying, the food is completely immersed in the oil, while in pan-frying the food is placed in enough oil to cover the bottom and sides, making it necessary to turn the pieces over to fry both sides.
  • Three cups of oil will give you a depth of 1/2-inch in a deep 10-inch skillet and is sufficient to pan-fry.

Cabbage Beef Bake

Cabbage Beef Bake

Embrace the comforting embrace of a hot dish straight from the oven with this heartwarming Cabbage Beef Bake. It’s like the culinary equivalent of a warm hug from grandma’s favorite quilt—unpretentious yet utterly satisfying, especially on those brisk evenings that call for a hearty meal. This dish is a testament to the ingenious simplicity often found in Midwest kitchens, where cabbage and ground beef are pantry staples. Whether you’re pressed for time or in need of some soul-soothing food that’s brimming with flavor (and a fair share of vegetables), this recipe is a must-try.

To round out the meal, consider serving this robust bake with some butter-slathered crusty bread—ideal for mopping up the succulent juices. A light, crisp salad on the side can offer a refreshing balance, while a dollop of sour cream on top of the bake adds a touch of indulgence.Servings

Ingredients:

For Ingredients And Complete Cooking Instructions Please Head On keep on Reading (>)

  1. 1 pound ground beef
  2. 1 medium onion, chopped
  3. 3 cups cabbage, chopped
  4. 1 can (14.5 ounces) diced tomatoes, undrained
  5. 1 cup cooked rice
  6. 1 teaspoon garlic powder
  7. 1 teaspoon salt
  8. 1/2 teaspoon black pepper
  9. 1 cup cheddar cheese, shredded
  10. 1/2 cup beef broth

Directions:

  • Begin by preheating your oven to 350°F (175°C) and lightly greasing a 9×13 inch baking dish.
  • Brown the ground beef with the onion in a large skillet over medium heat until the meat is thoroughly cooked and the onion is soft.
  • Layer half of the cabbage into the bottom of your baking dish, top with the beef and onion mixture, and evenly sprinkle the cooked rice over it. Then, pour the undrained diced tomatoes over the rice.
  • Place the remaining cabbage over the tomatoes and gently pour the beef broth over everything, ensuring the dish is evenly moistened.
  • Cover the dish with aluminum foil and bake for 45 minutes, letting the flavors meld together beautifully.
  • Remove the foil, sprinkle the shredded cheddar cheese across the top, and return to the oven, uncovered, for an additional 10-15 minutes, or until the cheese is bubbly and golden.

Variations & Tips:

  • For a Tex-Mex flair, add cumin and chili powder to the beef mixture and consider mixing in a can of drained black beans.
  • Quinoa can substitute rice for those looking for a low-carb option.
  • Prep the cabbage and onion ahead of time to make this dish even quicker to put together after a busy day.
  • Leftovers reheat well for a delicious lunch or dinner the next day.
  • Feel free to sneak in extra veggies, like shredded carrots or zucchini, for an added nutritional boost.
  • This Cabbage Beef Bake not only warms your home but also fills it with the inviting aroma of comfort food at its best. It’s proof that simple ingredients can create the most memorable and satisfying meals. I’d love to hear about your experience with this dish, whether through comments or photos. Let’s keep the warmth and conversation going in our cozy culinary community!

Salmon & Shrimp Alfredo Recipe

Salmon & Shrimp Alfredo Recipe

Salmon & Shrimp Alfredo Recipe

This dish for salmon and prawn alfredo is flavorful and creamy. If you’ve spent much time on this website, you are aware of my fondness for a fantastic pasta dish.

Ingredients

  1. 1/2 pound raw Shrimp, peeled/deveined
  2. 2 salmon fillets (4-6 ounces)
  3. 6-8 oz parmsean cheese,grated
  4. 1 pint heavy whipping cream
  5. 1 tbsp Prego Basil Pesto
  6. 1 stick of butter
  7. 2 tbsp seasoning salt
  8. 2 tbsp old bay
  9. 1/4 pepper
  10. 2 tbsp garlic powder
  11. 2 tbsp onion powder
  12. 3/4 box penne pasta
  13. 2 tsp minced garlic
  14. 1/8 tsp chili powder
  15. fresh parsley, finely chopped

Instructions;

  1. Wash shrimp and salmon then pat dry. Season the shrimp and salmon with seasoning salt, pepper, onion powder, garlic powder, chili powder, and old bay seasoning.
  2. For the pasta, cook according to the instructions on the back then drain it and set it aside.
  3. Add 1 tbsp of butter to a clean pan on medium heat and add your shrimp. Cook them for about 3 to 4 minutes on each side until their pink yet golden brown. Remove them and set aside.
  4. In a clean pan add 1 tbsp of butter on medium heat. Add the salmon to the pan and cook for about 7-8 minutes on each side or until done and golden brown.
  5. In a clean pan, melt 6 tbsp of butter on medium heat. Add the minced garlic cook for about a minute until fragrant. Add the heavy whipping cream and mix. Add the pesto mix again.
  6. Add Parmesan cheese and continuously mix. Season the sauce heavily. Mix until sauce starts to thicken (3-5 mins)
  7. Add the noodles to the sauce and make sure the noodle are coated. Season with salt, pepper, onion powder, garlic powder, and old bay seasoning. Add a pinch of fresh parsley and mix thoroughly.
  8. Grab a plate and add the noodles. Top with salmon and then shrimp. Garnish with parsley and parmsan cheese

Is it possible for me to prepare something in advance?

While it’s ideal to serve this dish right away, leftovers can be refrigerated in an airtight container and gently reheated over medium-low heat with a splash of water. It is not advisable to freeze the cream sauce since it may separate after thawing.

AIR FRYER CHICKEN BURRITOS

AIR FRYER CHICKEN BURRITOS

AIR FRYER CHICKEN BURRITOS Sometimes I just need something to eat quickly. It could be that I arrived home later than usual or I just forgot to take something out. Any night of the week, these chicken burritos from the air fryer are a game-changer!

These burritos will have dinner on the table in ten minutes! The best feature is that anyone can personalize them! Let your kids have cheese and salsa if they don’t like chicken. Now let’s get going!

Reicpe By: Heather

4 Rolls in Total (Two Per Person)
TIME OF PREP: 5 M

Cooking time: 5 M

ENTIRE TIME: 10 M

INGREDIENTS FOR AIR FRYER CHICKEN BURRITOS:


  • Four tiny 6-inch tortillas
  • Half a cup of cream cheese
  • One cup of rotisserie chicken, shredded
  • Half a cup of cheese, shredded
  • Half a cup of salsa
  • One-fourth cup sour cream
  • One-fourth cup salsa


INSTRUCTIONS FOR AIR FRYER CHICKEN BURRITOS:


  1. Arrange the tortilla.
  2. Cover the entire tortilla with 1-2 tablespoons of cream cheese.
  3. Leaving the cream cheese edge on the tortilla, spread out 1 to 2 tablespoons of salsa over 2/3 of it.
  4. Place a spoonful or two of chicken over the salsa.
  5. Add 1-2 tablespoons of shredded cheese on top.
  6. To seal the burrito, roll the tortilla and add cream cheese as “glue.”
  7. Apply cooking spray.
  8. I can air fry two at a time in my square air fryer basket for five minutes at 350 degrees; do not stack.
  9. As the rolls air fry, combine the sour cream and salsa to make a dipping sauce.

How may a simple dipping sauce be prepared?
Salsa and sour cream are the simplest sauces I can prepare! All you have to do is combine them in a dish to make the greatest dip ever! It tastes fantastic on these air fryer burritos, nachos, and chips!

Tender chicken, melted cheese, crisp bell peppers, onions, and zesty salsa are all combined in these delicious and easy air fryer chicken burritos, which are served warm in a tortilla. These tasty and easy lunch or dinner options are these air fryer chicken burritos. They are adaptable, adaptable, and certain to please the whole family. Savor the gooey, cheesy interior and crunchy outside of these amazing burritos!

Air Fryer Cheesy Ranch Potatoes Recipe

Air Fryer Cheesy Ranch Potatoes Recipe

Air Fryer Cheesy Ranch Potatoes Recipe

This recipe for Cheesy Ranch Potatoes in the Air Fryer is a fantastic side dish option. Air-fried potatoes with ranch seasoning and melted cheese on top. These air fryer-cooked potatoes are comfort food at its best.

Do you need a simple, quick side dish? These Cheesy Air Fryer Potatoes are the answer. The inside of them is fluffy and the outside is crunchy. As if having perfectly cooked potatoes wasn’t enough, these potatoes also have mozzarella sprinkled on them and are briefly broiler-baked.

Ingredients:


  1. One pound of baby Yukon gold potatoes,
  2. two tablespoons of extra virgin olive oil
  3. two teaspoons of ranch seasoning
  4. one teaspoon each of garlic powder, pepper, and kosher salt,
  5. one and a half cups of shredded mozzarella cheese
  6. one tablespoon each of grated parmesan
  7. and one tablespoon each of chopped fresh parsley


DIRECTIONS

  1.  Cut potatoes in half and combine with ranch dressing, extra virgin olive oil, garlic powder, pepper, and salt.
  2. Put the seasoned potatoes in the basket of the air fryer. Shake every five minutes while air-frying at 390 degrees for fifteen minutes.
  3. Arrange potatoes on a baking pan in a single layer. Add a sprinkling of mozzarella cheese. Cheese should melt after two minutes under the grill.
  4. Take out of the oven and top with parsley and parmesan cheese. Serve right away.

Notes:

Cover potatoes with foil for easy cleanup. Just watch out not to cover the basket all the way.


Variations:

For some great meatiness, sprinkle some crumbled bacon on top.

You can vary the cheeses as well. Try adding some pepper jack or cheddar cheese. Just be certain that it melts easily!


Alternate the spice mixtures to fit your current cravings. Do you want something hot and spicy? Give a cajun spice blend a try. Alternately, use taco spice and shredded cheddar to make a taco variation. or a pepperoni and Italian flavour pizza variant. There are countless options!


One Pot Mexican Rice Casserole

One Pot Mexican Rice Casserole

One Pot Mexican Rice Casserole

This recipe for One Pot Mexican Rice Casserole with ground beef is incredibly tasty, quick, and simple! This delicious dish with lots of taco flavour with beef, rice and corn will be a hit with the whole family!

This casserole has the exact same flavour as everyone’s preferred Mexican rice from a restaurant. All of that can be transformed into a substantial, all-you-you-eat supper in just 30 minutes! We all agree on this rice casserole, which is why it has always been a mainstay in my home. In the past, I would assemble it and bake it in the oven. That is, until I realised I could just turn this into a one-pan, stovetop meal. For incredible flavour, the rice simmers in the pan with the cooked ground beef, onion, corn, salsa, tomato sauce, and seasonings! When the rice is soft, toss in your preferred cheese and, if desired, garnish with green onions. Additionally, we truly enjoy this with an extra side of salsa

Ingredients

  1. 1 Pound Ground Beef
  2. 1 Small Onion, Diced
  3. Salt & Pepper, To Taste
  4. 2 Tablespoons Taco Seasoning
  5. 1 Teaspoon Garlic Powder
  6. 1 Cup Long Grain White Rice
  7. 1 1/2 Cups Beef Broth
  8. 1 15 Ounce Can Corn, Drained
  9. 8 Ounces Tomato Sauce
  10. 1/2 Cup Salsa
  11. 1 Cup Shredded Cheese

Directions

  1. Cook the ground beef and onion together with salt and pepper to taste in a large skillet over medium high heat until beef is no longer pink. Drain grease if necessary.
  2. Return the pan to the stove and sprinkle the beef with the garlic powder and taco seasoning.
  3. Stir in the rice, broth, corn, tomato sauce, and salsa.
  4. Bring mixture to a boil. Cover, reduce heat and simmer for 18-20 minutes until rice is tender.
  5. Top with cheese and return the lid to the pan for 2-3 minutes until cheese is melted.


air fryer shrimp deviled eggs

air fryer shrimp deviled eggs

You need look no further than air fryer shrimp deviled eggs for a tasty and nutritious snack to serve at your next get-together!

These flavor-filled eggs are a fantastic way to include more protein in your diet. They may also be easily altered to suit your personal tastes and are simple to build. Thus, why do you delay? Try these eggs out right now!

Components

  1.  Six big eggs
  2. 12 huge shrimp with peels and veins
  3. three tablespoons of mayonnaise
  4. One spoonful of mustard dijon
  5. Half a teaspoon of seasoning for seafood
  6. One-fourth teaspoon of paprika
  7. 1/4 tsp salt
  8. One tablespoon of freshly chopped parsley

Guidelines

  • After putting your eggs in the basket, cook them for 15 to 17 minutes at 250 degrees Fahrenheit on the air fryer setting. After taking the eggs out of the air fryer basket, drop them into a bowl of icy water. Allow to cool fully.
  • Peel the eggs, cut them in half lengthwise, and extract the yolks. Add a tiny touch of olive oil to your shrimp and sauté until pink, then set aside to cool.
  • In a medium-sized bowl, chop the shrimp and combine them with the egg yolks, mustard, mayonnaise, and seasonings. Stir until thoroughly combined.
  • The shrimp mixture should be spooned into the egg white halves. If desired, garnish with the parsley. Immediately transfer the eggs onto a platter and serve, or cover and chill for a minimum of two hours before serving.
  • Arrange, present, and savor!

Expert Advice

  • Perfect Air Fryer Shrimp Deviled Eggs require a combination of skill, imagination, and meticulousness. Here are some expert suggestions to help you become a gourmet with your deviled eggs:
  • To ensure that the yolks are cooked to perfection and to avoid the shells shattering, cook the eggs in the air fryer at a lower temperature. After cooking, an ice bath helps to retain the silky texture of the whites and facilitates peeling.
  • Season Shrimp Carefully: Use seasonings that go well with the filling when you season the shrimp before air-frying it. The flavor of your deviled eggs can be much improved by adding well-seasoned shrimp, regardless of your preference for spicy, smoky, or herbaceous flavors.

Air fry lasagna

Air fry lasagna

Did you know that your air fryer can produce delicious, traditional lasagna? It’s true that air fryer lasagna tastes great and is really simple to prepare. Imagine layers of creamy Parmesan white sauce, rich meat sauce, and al dente noodles all topped with mozzarella cheese. Delicious beyond belief and far quicker than your typical lasagna from the oven.

Ingredients:

  1. Pre-cooked lasagna noodles
  2. 1 cup ricotta cheese
  3. 1 cup shredded mozzarella cheese
  4. 1/2 cup grated Parmesan cheese
  5. 2 cups marinara sauce
  6. 1/2 pound ground beef or Italian sausage (cooked and drained)
  7. 1/2 teaspoon dried basil
  8. 1/2 teaspoon dried oregano
  9. Salt and pepper to taste
  10. Olive oil for greasing

Instructions:

  • In a mixing bowl, combine the ricotta cheese, half of the mozzarella, half of the Parmesan, dried basil, dried oregano, and salt and pepper. Mix until well combined.
  • Take your air fryer basket and lightly grease it with olive oil to prevent sticking.
  • Start with a layer of pre-cooked lasagna noodles on the bottom of the air fryer basket.
  • Add a layer of the ricotta cheese mixture on top of the noodles, followed by a layer of cooked ground beef or sausage.
  • Pour a layer of marinara sauce over the meat and sprinkle some mozzarella and Parmesan cheese on top.
  • Repeat the layers until you’ve used all your ingredients, finishing with a layer of cheese on top.
  • Preheat your air fryer to 350°F (175°C).
  • Place the lasagna in the air fryer basket. You may need to cut the lasagna to fit it into the basket.
  • Air fry the lasagna for about 15-20 minutes. Check it after 10 minutes to make sure it’s not burning. You want the cheese to be melted and bubbly, and the lasagna to be heated through and crispy on the edges.
  • Carefully remove the lasagna from the air fryer using tongs or a spatula.
  • Let it cool for a few minutes before slicing and serving.

Blueberry Basil Galette

Blueberry Basil Galette

haven’t tasted anything like the deep, concentrated flavor and depth of these sweet blueberries anyplace else. When it comes to fruit-based sweets, it should come as no surprise that the quality of the fruit determines the quality of the final result. Even though love blueberries straight off the vine, anything tastes even better when combined with butter and honey.

Ingredients

  1. – 3 cups blueberries
  2. – 2 teaspoons virgin coconut oil (melted) or other light oil (walnut, almo
  3. – 1/4 cup fresh basil leaves (chopped)
  4. – 1/4 cup fresh basil leaves (chopped)
  5. – 1/2 tablespoon fresh lemon juice
  6. – 1 teaspoon grated lemon zest
  7. – 1/4 cup maple syrup
  8. – 2 tablespoons arrowroot powder or quick-cooking tapioca, crushed fine in a mortar
  9. – 1/8 teaspoon sea salt
  10. – 1 1/2 cups white spelt flour
  11. – 1/4 cup plus 2 teaspoons sugar
  12. – cup up to ¼ cold water (as needed)

Preparation

  • Mix flour and salt.Melt coconut oil, then stir with flour and salt until mixture resembles coarse meal.
  • Add maple syrup gradually (if dough does not hold together on its own, add just enough ice water to hold dough together).
  • Mix until a soft workable ball forms in the bowl; do not overmix.
  • Add a small amount of flour if necessary.Shape the dough with your hands into a flattened disc.
  • Roll dough out between two sheets of parchment paper; dust flour over the bottom sheet and on top of the dough.Use quick gentle strokes to start rolling from the center outward in each direction, like a compass.
  • Transfer the parchment covered dough onto a baking sheet.Refrigerate the dough on the baking sheet while preparing the blueberry filling.To make blueberry basil filling:Preheat oven to 350 F.In a medium bowl, whisk 1/4 cup of the sugar, arrowroot powder, and sea salt together.Rinse and drain blueberries in a strainer, then transfer to a towel and blot dry.Gently stir in blueberries, basil, lemon zest, and lemon juice; set aside.
  • Remove dough from refrigerator.Peel off top layer of parchment paper.
  • Pour blueberry filling over tart dough, leaving a 2-inch border.Fold the dough border over the blueberry filling to form a pleated ruffle.
  • Brush the folded dough border with 2 teaspoons oil, then pat the berries with the rest.
  • Sprinkle the crust with 2 teaspoons of sugar.
  • Bake about 45-55 minutes, or until the galette is golden and thick juices bubble on top.Cool completely before serving.

Source: Foodista