Air Fryer Chicken Cordon Bleu

Air Fryer Chicken Cordon Bleu

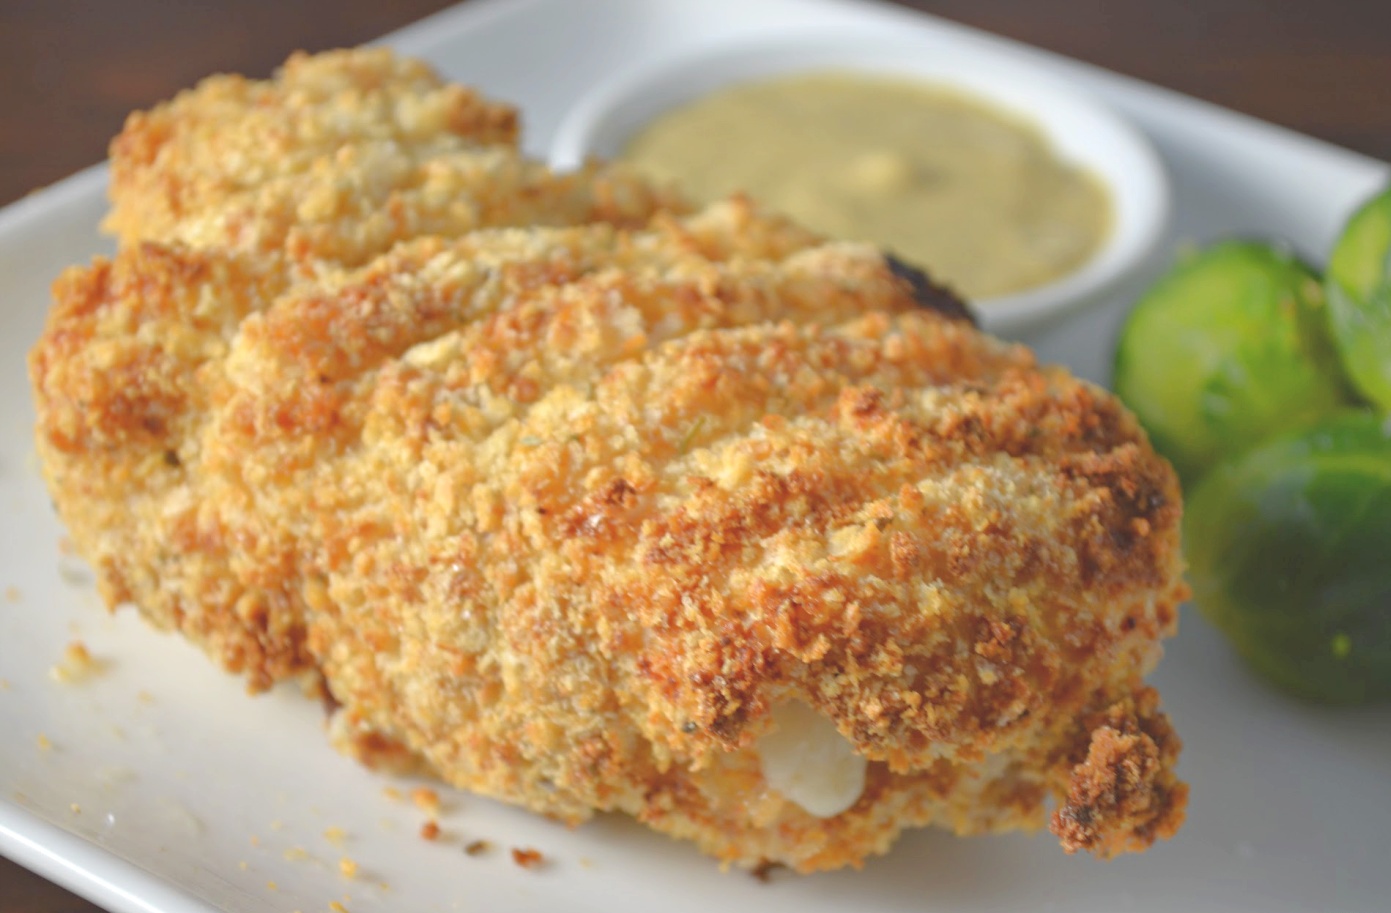
The Air Fryer Chicken Cordon Bleu recipe made using  Air Fryer turned out perfectly! My kids and wife really enjoyed it! Air-fried to perfection, a chicken breast filled with gammon and Swiss cheese and covered with Panko bread crumbs. Fantastic!

Ten minutes for preparation
20 minutes for cooking
Thirty minutes in total
Serves four.
452 kcal of calories

Recipe By: fatherandus

Ingredients For Air Fryer Chicken Cordon Bleu Recipe:

  1. Two substantial skinless, boneless chicken breasts
  2. Four pieces of Swiss cheese.
  3. Four slender gammon slices
  4. One beaten egg
  5. One and a half cups flour
  6. Panko Bread Crumbs, 1 cup
  7. Add the salt and pepper.

Instructions For Air Fryer Chicken Cordon Bleu Recipe:

  • Set the Air Fryer’s temperature to 375°F.
  • Cut the chicken breasts lengthwise in half. Thus, you can unfold them like a book to reveal two thin chicken pieces.
  • To thin them out even further, cover the breast with plastic wrap and pound it with a meat mallet.
  • Lay a slice of cheese in the centre of the breast and cover it with the gammon.
  • Utilising a toothpick to secure the roll, hold the chicken in place. To taste, add salt and pepper.
  • Roll up the chicken, dust it with flour, dip it in the egg, and finally roll it in bread crumbs.
  • Cook for 20 minutes in an air fryer set to 375 degrees. To ensure consistent cooking, turn over halfway.

Instructions for Recipe:
To achieve that lovely crispy exterior, make sure the chicken breasts receive a good coating. Before dusting the chicken with flour, you may also coat it in dijon mustard. This should improve the coating’s adhesion and add a hint of extra flavour. I just dipped mine in a side of mustard, though, because my kids detest it. I also used very thin gammon slices, and I believe that turned out nicely. Thus, the knife did not become stuck and pull the gammon out while I was slicing through the chicken. The cooked gammon crumbled easily and added a wonderful flavour and texture.

NOTES, ADVICE, AND SUGGESTIONS:

  • To achieve that lovely crispy outside, cover the chicken breasts thoroughly.
  • Before dusting the chicken with flour, you may also coat it in dijon mustard. This should improve the coating’s adhesion and add a hint of extra flavour. I just dipped mine in a side of mustard, though, because my kids detest it.
  • Cut the ham into very thin pieces. This way the knife won’t catch and yank out the gammon when you cut through the chicken. The cooked gammon crumbled easily and added a wonderful flavour and texture.
  • Keep your Air-Fryer Basket empty. When there is hot air circulating around the food to cook it evenly, air fryers function best. There must be spaces between the chicken for it to do this. Your air fryer’s capacity may need you to cook in batches.
  • To help prevent sticking, mist your Air Fryer Basket with cooking spray.
  • Cook until 165 degrees are reached inside.

Making chicken cordon bleu in the air fryer is surprisingly simple.The ingredients are really basic, and chances are you have them in your kitchen already.

Gluten Free Zucchini Muffins

Gluten Free Zucchini Muffins

Gluten Free Zucchini Muffins are prepared with common grocery ingredients. These are ideal for summer get-togethers, lunchboxes, breakfast, and on-the-go snacks. Before you need them, prepare them and freeze!
Ideal for vegetarian and gluten-free diets.

Ten minutes for prep

Cooking: Thirty minutes
Time in total: 40 minutes
Course: Brunch, Breakfast, and Snack

Diet: vegetarian and gluten-free

12 servings

215 calories

Recipe By: Bintu Hardy

Ingredients For Gluten Free Zucchini Muffins:

  1. Pear nectar (⅓ cup; 75ml)
  2. Vegetable oil (⅓ cup; 75ml)
  3. Dark brown sugar (⅔ cup; 225g).
  4. Four large free-range eggs
  5. One-half teaspoon vanilla
  6. Two and a half cups (350g) shredded zucchini
  7. Two and a half cups (300g) gluten-free flour
  8. Two teaspoons gluten-free baking powder
  9. One and a half teaspoons crushed cinnamon
  10. One-Quarter teaspoon nutmeg
  11. One pinch of salt

Instructions For Gluten Free Zucchini Muffins:

  • Turn on the oven to 350 degrees Fahrenheit, 160 degrees Celsius with a fan, 180 degrees Celsius or gas 4.
    Put the muffin liners inside your muffin tins.
  • In a sizable bowl, combine the pear nectar, vegetable oil, sugar, eggs, and vanilla; stir to blend.
  • Add the grated zucchini and stir.
  • Mix just till mixed after adding the flour, baking powder, nutmeg, cinnamon, and pinch of salt. Don’t overmix the batter, please
  • Pour the batter into the muffin tins and bake for 25 to 30 minutes, or until the muffins are cooked through, as measured by the toothpick or wooden skewer coming out clean.
  • Before serving, let the muffins to cool slightly on a wire rack.

Remarks Gluten Free Zucchini Muffins:

  • To keep moisture in the courgette, choose fresh ones and grate right before using.
  • After shredding, remove any extra moisture from the zucchini using a towel or your hands to avoid muffins that are too moist.
  • To avoid tough muffins, do not overmix the batter when combining the wet and dry components.
  • Muffin tin liners make cleanup easier and help keep food from sticking.
  • Lower the spice content at first and then gradually add more for kid-friendly muffins.
  • After baking and cooling, place the muffins in an airtight container and store it at room temperature for two to three days, or store it in the refrigerator for up to one week.
  • One dish consists of seven WW Blue Plan Smart Points.

Why Prepare This Dish Every Day?

  • Ingredients: There’s no need to look far or wide for unusual or fancy ingredients. This recipe is simple to prepare because it only calls for ordinary cupboard items.
  • Healthier Option: You may incorporate zucchini into your diet and enjoy a cake that is lighter and has less sugar. Both your health and taste buds will benefit from it.
  • Freezer-friendly These muffins are great made in large quantities and frozen. It works well for last-minute tea time treats, brunches, and hectic mornings. Your future self will be appreciative.
  • Vorteile von Zucchini: In addition to being delicious, courgette have a high water content and few calories. In addition, they offer vital nutrients such dietary fibre, potassium, vitamin C, and vitamin A.

Nourishment Facts Recipe:
12 muffins; 215 kcal; 33 g of carbohydrates; 5 g of protein; 8 g of fat; 1 g of saturated fat; 4 g of polyunsaturated fat; 2 g of monounsaturated fat; 0.05 g of trans fat; 55 mg of cholesterol; 31 mg of sodium; 180 mg of potassium; 3 g of fibre; 15 g of sugar; 137 IU of vitamin A; 5 mg of vitamin C; 71 mg of calcium; 1 mg of iron


10 Minute Pudding

10 Minute Pudding

10 Minute Pudding Recipe Finding a dish that blends speed and flavour is a genuine culinary discovery in a world where time is often limited. For dessert enthusiasts who want to sate their sweet tooth in the shortest amount of time, the 10-Minute Pudding seems like a real gem. Prepare to set out on an adventure where excitement and pragmatism collide.

Ingredients For 10 Minute Pudding Recipe:

  1. One condensed milk can
  2. Two milk cans (as a measure, use the condensed milk can)
  3. Three eggs
  4. One tsp vanilla extract
  5. One cup of sugar (to make the syrup)

Instructions For 10 Minute Pudding Recipe:

  • Making the syrup: Melt one cup of sugar in a custard mould until it turns golden caramel. Hold back.
  • Making Pudding: Condensed milk, milk, eggs, and vanilla essence should all be added to the blender. Until you have a homogenous mixture, beat for around five minutes.
  • Assembly: Fill the caramelised mould with the mixture.
  • Speedy Cooking: cook in the microwave on high for 8 to 10 minutes. The custard should have a somewhat creamy centre with firm edges.
  • Cooling: Give it at least two hours to cool before putting it in the refrigerator.
Relevance to Recipe:

Ten Minutes Pudding is more than just a quick dessert; it’s a call to pragmatism without sacrificing the pleasure of indulging in something delectably sweet. A choice that is well suited to the hectic pace of daily existence.

Advice for Recipe:

For a zesty twist, try adding some lemon zest to the mixture.
For a fragrant touch, lightly sprinkle some cinnamon over top before serving.

In summary:

One example of how to make sweet moments without spending hours in the kitchen is the 10-Minute Pudding. Talk about your experiences making this simple dish and see how taste and usefulness may go hand in hand. Post a comment to encourage others to savour the pleasure of life as it is happening!


Irresistible Chocolate Mani

Irresistible Chocolate Mani 😋

Ingredients:

  1. a quarter cup all-purpose flour
  2. 1 cup of sugar, granulated
  3. ½ cup chocolate powder, unsweetened
  4. One tsp baking powder
  5. One-half teaspoon of baking soda
  6. Half a teaspoon of salt
  7. One cup of buttermilk
  8. Half a cup of vegetable oil
  9. Two big eggs
  10. two tsp of essence from vanilla
  11. One cup of dark or semi-sweet chocolate chips
  12. Chocolate bits or chopped nuts are optional but add added texture.

Guidelines

  • Set the oven temperature to 350°F (175°C). Grease a muffin tray gently or line it with paper liners.
  • Mix the flour, sugar, baking soda, cocoa powder, baking powder, and salt together in a big bowl.
  • Beat the eggs, vegetable oil, buttermilk, and vanilla extract together until smooth in a separate basin.
  • Gently incorporate the dry ingredients into the wet ones until they are just blended. Take care not to overmix; some lumps are acceptable.
  • Add the chocolate chips and, if desired, the nuts or chocolate pieces and stir.
  • Evenly distribute the batter into each muffin cup, filling each to about ¾ of the way.
  • Bake for about 18 to 20 minutes in a preheated oven, or until a toothpick inserted into the center of a muffin comes out clean. with a few moist crumbs.
  • Remove the muffins from the oven and let them cool in the tin for a few minutes before transferring them to a wire rack to cool completely.
  • Enjoy your irresistibly delicious chocolate muffins!

Note: This recipe yields about 12 standard-sized muffins. Cooking times may vary, so keep an eye on the muffins as they bake

potatoes delmonico air fryer

potatoes delmonico air fryer

Looks like there may be some misunderstanding. Usually, “delmonico” refers to a particular kind of steak—a bone-in ribeye steak—rather than a particular kind of potato dish. On the other hand, I can supply you a recipe for air fryer potatoes to go with your steak or any other main course. Please let me know if you have a particular kind of preparation in mind, and I will try my best to help.

Here’s a basic recipe for roasted potatoes cooked in an air fryer:

INGREDIENTS

  1. 4 big potatoes, peeled and cut into little pieces
  2. Two tsp olive oil
  3. one tsp powdered garlic
  4. One tsp powdered onion
  5. A single tsp of dried thyme
  6. Half a teaspoon of paprika
  7. To taste, add salt and black pepper.
  8. fresh parsley that has been chopped (optional)

INSTRUCTIONS

  • Set your air fryer’s temperature to 400°F, or 200°C.
  • Diced potatoes should be combined with olive oil, paprika, dried thyme, onion powder, garlic powder, and black pepper in a big bowl. Make sure all of the potatoes are covered.
  • Make sure the seasoned potatoes are not packed too tightly in the air fryer basket and arrange them in a single layer.
  • The potatoes should be air-fried for 20 to 25 minutes, shaking the basket or tossing them halfway through, or until they are crispy and golden brown.
  • After that, move the air-fried potatoes to a platter for dishing.

Optional:

  • Add some finely chopped fresh parsley as a garnish for a pop of color.
  • Serve your favorite dinner with these tasty air-fried potatoes as a side dish.

Healthy Pineapple Smoothie Recipe

Healthy Pineapple Smoothie Recipe

With just 5 ingredients and 5 minutes of preparation, this nutritious pineapple smoothie recipe is simple to create! This pineapple banana smoothie is like a beach vacation in a glass; one sip will transport you to a tropical island! It is also dairy-free!

Make this Pineapple Smoothie in the kitchen when I am hankering after warm, sandy beaches and serene ocean waves! It’s like a beach vacation in a glass and tastes like a kid-friendly, healthy pina colada!

INGREDIENTS

  1. Light coconut milk, 14 oz. One and a half cups
  2. one frozen banana
  3. two cups of frozen pineapple;
  4. two TBS honey;
  5. and one tsp pure vanilla essence

Guidelines

  • Add items to the Vitamix (or other high-powered blender) container in the indicated sequence.
  • Using the tamper to force the contents into the blades, blend on low for a little while before turning it up to high.
  • Process the ingredients on high speed for 30 to 60 seconds, or until the mixture is smooth but thick.
  • Serve right away!

Keto Tater Tot Casserole

Keto Tater Tot Casserole

My Keto Tater Tot casserole, a beloved childhood classic, transforms all of those ingredients into a low-carb, keto-friendly dish!

INGREDIENTS

  1. One pound of grass-fed Cooked and drained ground beef (I used a ButcherBox). They are of incredible quality.
  2. half a diced onion
  3. Two minced garlic cloves and a 10.75-ounce can of cream of mushroom soup
  4. Two cups of cheddar cheese, shredded
  5. Two cups of frozen cauliflower riced with salt and pepper, to taste.

GUIDELINES

  • Make your cauliflower rice first. Since I use steamer bags, I simply place the two bags in the microwave and cook them for the specified amount of time. After cooking, pour the bags into a colander set over a sink to remove any remaining water.
  • This is the moment, if you haven’t already, to cook the ground beef over medium-high heat and remove any extra fat.
  • Grease a 9-inch baking dish very lightly. Combine the cooked ground beef, cream of mushroom soup, onion, garlic, and season with salt and pepper. Fill the baking dish’s bottom with the mixture.
  • Place one cup of the shredded cheddar cheese on top, then add the drained cauliflower, additional salt, and pepper, and lastly, the leftover cheese.
  • Bake for 35 to 40 minutes, or until the cheese is melted and the cauliflower begins to color.
  • Present and savor!

KETO CREAM CHEESE SAUSAGE BALLS RECIPE

KETO CREAM CHEESE SAUSAGE BALLS RECIPE

This recipe for keto cream cheese sausage balls is a great low-carb appetizer, snack, or quick brunch.

There is just one way to characterize this recipe: protein pick-me-up. Its ingredients are all great sources of protein. This is the ideal dish to make if you’re hungry after working out or need something to tide you over until your next meal. The greatest approach to get your metabolism going in the morning is to eat protein! It may surprise you to learn that having high-protein breakfast can aid in weight loss. Yes! Your metabolism rises as result of it helping to grow muscle mass. These are also the ideal recovery food for after workout. Protein gives your body the fuel it needs to rebuild your muscles. Additionally, it will lessen your need to nibble afterwards.

Twenty minutes for preparation

 20 minutes for cooking

 Forty minutes in total

 Servings Seven individuals

 90 kcal of calories

Components

  1. 1 pound of hot or mild ground sausage
  2. two sacks Grated Cheddar Moon Cheese into crumbs
  3. One cup of shredded cheddar cheese
  4. Eight ounces of softened cream cheese

Guidelines

  • Set oven temperature to 400 degrees.
  • Place all the ingredients in a large mixing basin and use your hands to knead until thoroughly incorporated.
  • Roll the mixture into 35 uniformly sized balls, each measuring approximately an inch across.
  • After putting the sausage balls on a rack set over a baking sheet, bake them for 18 to 20 minutes, or until they are cooked through and have a light brown color.

Instructions for Recipe

Accompany it with your preferred reduced-carb dipping sauce. Remoulade was employed.

Keto Zucchini Casserole

Keto Zucchini Casserole

For a vegetarian entrée or side dish, this simple baked keto zucchini casserole with sour cream and cheese is ideal.

This nutritious zucchini gratin is also devoid of gluten and eggs. The ideal casserole dish for keto that will make the most of your summer squash.

INGREDIENTS

  1. Two pounds of zucchini Four huge zucchinis
  2. One tsp salt
  3. Two ounces of peeled and sliced onions,
  4. plus one tablespoon of melted unsalted butter
  5. or olive oil to coat the dish
  6. Three cloves of garlic
  7. Half a cup of heavy cream
  8. Half a cup of sour cream
  9. one cup of split shredded Parmesan
  10. One cup of split grated mozzarella (or aged cheddar or emmental)
  11. One tsp salt

PROCEDURE

  • Aim for 425°F (220°C) in the oven. Butter should be used to grease a 1.5-liter square glass or ceramic baking dish. Put aside.
  • Cut the zucchini into 1/4-inch (0.6 cm) slices, then transfer them to a large bowl and add 1 teaspoon of salt on top.
  • over the slices, tossing them with your hands to coat each one with salt. Allocate twenty minutes. Don’t omit this step as it will extract the water from the zucchini and prevent a watery casserole!
  • After draining the zucchini slices, place them on absorbent paper and pat dry with additional absorbent paper to get rid of any remaining water.
  • Melt butter in a large saucepan over medium heat, then cook onions until they become tender and fragrant. Add the garlic, pour in the sour cream and heavy cream, and continue heating until bubbles start to form on the edges.
  • Add half of the parmesan and half of the mozzarella that have been grated, and stir until the cheese has melted completely and a cheesy sauce appears.
  • Arrange the slices of zucchini in a row within the square baking dish. To see how to make this, view the picture in my article or the video.
  • Spread the cheese sauce equally over all of the zucchini slices after pouring it on top. Over the zucchini slices, distribute the remaining mozzarella and parmesan cheeses.
  • Bake for 15 to 20 minutes, or until the zucchini are soft, the sauce is bubbling in the pan, and the cheese is browned on top. Avoid overbaking to avoid mushy zucchini.

Easy Loaded Creamy Shrimp Baked Potato Recipe

Easy Loaded Creamy Shrimp Baked Potato Recipe

When it comes to baking potatoes, I always make sure to serve my family the best and tastiest version I can find—and by best, I mean something like this recipe from Whip It Up With Jay on YouTube! This dish is so delicious that you won’t be able to eat it all in a matter of minutes once you put it on the table. If you would like to try this dish, please read the directions below and watch the tutorial video while you work.

INGREDIENTS

  1. Two big russet potatoes
  2. 1.5 pounds of big shrimp
  3. One teaspoon of your preferred seasoning or “slap your mama once” seasoning
  4. One teaspoon One teaspoon full seasoning
  5. One-half teaspoon of parsley
  6. 1/2 teaspoon ground black pepper
  7. One teaspoon of paprika

Rich Sauce

  1. One tablespoon of garlic paste
  2. One cup of heavy cream
  3. ¼ cup parmesan cheese and one cup Colby Jack cheese
  4. One teaspoon full seasoning
  5. 1/2 teaspoon ground black pepper
  6. 1 tsp of seasoned cilantro
  7. One teaspoon of paprika
  8. ½ little onion
  9. bell peppers
  10. Unsalted butter
  11. Parsley

INSTRUCTIONS

Step 1

  • Adjust the oven temperature to 400°F and get a baking pan ready. Make indentations all over the potatoes with a fork, then cover them with a generous amount of oil, rubbing it in until fully covered, and then toss in some salt. Place the potatoes on a baking sheet, cover them nicely with foil, and bake in a preheated oven for approximately one hour, or until fork tender (the larger the the potato, the longer cooking is required). After the shrimp have been deveined and their skin removed, put them in a big bowl and pour some oil over them.

Step Two

  • After giving them a thorough massage or tossing them to coat, season them thoroughly using your preferred brand of seasoning and the entire amount of seasoning. Put a pan on the stove over medium-high heat, add a little oil, and let it get hot before adding the shrimp with seasoning. Make sure they are well charred on all sides by tossing them every so often and letting them cook for 4 to 5 minutes.

Step Three

  • After the shrimp are cooked, remove from the pan and place the butter in it. Melt the butter and add the diced onions and bell peppers after that. Toss them well and cook for 4 minutes or until they become tender. Add the creole seasoning and all of the seasonings, stir well, and pour in the heavy cream. Reduce the heat to medium. After giving them a thorough swirl, add the Colby Jack and Parmesan cheeses and stir until they melt. After removing the sauce from the pan and turning off the heat, leave it aside.

Step Four

  • As demonstrated in the video, cut off the potatoes’ tops and scrape off the insides before putting them in a big dish. Add the cheese and a small amount of the cream sauce to the bowl of mashed potatoes and stir to incorporate. Season with salt and pepper. Evenly load the potatoes with the mixture, top with a little more cheese, and then gently arrange the shrimp on top. Re-place them in the baking dish, pour additional sauce over them, and bake for a further ten minutes. Present and savor!