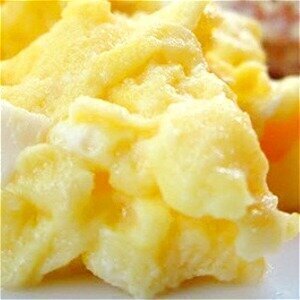
16 Tips For The Fluffiest Scrambled Eggs
BY SARA KLIME
Breakfast wouldn’t be the same without
scrambled eggs. Out of 17,000 respondents , 45% of them said they preferred scrambled eggs to poached, fried, hard-boiled, and sunny side up, according to our exclusive study. It’s difficult to say no to a lovely plate of warm fluffy eggs that has been lightly seasoned with salt and pepper.
Overcooked and dry scrambled eggs, however, are much less appetising. Understanding how and why eggs cook the way they do, as well as how to make them tasty rather than disgusting with a few simple ingredient additions, technique adjustments, or even an appliance purchase other than a hob, will help you avoid such a cooking disaster. Here are some of the greatest ways to cook eggs so they’re always properly fluffy and ready to eat—whether they’re to be eaten with other breakfast staples or on toast.
1.Put in additional egg yolks.
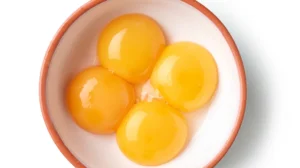
Most individuals just need to crack the eggs into the bowl and mix them when making scrambled eggs. However, you might want to experiment with a different yolk to white ratio to achieve the softest scrambled eggs possible. Egg proteins need a certain temperature to link, and adding extra egg yolks will enhance that temperature and elevate scrambled eggs to a new level. Because of this increased temperature requirement, there is a decreased chance that the eggs would be overcooked, virtually assuringR
emember, you don’t have to overdo it when it comes to adding extra yolks to recipes. Just one extra yolk should be added for every four eggs. If you’re looking for something to do with the extra egg whites, consider whipping up a meringue dessert, adding them to a baked good, or saving them for your next egg white omelet.
2.Don’t add milk.
Who came up with the brilliant notion to add milk to scrambled eggs is anyone’s guess, but it’s probable that they were unaware of the scientific reasons why this trick doesn’t work. If you’re thinking of adding milk to scrambled eggs, think again. The addition of cow’s juice merely dilutes the dish’s exquisite eggy flavour and makes it harder to cook to perfection. This is because the addition of milk thins the scrambled egg mixture, accelerating the cooking process. The consistency of eggs that have had milk added will likely be drier than if the milk had been omitted.
Instead, think about including butter, a different dairy product. The protein in the eggs is changed by the fat in a stick of butter, preventing them from coagulating. It also adds that delicious, rich buttery flavour that elevates scrambled eggs to new heights; served with a toasted bagel, it’s the ideal way to start the day.
3.Add a little bit of water.
There are others who will not let their eggs sit without adding some kind of liquid. The next best thing to do is add water if the milk dries up the curds and results in a crumbly mess instead of a fluffy, soft feel. The eggs in the pan will steam from the water, retaining some of their moisture and soft texture.
However, use caution when incorporating water into an egg mixture. For each egg, you only need to add roughly ½ teaspoon of water, so don’t add more than two teaspoons in total. If there is too much water in the pan, it can flood and dilute the eggs excessively, which would only make the issue worse than if you added milk to the eggs. Furthermore, it’s imperative to exercise patience when cooking the eggs over medium-high heat until the water steams and the eggs are cooked. Have faith in the procedure; the outcome will be fluffy eggs of the highest calibre.
4.Turn down the heat.
Setting a stove’s dial to the ideal temperature always seems a little random. How should a cooker be adjusted to the ideal temperature, and when should eggs be added to the pan?
Steer clear of overheating the stove in order to achieve softer scrambled eggs. The proteins in the eggs can coagulate and form curds very quickly when they come into contact with a hot pan. Alternatively, cooking the eggs on medium-low will allow you to have complete control over how long they cook and will let the eggs stay moister longer.
The colour of the butter is a good indicator of when a skillet is ready for eggs. The pan’s temperature is too high if the butter has browned. It’s also crucial to keep in mind that a pan retains heat, so after the eggs have set into soft curds, which should happen after about ten minutes, turn off the stove. After letting the eggs simmer in the pan for a further thirty seconds or so without direct heat, serve.
5.Before adding eggs to the pan, whisk them.
There will always be those who don’t think things through, and one of their actions may be to just throw their eggs into a skillet without properly scrambling them first. It may seem like a small, unimportant step in the making of scrambled eggs (since they will eventually just scramble in the pan), but it is an important step that shouldn’t be ignored.
6.Whisking the eggs breaks apart the proteins in the egg whites,
which makes this step extremely important. A looser whites structure allows air bubbles to become trapped inside, making the scrambled eggs on the plate softer. What is used to beat the eggs is just as important as whisking them before adding them to the pan. A regular kitchen fork works far better than a wire beater, which tends to add too much air to the mixture. The finished product will be exquisite, with a flawlessly fluffy texture.
7.Pour in a small amount of lemon juice to keep the blend light.
When preparing traditional scrambled eggs, an acidic element isn’t frequently taken into account, but it should be. Because lemon juice fundamentally alters the protein structure of egg whites when they are whisked, it can improve scrambled eggs. This makes the scrambled eggs on the plate more fluffy by improving the egg mixture’s ability to contain air. Furthermore, the acid will cause some of the proteins to denature, which will keep the curds soft and stop them from overcooking too quickly. The steam from the cooking lemon juice will cook the eggs nearby as well.
8.In addition to serving a practical purpose,
adding lemon juice to eggs creates a vibrant, acidic flavour contrast that tantalises the taste senses with each bite. For every two to three eggs, just about a half-teaspoon of juice is needed; add a little bit more if you want the flavour to be more intense.
9.Go to the cappuccino maker.
Geek enthusiasts may scan the space and think which appliances could improve scrambled eggs.Although Martha Stewart’s advice is a little out of the ordinary, it works well.
10.Instead of cooking the eggs on the stove, use an air fryer
It seems like you can cook anything in an air fryer. Indeed, even eggs.U
sing an air fryer instead of a stovetop makes making fluffy scrambled eggs easier. Before adding the fat to a small, heat-safe pan, such as a ceramic ramekin, preheat the air fryer to 220 F. It is imperative that you nestle the pan into the air fryer’s basket as opposed to simply pouring the eggs inside. Use a non-stick pan because it will facilitate the scrambling process.
When the air fryer reaches the right temperature, add the pre-whisked, seasoned eggs. After two minutes, turn the eggs over and continue cooking until they are cooked to your preferred consistency. To keep the eggs fluffy and moist, cook them slowly on a hob instead of adjusting the temperature to cook them faster. Stirring is also very important because it keeps some of the eggs from cooking through more quickly than others.
11.Use seltzer water to keep everything soft
Many people enjoy the fizzy sensation of chilled seltzer. Surprisingly, the drink can not only be delightful to sip on a hot summer day, but it can also be the secret to effortlessly achieving fluffy eggs. To make air pockets in scrambled eggs that expand in the presence of heat, try adding seltzer water.
To the recipe, add a tablespoon of seltzer water for every two eggs. It’s important to follow this proportion since adding too much liquid—either milk, seltzer water, or regular water—will result in runny eggs. While the taste of the water won’t affect the eggs, basic seltzer is the recommended option; avoid trying with flavours like cranberry lime or black cherry. Just open the can to discover fluffy, cloud-like eggs; save the remainder for drinking or mixing into a cocktail inspired by mimosas.
12.To make fluffy eggs, use sour cream.
Fat is a buddy when it comes to producing great scrambled eggs. This is why adding sour cream to a recipe is a great way to bring out its flavour. Four teaspoons of sour cream are needed for every four eggs in Paula Deen’s scrambled eggs recipe. The Southern culinary icon whisks the creamy dairy product into her eggs along with some salt, pepper, and water, then transfers the mixture onto a hot skillet to cook. The finished dish of eggs is fluffy and creamy but also slightly moist.
Bacon grease is another item that Deen uses to enhance the flavour of her scrambled eggs. Before adding her egg mixture to the pan, she adds equal amounts of the leftover ingredient and butter, another favourite of hers. This not only gives eggs a great breakfast flavour boost, but it’s also a clever way to use up fat that would otherwise go to waste.
13.Try using a rice cooker to prepare scrambled eggs
While most people only cook white, brown or jasmine rice in their rice cookers, savvy cooks also know that this handy gadget works wonders for making delectable scrambled eggs without the need for a stove. To begin using this multipurpose culinary tool, beat eggs with your preferred seasoning and a small amount of water. Next, apply non-stick cooking spray or your preferred fat to the rice cooker. Next, close the machine after setting it to the “cook” setting.
But that doesn’t mean those eggs can be ignored, even if this appliance is largely hands-off. After two to three minutes of cooking, remove the lid and give the eggs a good stir. But take care not to turn the heat up too much, as this will dry out the eggs and make them just as unsuccessful as any hob accident.
14 .Put some crème fraîche on top.
The French have taught us a lot about cuisine, and American chefs and entertainment star Gordon Ramsey have taught us a lot in the current day. Thanks to a component that’s popular in French-style scrambled eggs but less common here, his scrambled egg recipe has been praised as one of the creamiest and fluffiest out there.
Ramsay gives his eggs a fluffy texture by adding crème fraîche. As an added bonus, Ramsay saves the crème fraîche till last, giving his eggs a bright, creamy finish—a departure from other chefs who add creamy ingredients right away.
15.Take out a jar of mayonnaise.
The condiment mayonnaise has the power to permanently alter your scrambled egg recipe. Alton Brown adds a surprising ingredient to his scrambled eggs that keeps them fluffy and tender. While the condiment is usually used to cream potato salads or schmeared over hamburgers, adding it to eggs will increase the fat content and provide a creamier texture for breakfast.
16.To keep the eggs from stiffening, stir them frequently.
Perfect, fluffy scrambled eggs are impossible to achieve with an imperfect cooking process, no matter how many odd additives are included. More than anything, the way the eggs are made is the key to preventing flat scrambles.
.