Bread in 5 Ingredients

Bread in 5 Ingredients

Hello! Today I baked delicious bread. I don’t buy bread anymore! I bake my own bread. Simple recipes help me bake bread every day.

My grandfather taught me how to bake German bread. My grandfather was right. It’s quick and easy. Baking bread is easy. How do you make bread? Today we are preparing a recipe for German bread. Bread in 5 minutes! That is possible! Practical recipes will help you with this.

Ingredients For White bread recipe

  1. 1 tbs Sugar
  2. 450 ml olukewarm water (cold water works too, but the dough will rise more slowly). However, avoid using hot water as this could kill the yeast.
  3. 1 tablespoon granulated yeast (you can use any type of yeast, including non-granulated fresh cake yeast and those labelled as instant, “quick,” rapid rise, bread machine, or active dry).
  4. two tbs  salt
  5. 600 gram of wheat flour (regular supermarket flour was used in the recipe’s testing). Check here to see if the flour you use has more protein.

Instructions:

  1. Take a bowl pour lukewarm water add one tbs yeast and sugar
  2. Mix well and cover and let rest for five mins.
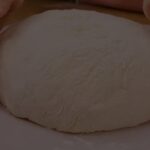
  3. 600 gramm flour sift through a sieve.This is necessary to make the bread softer.
  4. Mix the dough with spatula or dough wisker.
  5. cover the dough in air tight container and let it rise in a warm place for 3 hours.
  6. The dough rose well.
  7. Let the air out with spatula.
  8. Be sure air was out again cover and leave in a warm place for another 40 mins.
  9. after that collect the dough with spatula.
  10. sprinkle parchment paper with flour.
  11. transfer the dough
  12. dust some flour on the top.
  13. gently pull the edge of the dough toward the center.
  14. Transfer the dough into baking dish or glass mold.(i use glass mold).
  15. mae a cut.
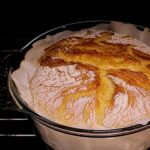
  16. cover with a lid and bake at 220 degree c(428 F) for 25 mints.
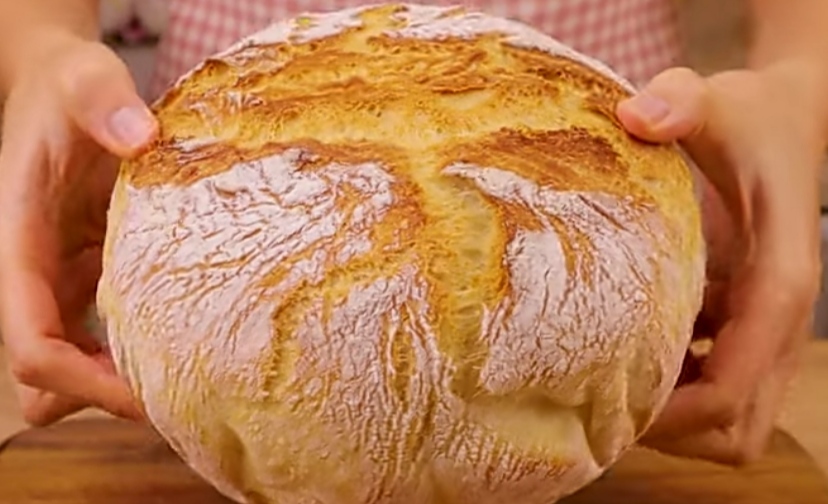
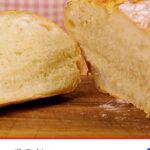
  17. after that take out covered dough from the oven and remove the lid.And Bake at 220 C(480 F) for another 30 minutes.The Bread is Ready.its very yummy and crispy.


Equipment:

This egg and rice recipe

This egg and rice recipe is so delicious I can cook it almost every day! Top recipe! Good day! In this Recipe I show you how to make a delicious dinner with rice, eggs and vegetables!

You will love the delicious taste of this Rice and Vegetable Casserole! Be sure to cook such lasagna with eggs and rice for your loved ones, and they will be happy!

Recipe by: Schnell Lecker Kochen

Ingredients

  1. 1 cup of rice
  2. 6 eggs
  3. 1 cup of milk
  4. 1 cup flour
  5. 30 melted butter
  6. 1/2 cup warm water dill,
  7. green onion
  8. 2-3 tbsp mayonnaise
  9. 1 onion
  10. 2 peppers
  11. 1 carrot
  12. 1 cup tomato paste
  13. 60 grams of pizza mozzarella

Instructions:

1. Boil 1 cup of rice in salted water.

2. Beat 3 eggs, add salt and sugar.

3. Add milk and flour, melted butter and warm water.

4. Stir thoroughly.

5. Before the first serving, lubricate the pan with vegetable oil.

6. Pour the batter into the pan and cook until golden brown on both sides.

7. Boil 3 eggs for 10 minutes.

8. Grate boiled eggs and mix with rice.

9. Dill and green onions, add mayonnaise, mix.

10. Spread the filling on the cake and roll up.

11. Cut the onion, stew in a pan until soft.

12. Cut the peppers and add to the onion, cook for 5 minutes.

13. Grate the carrots and add to the peppers.

14. Add the tomato passata, salt and pepper.

15. Boil for 5-7 minutes.

16. Put some pepper sauce in a casserole dish, spread the rolls on top, cover with the remaining sauce.

17. Grate the cheese, sprinkle the casserole on top.

18. Cook at 180°C (350°F) for 15-20 minutes.

This egg and rice recipe is so delicious I can cook it almost every day! Top recipe! Good day! In this Recipe I show you how to make a delicious dinner with rice, eggs and vegetables!

air fryer gingerbread cake

air fryer gingerbread cake

Recipe for air fryer gingerbread cake This air fryer gingerbread cake is the perfect choice for a simple yet elegant Christmas dessert. Your sweet craving will be satisfied by the cake’s crispy top and moist, delicious inside. It’s also quite quick to prepare, making it ideal for guests that arrive at the last minute!


This is a classic recipe for gingerbread. This air fryer recipe for homemade gingerbread cake turned out really great, and it’s a rich bread.

This is delicious when cut into squares and served with a generous dollop of whipped cream and a dash of ground cinnamon.

Spend 20 minutes preparing

Cooking Time: 20 minutes

Total Time: Forty Minutes

Servings: Eight portions

Recipe By: Fork to spoon


Ingredients for air fryer gingerbread cake:

  • 2 1/2 cup of flour for all purposes
  • One tsp salt
  • One tsp baking soda
  • One tsp of ginger
  • One cup of molasses
  • One big egg
  • 1/4 cup of sugar, granulated
  • One cup of buttermilk
  • Three tablespoons of unsalted, melted butter


Instructions for air fryer gingerbread cake:

  • In a large mixing basin, stir together the flour, baking soda, salt, and ground ginger.
  • The egg, molasses, sugar, buttermilk, and butter are then combined.
  • Stir thoroughly, making sure to scrape down the sides of the basin to incorporate all of the batter.
  • Apply some olive oil spray to your baking pan.
  • Transfer the mixture into the ready pan.
  • Place the pan inside the air fryer. And for 20 minutes, set the air fryer’s temperature to 320 degrees Fahrenheit.
  • Check to see if it’s done after 20 minutes; if not, cook for a further 10 minutes. Your particular air fryer and the pan you use will dictate the precise timing. I suggest utilising a thinner pan to ensure complete cooking.
  • Arrange, present, and savour!


Supplies: Air Fryer, Baking Pan, Cooking Spray

Nutrition Facts for the Reicpe:
One serving is provided.354 kcal of calories 69g of carbohydrates 6g of protein 6g of fat Four grams of saturated fat1g of polyunsaturated fat2g of monounsaturated fat Trans Fat: 0.2 g38 mg of cholesterol 518 milligrams of sodium Potassium: 708 mg 1g of fibre 39g of sugar 214 IU of vitamin A Vitamin C: 0.01%132 milligrams of calcium Iron: 4 mg


Morning Glory Baked Oatmeal with Pineapple Frosting

Morning Glory Baked Oatmeal with Pineapple “Frosting"

Morning Glory Baked Oatmeal with Pineapple Frosting. Similar to the traditional treat, this baked cake muesli is seasoned with different ingredients. I eat it for breakfast, but it’s like dessert…very similar to carrot cake. Although I adore all of the flavours of cakes, I think one of my all-time favourite is the “morning glory” flavour. Let me briefly introduce you to morning glory baked oatmeal in case you aren’t familiar with them. This cake batter usually contains an enormous amount of flavourful ingredients. If my fondness for morning glory cake isn’t enough to convince you that it baked good to be flavourful and texture-rich, then nothing will.

Serves 8 (could easily be 12)


Ingredients For Morning Glory Baked Oatmeal with Pineapple “Frosting”:

  • 4 cups (320g) of old-fashioned oats
  • 1 ½ cups (360mL) unsweetened vanilla almond milk
  • 2 cups (492g) of unsweetened applesauce
  • 4 large eggs
  • ½ cup (120mL) sugar-free pancake syrup
  • 1 Tablespoon pure vanilla extract
  • 1 teaspoon coconut extract
  • 1/3 cup Stevia (or sweetener of choice)
  • 2 tablespoons cinnamon
  • 1 teaspoon baking powder
  • 1 teaspoon ginger
  • ½ teaspoon salt
  • 6 ounces (about 17 baby) carrots, grated
  • 1 pound apples (3 small), grated (don’t peel)
  • 47g Raisins
  • Pineapple “frosting”:
  • 8 ounces nonfat Greek yogurt
  • 6 tablespoons (90mL) sugar-free pancake syrup
  • ¼ teaspoon pure vanilla extract
  • ¼ teaspoon coconut extract
  • 20 oz. can crushed* pineapple in 100% juice, drained well
  • Optional Garnish (per serving):
  • 5g Fat-Free Reddi Wip
  • 2g chopped walnuts


Instructions For Morning Glory Baked Oatmeal with Pineapple “Frosting”:

  1. Preheat the oven to 350 degrees.
  2. Spray a 9” x 13” glass baking dish with cooking spray.
  3. In a mixing bowl, combine oats, milk, applesauce, eggs, syrup, vanilla extract, coconut extract, Stevia, cinnamon, baking powder, ginger, and salt.
  4. Stir in carrots, apples, and raisins.
  5. Pour into the prepared baking dish.
  6. Bake for 40 minutes or until set and lightly brown.
  7. Serve warm or cold with glaze.
  8. Store in refrigerator for up to one week.
  9. For the glaze, stir all ingredients together in a bowl.
  10. Cover and refrigerate.
  11. I reheat each piece in the microwave on HIGH for 30 seconds.
  12. Top warm oatmeal with a couple of spoonfuls of glaze…the glaze will melt.
  13. Garnish with fat-free Reddi Wip and chopped walnuts if desired.

Notes: Serves 8 – 5 Points or Serves 12 – 3 Points     1/8 is 1 Point weight watchers recipes

Skinny Orange Julius

Skinny Orange Julius

I love this quick & easy recipe and it’s a treat for Beginners….

Here’s a skinny orange, light smoothie you’ll really enjoy.  It contains just a handful of ingredients and is so refreshing. Along with orange juice, soy milk, almond milk or reduced-fat milk, it contains vanilla extract. The vanilla softens the hard, acidic edge of the juice and produces a unique flavor, which is fruity and creamy. The milk further softens the blend.  To make it extra skinny, I’ve added a bit of sugar substitute. This is a refreshing, light smoothie for anyone who’s lactose intolerant if you use soy or almond milk. Each drink has 120 calories and 1 gram of fat. So give it a whirl, grab a straw and start skinny sipping!

Ingredients

  1. 1 1/2 cups ice crushed
  2. 1/2 cup almond milk
  3. 2 ounces orange juice no sugar added
  4. 3 mandarins peeled
  5. 2 tablespoons nonfat yogurt
  6. 2 tablespoons nonfat dry milk
  7. 1/2 teaspoon vanilla
  8. 1/2 teaspoon orange extract
  9. 1 tablespoon maple syrup

Instructions

  1. Add ice, almond milk, and orange juice to blender and blend on high for ten seconds.
  2. Add mandarins, one at a time. Blend until smooth.
  3. Add the last five ingredients and taste. Adjust flavor with orange and/or vanilla extracts, sweetness with more maple syrup, frothiness with more non-fat dry milk.

Notes

  • One orange may be subbed for the mandarins. Seedless is best, but you can always pick out the seeds.
  • Due to use of fresh fruit, pulp will be present. To remove pulp, strain directly after blending mandarins with the liquid ingredients. Proceed to step three.
  • If not using orange extract, just double the vanilla extract to total one teaspoon.

Nutrition Information

Serving: 8ounces | Calories: 160kcal | Carbohydrates: 33g | Protein: 5g | Fat: 1g | Saturated Fat: 1g | Cholesterol: 2mg | Sodium: 150mg | Potassium: 484mg | Fiber: 3g | Sugar: 28g | Vitamin A: 1119IU | Vitamin C: 50mg | Calcium: 274mg | Iron: 1mg |


Steak Stir-Fry

Steak Stir-Fry 

Steak Stir-Fry 

15-Minute Pepper Steak Stir-Fry: Savory-sweet sauce combines succulent steak with luscious bell peppers! This recipe for pepper steak stir-fry is sure to please.

Here’s a quick and delicious recipe for Pepper Steak Stir-Fry that you can make in just 15 minutes:

Ingredients Steak Stir-Fry:

  1. 1 lb (450g) beef steak, thinly sliced (flank steak or sirloin work well)
  2. 2 bell peppers (any color), thinly sliced
  3. 1 onion, thinly sliced
  4. 3 cloves garlic, minced
  5. 2 tablespoons soy sauce
  6. 1 tablespoon oyster sauce
  7. 1 tablespoon hoisin sauce
  8. 1 tablespoon cornstarch
  9. 2 tablespoons vegetable oil
  10. Salt and pepper to taste
  11. Cooked rice, for serving
  12. Optional garnishes: sliced green onions, sesame seeds


Instructions For Steak Stir-Fry:

  • In a small bowl, whisk together soy sauce, oyster sauce, hoisin sauce, and cornstarch. Set aside.
  • Heat 1 tablespoon of vegetable oil in a large skillet or wok over medium-high heat.
  • Add the sliced beef to the skillet in a single layer. Cook for 2-3 minutes without stirring to allow the beef to sear and brown on one side. Then, stir-fry for an additional 1-2 minutes until beef is almost cooked through. Remove the beef from the skillet and set aside.
  • In the same skillet, add the remaining tablespoon of vegetable oil. Add the sliced onions, bell peppers, and minced garlic. Stir-fry for 3-4 minutes until the vegetables are crisp-tender.
  • Return the cooked beef to the skillet. Pour the sauce mixture over the beef and vegetables. Stir well to combine and coat everything in the sauce.
  • Cook for another 1-2 minutes until the sauce thickens slightly and coats the beef and vegetables evenly.
  • Season with salt and pepper to taste.
  • Serve the pepper steak stir-fry hot over cooked rice. Garnish with sliced green onions and sesame seeds if desired.
  • Enjoy your quick and tasty pepper steak stir-fry

Finishing Touch:

  • Stir-fry mixes so many different cuisines and flavours that you can add anything to top it off that you think your palate would enjoy.
  • provide shredded carrots to your dish to provide some colour. A lovely touch would be to add some crushed water chestnuts or your favourite nut on top!

AIR FRYER CHICKEN DRUMSTICKS

AIR FRYER CHICKEN DRUMSTICKS

For anyone who wants to savor the crispy, flavorful taste of fried chicken with a fraction of the oil, air fryer chicken drumsticks are a game-changer. Drumsticks cooked using this approach should be wonderfully golden on the exterior and succulently delicate on the inside, making for a hassle-free cooking experience. These air fryer drumsticks are ideal for a fast supper, meal prep, or even a laid-back get-together. Your guests will be enquiring about your secret to such flawlessly prepared deliciousness.

ingredients


  1. Six skin-on chicken drumsticks for that delectable crunch.
  2. To help the seasoning adhere and crisp up the skin, use one tablespoon of olive oil.
  3. One teaspoon of garlic powder: To provide a deliciously garlicky touch.
  4. One teaspoon of smoked paprika gives the dish a lovely color and smoky flavor.
  5. One teaspoon of onion powder: To add flavor and depth.
  6. One-half tsp salt: To bring out every taste.
  7. Half a teaspoon of black pepper gives it a little kick.
  8. For added spiciness, optional: To taste, add 1/4 teaspoon cayenne pepper.

Instructions

  • Preheat the Air Fryer: For around three to five minutes, set your air fryer to 400°F (200°C). This guarantees that the drumsticks cook at the proper temperature right away.
  • Get the drumsticks ready: Using paper towels, pat the chicken drumsticks dry. To get crispy skin, you must do this step.
  • The season The drumsticks should be put in a big basin. Add the onion powder, smoked paprika, garlic powder, black pepper, and cayenne (if using) to the olive oil. Toss until the oil and seasoning are distributed evenly over the drumsticks.
  • Place the drumsticks in the air fryer basket, making sure they are not in contact with one another. This makes it possible for air to flow freely, cooking the chicken uniformly and giving it a crispy outside.
  • Cook: For about ten minutes, air fried the drumsticks at 400°F (200°C). Once the drumsticks have been flipped, cook for a further 10 to 15 minutes, or until a meat thermometer inserted into the chicken registers an internal temperature of 165°F (74°C).
  • Rest: After cooking, let the chicken a few minutes to rest. This keeps the inside of your drumsticks moist and tasty by allowing the liquids to disperse.
  • Serve: Present your hot chicken drumsticks from the air fryer beside your preferred sides and dipping sauces. They go very well with creamy coleslaw, roasted vegetables, or a light salad.

Not only do these chicken drumsticks from the air fryer have excellent flavor and texture, but they also provide a healthier option compared to deep-frying. The outcome is totally gratifying, guilt-free, and sure to become a staple in your meal plan. Take pleasure in the simplicity and ease of air-frying these delicious drumsticks, and relish each crispy, juicy bite.

GARLIC AND BUTTER FLATBREAD

 Ingredients :

  1. 350g of Flour
  2. 250g of Yogurt
  3. 1 tsp of Baking Powder
  4. 1 tsp of Salt
  5. 1 tsp of Sugar
  6. 2 cloves of Garlic
  7. 30g of Butter

Preparation

Prepare the Dough:

  • Sift the flour into a bowl and create a well in the middle. In this well, add the yogurt, baking powder, sugar, and salt. Mix the ingredients together, gradually incorporating the flour from the sides until completely absorbed.

Form the Balls:

  • Knead the mixture into a soft dough and divide it into 8 balls. Let them rest for 5 minutes.

Roll Out the Dough:

  • Roll each ball into a thin disk and stack them, placing a sheet of baking paper between each flatbread to prevent sticking.

Cooking the Flatbreads:

  • Heat a pan over medium/high heat (level 7-8 out of 9). Lightly oil it and cook each flatbread for approximately one minute on each side.

Garlic and Butter:

  • Once removed, grease generously with butter and rub with sliced garlic cloves. If you prefer, you can also chop the garlic and sprinkle it over the hot, freshly made flatbreads.

Serving:

  • Serve and consume immediately as the garlic and butter flatbreads tend to become harder once they cool down.

Conclusion:

  • The Garlic and Butter Flatbread recipe is more than a mere guide to making bread; it’s an invitation to infuse your kitchen with the warmth of freshly baked delights and the aromatic allure of garlic and butter. So, gather your ingredients, preheat the oven, and let the magic unfold as you embark on a culinary adventure that promises not just a meal, but a symphony of flavors that will linger in your memory.
  • ENJOY!

Easy Snack top tomato slices with parmesan chees

Easy Snack top tomato slices with parmesan chees
Easy Snack – top tomato slices with parmesan cheese (or mozzarella) and put in your air fryer. It’s like a crustless, low-carb pizza and so good.
Roasted tomatoes are the ideal summertime appetiser or side dish when topped with mozzarella, parmesan, and basil. Thanks to the air fryer, you may enjoy this meal not only in the summer but throughout the year!

INGREDIENTS:

  1. 1 tomato large
  2. 2 teaspoons olive oil
  3. ½ teaspoon dried oregano
  4. salt
  5. pepper
  6. ¼ cup parmesan cheese freshly grated
  7. basil leaves optional
INSTRUCTIONS:
  1. Slice your tomato into thick slices. Spread the slices out on a cutting board.
  2. Drizzle the olive oil over the slices. Season with oregano, salt, and pepper.
  3. Grate the parmesan cheese, then top the tomato slices with the cheese. Carefully add the tomato slices to the air fryer basket in a single layer.
  4. Cook at 380 degrees F for 10 minutes, checking frequently for doneness. Remove from the air fryer and top with fresh basil leaves.

Can you roast tomatoes in the oven?

Looking for easy oven instructions for roasting tomatoes? Here’s how!

  1. Preheat the oven to 450F/230C.
  2. Prepare the tomatoes as previously explained.
  3. Place tomatoes on a baking sheet or dish. Roast in the oven for 10-20 minutes, or until they are cooked to your liking.

Can you roast tomatoes on the grill?

Try roasting the tomatoes on the grill in the summer breeze. Here are easy step-by-step instructions.

  1. Preheat the grill to medium high heat.
  2. Prepare the tomatoes as previously explained.
  3. Place the tomatoes, cut side up, on the grill for about 4 minutes. Flip and grill the other side for an additional 2-4 minutes, or until roasted to your liking.

How long are roasted tomatoes good for?

The roasted tomatoes will best if served fresh out of the air fryer. But, like most foods, will last for 3 to 5 days if stored in an airtight container in the refrigerator.

You can also freeze cooked tomatoes for up to a year in the freezer.

Dry Rub Chicken Wings

Dry Rub Chicken Wings

Dry Rub Chicken Wings

Spice up your game day with these homemade Dry Rub Chicken Wings! Perfectly crispy and packed with flavor 😋🍗

With an air fryer, you can get crispy, flavorful dry rub chicken wings in 30 minutes. With the help of the spices and herbs in this dry rub seasoning, your chicken wings will taste better than ever and guilt-free!

PREP TIME: 10 minutes 
COOK TIME: 25 minutes 
TOTAL TIME: 35 minutes 

*Ingredients:*

  1.  2 lbs chicken wings
  2. 1 tablespoon baking powder
  3.  2 teaspoons garlic powder
  4. 2 teaspoons onion powder
  5. 2 teaspoons smoked paprika
  6. 1 teaspoon ground cumin
  7. 1 teaspoon salt
  8.  1/2 teaspoon black pepper
  9.  1/2 teaspoon cayenne pepper (adjust to taste)

Directions:

  • Preheat air fryer to 400°F. If baking preheat oven to the same temperature, baking instructions in notes below
  • Pat the chicken wings dry with paper towels to remove excess moisture.
  • Combine all of the dry rub seasoning above then toss chicken wings and coat evenly.
  • Place in preheated air fryer for 24 minutes flipping at the 12 minute mark. Remove and serve
  • The dry rub recipe will cover 15-20 chicken wings. You can add a little baking powder for extra crispiness about 1/2 tsp for that amount of wings.

How Long To Cook Chicken Wings In Air Fryer

I have done chicken wings in the air fryer several times and in a few different air fryers. Cook time is always the same. For crispy wings on the dry side, around 25 minutes flipping halfway is ideal. For juicy wings with a little crunch 18-20 minutes is great. Don’t stack the wings but you can crowd them side by side.

Do You Put Dry Rub On Wings Before Or After Cooking?

In this recipe add all of your dry rub seasoning before. Now, you could wait until they are done cooking to season as well but I suggest adding before just due to how I prepared them.

Nutrition Facts
Air Fryer Dry Rub Chicken Wings
Amount Per Serving (1 full dry rub recipe)
Calories 26.5 Calories from Fat 3
% Daily Value*
Fat 0.3 g 0%
Saturated Fat 0.1 g 1%
Sodium 3560.4 mg 155%
Carbohydrates 5.9 g 2%
Fiber 1.6 g 7%
Sugar 0.4 g 0%
Protein 1.1 g